Linda was up at 5:45 AM and on her way to the bakery at 6:15. I got up an hour later and also got an early start to my day; early is relative, after all. After a bowl of granola I brewed some Cafe Europe / Columbian decaf coffee, turned on the gas fireplace, and continued reading Number Theory and its History. A week ago Jim (N8KUE) e-mailed some questions to us regarding RVing and bus conversions. I felt that too much time had passed without a response so I settled in at my computer to answer his questions as best I could. I sent my reply at 9:30 and turned my attention to our bus project.
I got the pull-out pantry (mostly) installed yesterday. Before we could place the refrigerator in the alcove, however, I needed to do four things:
- Install a piece of aluminum angle to prevent the fridge from sliding to the left;
- Secure the water line that went to the old refrigerator;
- Plug up openings in the cabinet with steel wool; and
- Install the 10th drawer slide on top of the pantry to reduce lateral movement at full extension.
I decided to tackle these tasks in that order, which meant a trip to Lowe’s to get the aluminum angle. I chatted briefly with Mike (W8XH) on the drive and stopped at The Home Depot first but did not find what I wanted. Lowe’s had a 3 foot length of 1/8″ thick 1.5″X1.5″ angle. I wanted aluminum because it is light, easy for me to work, and won’t rust or need to be painted, but I wanted the 1/8″ thickness for strength. While I was there I picked up another foam brush, a bottle of Mineral Spirits, and a package of #8-1.75″ stainless steel self-drilling exterior wood screws.
The road graders were out today in our part of the county and I passed the one working on Golf Club Road going to, and returning from, Lowe’s. There was also one working on our road that I could not get around, so I followed it slowly until it reached our driveway and I could turn in.
Back home I cut the aluminum angle to a length of 26.5 inches, the same as the depth of the refrigerator base section and the top piece of plywood in the base of the alcove. I selected a drill bit that was just barely larger in diameter than the stainless steel screws. Starting with the midpoint I drilled holes every three inches along the centerline of one side of the angle. I then countersunk each hole, checking with a screw until the head was just slightly recessed. A light back bore with the countersink bit removed any rough edges.
With the pantry pulled all the way out I placed the side of the angle with the holes on the 2nd piece of plywood in the alcove base with the other side of the angle against the edge of the 3rd piece of the base. Since these pieces of plywood are all 3/4″ thick the vertical side of the angle extended above the plywood by 3/4 of an inch, more than enough to catch the left side of the refrigerator. I held the angle tight against the edge of the 3rd piece of plywood, with the front edge back about 1/2″, and used the #8 VIX self-centering drill bit to drill a pilot hole in the back hole. I then secured it with one of the stainless steel screws, penetrating both the 2nd and 1st layers of plywood and probably a heavy 1/8″ of the subfloor. I held the front of the angle tight and secured the 2nd hole from the front in the same way, as I could not access the first hole due to the pantry. I drilled all the remaining holes except the first and put in the screws. I then pushed the pantry all the way in so I could access the front hole and secured it. The angle was now held in place by nine strong screws fastened into a lot of wood.
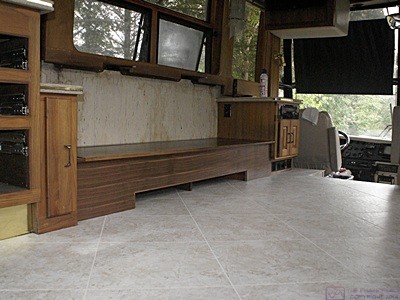
The pantry and refrigerator installed in the alcove.
The old refrigerator had an ice maker and cold water dispenser in the freezer door so there is a flexible copper water line at the back of the alcove. The line runs through an inaccessible area and into the cabinet under the kitchen sink so removing it would be difficult and impractical. It was easier to secure the water line, and besides, we might want to use it again someday. I found some used screws with broad #2 SR heads and used them to secure cable ties with mounting tabs to the back wall of the alcove. I re-shaped the copper tube as best I could so it would lie relatively flat against the back of the alcove and used the cable ties to hold it in place.
I noticed when I moved the tube that a little water came out of the end. That struck me as odd as I had it in my head that the line was out of service. After a little investigation I remembered that the shutoff valve for this line was still attached to the water inlet tube on the back of the old refrigerator. If we had pressurized the fresh water system this would have been an open line. Yikes!
I now had another, unexpected, task that had to be done before I could do anything else. I gathered up a few tools, parts, and materials, got my head and arms into the under sink cabinet (which is never comfortable), shut off the supply line valves (just to be safe), and disconnected the copper tube to the refrigerator alcove. I wrapped the threads of the open end of the T-fitting with several turns of Teflon tape, threaded a cap into the fitting, and snugged it up tight. I did not, however, pressure test it as I did not want to take the time and I did not want to pressurize the fresh water system with the toilet disconnected.
With the water line secured I got one of the old packages of steel wool and used it to stuff the openings in the lower rear corners of the alcove where lots of wires, the water line, and two air lines pass in and out. I meant to use the #1 steel wool but grabbed the 4/0 by mistake. It will work just as well but the 4/0 is what Linda is using to clean all of the walnut woodwork, so it was a bit of a waste.
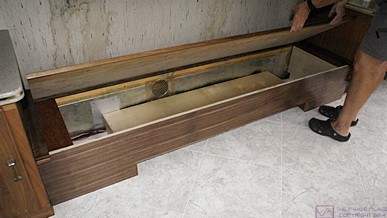
The pull-out pantry is very stable vertically and horizontally except when it is all the way out where it can move side-to-side about 1/2″. I decided to install the last of the 10 slides on the flat between the top of the pantry box and the ceiling of the alcove, which is also the base of the upper cabinet. The ceiling of the alcove is not parallel to the floor and so it was not parallel to the top of the pantry box. I was able to slide a piece of 3/4″ oak veneered plywood between the ceiling and the upper edge of the top slide. With the 10th slide on top of the pantry I had about a 1/8″ gap between the slide and the plywood at the front, opening to about a 1/4″ gap at the rear.
My first attempt at a solution was to try cutting blocks from the end of a 2×4 to be just the right thickness for the front, middle, and rear. That quickly proved to not be a workable solution without some form of stationary saw. After further pondering I decided to cut a 4.5″ wide piece of the oak veneered plywood from one of the leftover pieces that happened to be 26.5″ long.
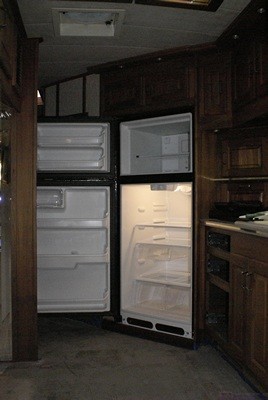
The new refrigerator in the alcove with the doors open.
I set the piece of plywood in place on top of the two slides, one mounted to the alcove side panel and the other resting on top of the pantry box, and shimmed it with wood shims between the plywood and the ceiling to remove the gap between the plywood and the slide without making it tight. I pulled the pantry out slightly so I could drill and screw the rear hole of the stationary part of the slide. I then pulled the pantry all the way out, pushed the center section of the slide part way back in, and secured the front hole of the moveable part of the slide to the top of the pantry. I used a slot that allowed side-to-side adjustment, just in case. I also secured the center slot on the moveable slide to the top of the pantry box.
I fiddled with the slide until it went in and out smoothly. It is tight enough that I don’t think it will come open when driving, but it pulls out easily enough and will be easier once we get a handle on it. Linda called at 4 PM as I was finishing this task to let me know she was on her way home from the bakery. It would be 60 to 90 minutes before she got home so I moved on to the next task.
The first piece of underlayment to go in will be a full 4’x8′ sheet minus a notch for the middle air-conditioner drain line and part of one short side that has to fit around the built-in pantry. I measured for those cuts and then laid the sheet out in the driveway on top of 2x4s (on the flat). I tried plunge cutting most of the 21″ long by 1″ wide strip off the end with my circular saw without using a guide and finished the cut with my saber saw. My plunge cut wasn’t very good so I trimmed it with the saber saw. That edge will go under the mirror tiles against the back of the built-in pantry so it will be OK.
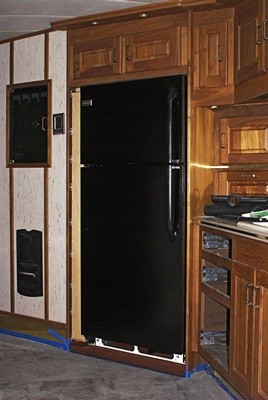
Linda got home around 5:30 PM. After unloading her car and changing clothes she examined my work for the day and was pleased with the way the pull-out pantry worked. She helped me carry the 4’x8′ sheet of underlayment into the bus at which point I decided that we needed to get the refrigerator into the alcove before doing anything else.
We set the underlayment aside and uncovered the fridge which we had previously wrapped in painter’s plastic to keep it clean while grinding and sanding. Linda cleaned off packing tape adhesive with Goo Gone, wiped it off with a wet rag, and then I wiped it off with a dry towel. We rolled it over to the alcove, shut off the circuit breaker, plugged it in, and secured the cord to the back. It rolls very easily but to get it into the alcove we had to tilt it forward to get the bottom back edge of the unit onto the 2.25″ high plywood base. Oops; the left edge of the fridge space overlapped the built-in pantry opposite and prevented the unit from tilting enough to get the back edge up high enough.
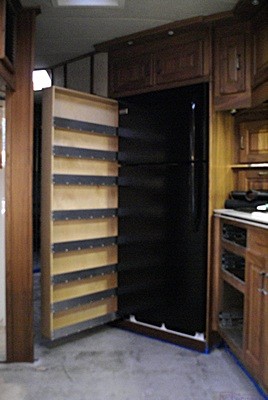
The pantry pulled out with the refrigerator installed.
We have learned not to panic, and after a moment’s thought we turned it slightly to the right, got the right rear bottom corner up onto the plywood and slid it into the alcove a couple inches. We were then able to turn it to the left and get the left rear bottom corner onto the plywood base, making sure it was inside the aluminum angle. Fortunately we had enough clearance above the unit to do that. (If not we would have used the leftover 3/4″ plywood in front of the alcove, gotten the fridge onto those pieces, and then rolled it straight into its space.). We lifted the front bottom of the unit and rolled it back into its cubby. It was a perfect fit; snug to the aluminum angle on the left, tight to the right side of the alcove at the rear with a small (3/16″) gap at the right front, and far enough into the alcove that we can open the three drawers to the left of the sink. High five! Good job team.
I turned on the breaker to make sure the refrigerator still worked. It did, and we were both pleased with how much quieter it is than the old one. We did not need it running at the moment, however, so I turned the breaker off. Linda got a towel and propped the doors open.
We got the underlayment flat on the floor and slid it into position. It needed to be trimmed in three spots and I did not want to get into that at this hour so Linda started preparing diner while I put tools and materials away, locked the bus, and closed up the garage/shop. I plugged in the old refrigerator (in the garage) to let it cool down overnight as DTE Energy’s recycling program is picking it up tomorrow between 8 AM and noon.
Dinner was mock riblets in BBQ sauce, green beans with onions and carrots, and fresh peaches, all very tasty. After dinner I worked at my desk. I replied to several e-mails from Gary at Bus Conversion Magazine, and looked at my Habitat For Humanity article to see if I could split it into two or three parts. It looked like that was possible so I let Gary know. I chatted briefly with Steve (N8AR) on the Novi 440 repeater and with Jim (N8KUE) on the South Lyon 2m repeater. I processed three photos of the finished pantry/fridge installation showing that everything goes in and out and e-mailed it to a dozen people.
I came to bed just before 10 PM. We watched TV for a while until Linda drifted off to sleep. I stayed up a bit longer to finish this post.