Monthly Archives: November 2023

202308_01-26 – A break from barn work

Blog Post for most of August 2023


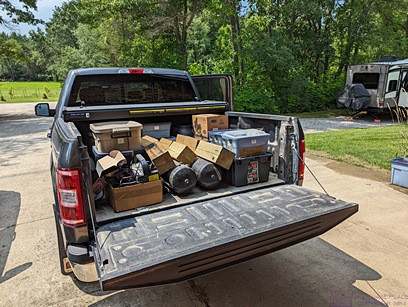
This post consists of 10 photos with captions, mostly to do with family and stuff going on around the property.  During this time, however, we were also preparing for a cruise from Vancouver, British Columbia along the coast (inside passage) to Skagway, Alaska, and then across the North Pacific Ocean to Hawaii, with ports of call at Kauai, Hawaii, and Oahu.  I don’t have any photos of our preparations, but I will have a series of blog posts about the cruise.  Photos by me (Bruce) unless otherwise noted.


Linda likes to take care of our two youngest grand-daughters when she can while our son and daughter-in-law work.  I think ice cream is often part of the deal.  (Photo by Linda)


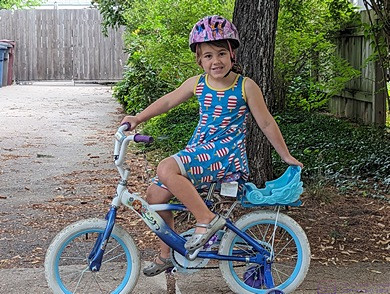
Our youngest grand-daughter on her two-wheeler.  ABIR, the training wheels came off not long after this photo was taken.  She is a determined, and perhaps slightly fearless, young lady, as evidenced by her expression.  (Photo by Linda)


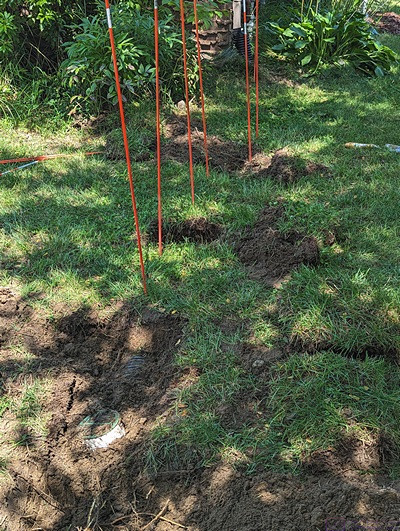
I hope this photo shows what I was doing.  The SE corner of our house is top-center in the frame.  There is a downspout on the side of the house (to the right) at that corner.  Lower left is the drain (green grate cap on white plastic pipe 90-degree elbow) which was completely buried and thus not functioning as a drain.  I located it by probing for the plastic corrugated drain tile that is buried between the downspout and drain, and marking its (approximate) location with fiberglass poles.  There are three such drains on the front of the house and one at the SW corner of the garage. All of them were buried/clogged, and required investigative probing to find and dig up.  I replaced the grates/elbows with pop-up drains, installed with the large plastic surround at the surface of the soil so they are clearly visible.  The should “work a treat” as I often hear folks say on British Youtube channels.


Our youngest grand-daughter loves being in the water.  Nuf said.  (Photo by Linda)


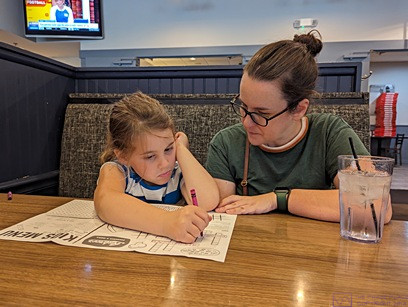
Our youngest grand-daughter works on an activity under the watchful eye of her aunt (our daughter) while waiting for their lunch at a restaurant in Dexter, Michigan. (Photo by Linda)


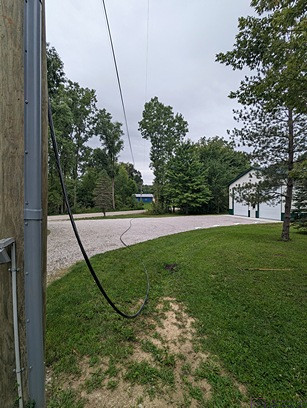
As I described in posts from several months ago, Comcast / Xfinity was told by DTE energy to bury a section of their broadband cable in our neighborhood and then remove the overhead cable.  The buried cable was installed and tied-in to the affected house some time ago, but the overhead cable had not been removed.  Until today.  This photo shows the section of the cable that runs from the utility pole by our guest RV site, along and across our driveway, and then across the road to the utility pole in the SW corner of our yard.  This is very large (low loss) coaxial cable that I thought I might be useful for our amateur (ham) radio station, so I asked the contract crew what they were going to do with it?  They said it was going to be scrapped, so I asked if I could have it?  They were all too willing to say “yes;” after all, it meant they didn’t have to wind it up to haul away and dispose of it.  I might have some photos taken at a later time, but I think I ended up with about 500’ of this stuff.


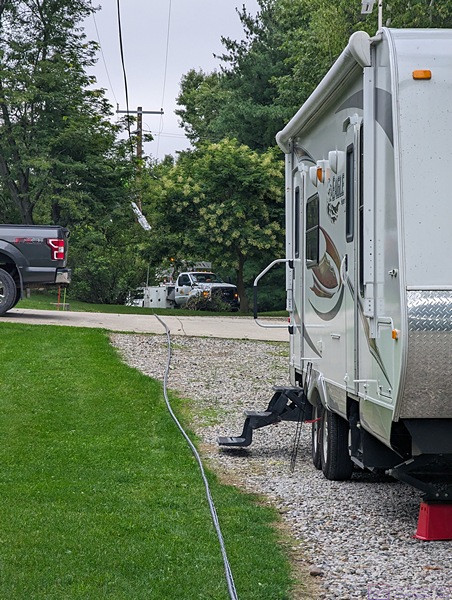
In this photo, the broadband cable on the ground ran from the utility pole by our guest RV site to the utility pole in the SE corner of our property.  The contracted crew removing the cable from the poles has their boom truck by the pole in the SE corner.  The trailer belongs to a Boondockers Welcome (BW) program guest.  We are a BW program host site when we are home, weather and/or other obligations permitting.  (Boondockers Welcome is one of the programs owned/operated by Harvest Hosts LLC.)


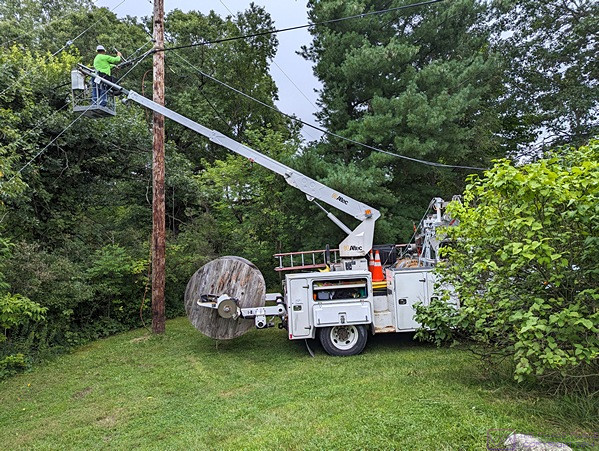
A closer look at the contracted crew truck working on removing the broadband cables from the utility pole in the SE corner of our yard.  The cable continues on to the left over a pond to a pole in our neighbor’s yard.  Another section of cable T’s off and goes across the street to the pole in that neighbor’s yard.  All of this overhead cable was installed just a few years ago.  I never did get a clear explanation was to why it had to be removed and placed underground as the various contractors did not seem to know and were just following their work orders.  My best guess is that there were issues with road and driveway clearances and/or proximity to the power lines at the tops of the poles.  The broadband cable was installed above the existing phone lines, which might have put it too close to the power lines.  Strangely (I think) there has been no indication that AT&T will be removing or burying their phone lines.  I suspect that many (most?) of the houses in our subdivision no longer have landline phone or data service.


Our middle grand-daughter at her local library, absorbed in a book.  (Photo by Linda)


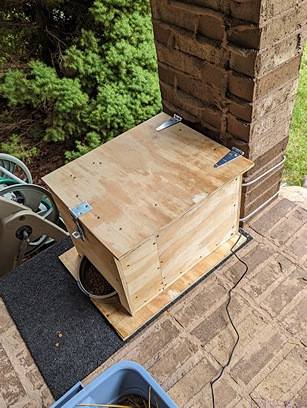
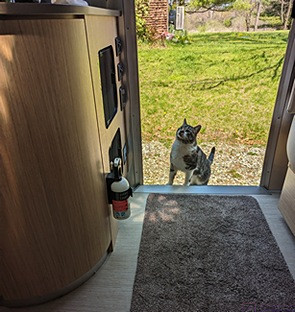
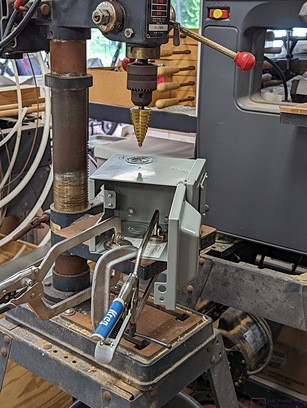
Bruce made this wood box with opening lid (and latch) to house a programmable automatic pet feeder.  Only the food bowl is visible in this photo.  We bought this feeder to try and make sure that Cabela, who is not our cat, has access to food while we are away on our cruise.  Fortunately, we have neighbors who can/will check on our house and things like this when we are away, and our children can also check on things if/as needed.  (Photo by Linda)


202307_01-31 – Summer Days

Blog Post for July 2023.

This post consists of 18 photos with captions.  It covers some additional electrical work in the barn, along with setting up shelving in the store room, moving stuff from the garage to the barn, fixing the screen doors on the house doorwalls, and hanging out with family.


Our youngest grand-daughter (SRF) with her dad sitting on the hearth of our fireplace.  (Photo by Linda)


Our middle grand-daughter (MEF3, right) and daughter (MEF2, left) at our house.  Bruce’s mom was MEF.  (Photo by Linda)


Bruce snaps a self-portrait with the approval tag for the rough electrical inspection on the barn.  No changes were needed.  It’s just a yellow piece of cardstock, but it was a big deal for him and a significant milestone for the barn project.


Linear LED light fixtures installed in the barn shop.  Light switch in the white outlet box between the door and the subpanel.  Bruce worked out the lumen calculations for a detailed work area ahead of time and these fixtures appear to produce sufficient light intensity with a daylight white (5000K) color temperature.  As shown, they are installed in every other joist space—three in some and two in others (alternately)—which distributes the light nicely and protects them from physical damage.  More fixtures could be added in the unused spaces if needed in the future.  Note that the underside of the storeroom floor is the visible ceiling in the shop, and is painted white along with the joists and all of the walls.  It’s a well-lit space.  Note also that there is no insulation between the shop and the storeroom above.  By design, the electric heater in the shop should also provide enough heat to the storeroom to keep it above freezing in the winter.  If needed, Bruce will cut in a couple of floor vents to allow air to circulate, and possibly add a fan to one of them to draw cold air down from the storeroom to the shop.  Winter 2023-24 will be a test to see what else, if anything, is needed.


It did take very long after the rough electrical inspection to complete the work needed for the final inspection.  Again, no corrections were needed, and the work was approved.  Here is the final electrical inspection approval tag (left) along with the rough electrical inspection approval tag (right).  This was a major milestone for the barn project, and the culmination of a lot of work that included planning, specifying, purchasing, and installing many different components.


Although we did not yet have our Certification of Occupancy (CoO), we needed to start getting some things out of the garage.  The Ford F-150 has been an excellent vehicle for us, providing excellent passenger comfort, great performance and fuel economy, and a lot of very versatile utility, including hauling things, towing our trailer, and being equipped to tow behind our bus.


There was still a lot of stuff in the garage, but a space was starting to appear where we could get Linda’s car inside.  Much of what is visible in this image, including the plastic shelving units, will get moved to the barn, some in the storeroom, some in the shop, and some in the RV bays (but not too much).  Some of it will also end up in the shed.


Our youngest grand-daughter shares a bench with a couple of book-reading statues at the local public library.


The local public library as a great children’s room that includes this reproduction tree truck and with child-sized hollow.  Our youngest grand-daughter seems to fit in this space just right.


By this point in July 2023, we still had a lot of work to do to get the shop and storeroom in the barn set up to use efficiently.  The heavy-duty Kobalt metal shelving is set up on the front and rear walls of the storeroom.  The shorter east and west walls will get some of the full-height plastic shelving units from the garage.  The table in the center of the room is temporary, and will be replaced with shorter (3-shelf) plastic shelving units and capped with a sheet of plywood or other suitable counter-top surface.


It might not look impressive, but we could not ever recall getting two vehicles in this garage since we bought the house 10 years ago.


This little device might not look like much, but it is an important part.  It’s the combination roller / height-adjuster for the screen doors on our house doorwalls.  The doorwalls (and Windows) are Renewal by Andersen, and I could NOT find these adjusters at any of the local big box / hardware stores.  We found this one in the garage, left behind by the previous owners.  With the part number in hand, I was able to order additional ones.  We have five (5) doorwalls, each screen requires two of these devices, and most of them were broken or just plain worn out, and needed to be replaced.


Plastic shelving units in place along the east wall of the storeroom in the barn.  And yes, we are putting things on them because we have to.  But everything in this storeroom will be reorganized once all of the storage units are in place.  Really, it will.  Promise.


The west wall of the barn storeroom, with plastic shelving units in place.  A unit with parts bins will eventually occupy the space by the door.


The barn shop looking east from the west wall.  The band saw (left) and drill press (far end) are positioned in front of the two windows where wall storage isn’t possible.  Both of these will eventually be mounted in/on custom designed/built workbench/storage units.


The National Electrical Code requires a clear space in front of load centers and other electrical equipment that require access for facility operation and maintenance.  Minimum depth, width, and height of this space is specified.  Bruce has taped out this area on the floor for the main load center, but will eventually mark it permanently with paint or more durable tape.


What’s good for the goose is good for the gander.  The sub-panel in the barn shop gets the same “no go” floor treatment as the main load center.  It might seem silly, but we will be moving a LOT of stuff around, and it’s just too easy to forget that we can not store anything in these spaces.


And last, but not least, for this month, work begins on replacing the roller / height-adjusters on the doorwall screen doors.


202306_01-30 – Summer Solstice

Blog Post for June 2023

This post consists of 23 photos with captions.  It continues the wiring of the barn, but also includes some family, friends, and home photos, including a new refrigerator for the house.  The term “conduit” refers to Schedule 40 PVC electrical conduit.  All photos by Bruce unless otherwise attributed (Linda).


The east wall of the barn (RV trailer bay).  Main Load center (electrical distribution panel) right-center.  Large horizontal conduit carries the 100A feeder cable to the sub-panel for the shop/storeroom.  The mounting board for this large diameter conduit conceals a smaller diameter horizontal run for the utility receptacles, one of which is visible left-center (left side of the 6×6 post) along with its conduit drop. On the right side of the 6×6 post is the 120/240VAC / 50A RV receptacle for the travel trailer and the conduit that carries the wires from the load center running along the top edge of the bottom girt.  Conduit also runs vertically out of the top of the load center and up to the roof trusses, but is difficult to see in this photo.


The left/west side of the staircase to the storeroom above the shop.  An outlet box opening with a pair of duplex 120VAC/20A receptacles is visible in the staircase sheathing.  A matching outlet box and receptacles are installed on the other right/east sidewall of the staircase.  The wires for these receptacles come in from a T-body above the shop door.  The two RV bays are really one continuous space, except for the staircase, so this was the only practical way to get power to the center-middle part of the barn.


The outlet box and thermostat for the electric shop heater.  The heater and Tstat are 2-pole, 240VAC devices.  This photo shows a WAGO snap connector suitable for the 10AWG wire used to supply the heater.


The thermostat for the shop heater installed in its outlet box at a little over 4’ above the floor, and conveniently close to the shop sub-panel.


Bruce straddles the 14’ step-ladder so he can sit and work comfortably on the outlet boxes / receptacles for the LED linear light fixtures for the front center part of the barn.  The white disc behind him is one of the four VELOX Sun Tunnel’s in the barn ( three in the RV bays and one for the storeroom).


A short galvanized steel “nipple” (threaded on both ends) and threaded PVC conduit adapters.  There use will be more obvious (?) in the next three photos.  Bruce had to drill holes through horizontal girts to get wires to the four outdoor flood lights on the front of the barn.  (A girt is a 2×4 installed “on the flat” for lateral structure and steel siding attachment).  These nipples and fittings attached to the light fixtures, sealed the hole, and protected the wires.


Bruce is working on one of the access/mounting holes for one of the four exterior flood lights on the front of the barn.  The lights are being installed at the 12’ level up from the floor, in part because there were girts at that level which made the installation more convenient than putting them higher up.  It was also high enough to provide good coverage at ground level for the entry door and both RV bay rollup doors.  (Photo by Linda)


Shown here are the two exterior (weatherproof) outlet boxes between the large bay doors and above the entry door.  The flood light fixtures will attach to these outlet boxes.  Both boxes and the fixtures are white, to blend in with the white siding on the barn.


One of the nipples with the conduit adapter installed in the girt just to the west of the east RV bay door.  The chain at the left edge of the frame is the operator for the rollup door.  These doors can be motorized later, if we wish, but they are easy enough to operate manually.


Our youngest grand-daughter having a conversation with her “grandma N” (our close friends and travel companions).  (Photo by Linda)


A Pileated woodpecker visits our larger woodpecker feeder.  We know they are in the area as we often hear them “drumming” but they are rarely seen, and only very briefly when they are.  Linda was lucky to get this photo.


A view to the rear of the large/west RV (bus) bay in the barn.  Tools and materials are lined up down the center to make space for the 14’ step-ladder around the edges so Bruce could install and wire the lights (which are on in this photo).  Stairs up to the storeroom are partially visible along the right edge of the image.


This PEX cold water line and shut-off valve T’s off of a main run in the basement of the house and up to a coupling (the white thing that is partially visible in the floor board) for a water line to the refrigerator.


This photo shows the water line coupling pulled down out of the hole in the floor board.  The translucent line going up through the floor board is the water line to the old refrigerator.  The fridge is being replaced, and this line needed replacing too.


One of the 10 or so area/downlight fixtures installed around the top frame members of the barn side walls in the RV bays.  They are outdoor rated, 2-part fixtures, with the LEDs and driver module in the removeable cover, while the base plate has openings for wire glands, mounting screws, and a ground screw.  Towards the lower right of the base is a small horizontal green “thing”.  It’s a bubble level, which made it easier to get each base installed parallel to the floor.  Because these are over 15’ from the floor, out of reach of anyone (except someone named “Bruce” working on the roof of the bus) Bruce used NM-2 (non-metallic 2-conductor + ground) shielded cable (generically referred to as “ROMEX”) instead of running conduit.  He ran pieces of cable between adjacent units, securing it to the top frame members with cable stapes, and used weather tight strain-relief glands at the entry points into the units.  There is a rubber seal between the two pieces of the unit, making the unit weathertight when properly installed.  WAGO wire connectors were used to tie the NM-2 wires and the fixture wires together, placing all of the fixtures in parallel on the circuit.  The lights for the east and west bays are on separate circuits and are switched using their respective SD (switch duty rated) circuit breakers in the main load center.


The inside of the front wall of the barn on the east side of the entry door.  The outlet box at the top has two single-pole, single-throw (on-off) switches.  The one nearest the door is for the four outside floodlights on the front of the barn.  The other switch is for the interior center lights.  These lights illuminate the open area between the entry door and the staircase to the storeroom, as well as the stairs and landing, and the floor on either side of the staircase.  This ensures safe/lighted entrance to the barn, the storeroom, and the shop door under the staircase landing.  Also shown is an outlet box with duplex receptacle towards the bottom of the frame.


This is still the old refrigerator in the house kitchen, but Bruce has installed a new/clean translucent water line and replaced the old duplex electrical receptacle with a new, single one.  We had not used the automatic ice-maker in this fridge since we bought the house and the water line was shut-off at this point.


We bought the new refrigerator from Big George’s in Ann Arbor, Michigan.  This is our old refrigerator being loaded into their truck.


Our new refrigerator being unloaded from the delivery truck.  The Big George’s crew did a great job of removing the old refrigerator and installing the new one.


Our new refrigerator takes center stage in our kitchen.  Linda studies the directions for getting the interior ready to use while Bella (Paula and Nan’s dog) chills out on the floor.  (We took care of Bella while they went on a family vacation.)  Although not obvious from this photo, the new refrigerator is wider than our old one.  As part of the preparation for getting it installed, we had to move the wall cabinet over the desk ~8” to the left.  We also had to move the desk, but that was easy.  Up to this point, all of our appliances have been white, but we had to go with something else in order to get the model/features we wanted.  In time the other major appliances might get replaced/upgraded to stainless steel, but the fact that everything doesn’t match does not bother us.


The new refrigerator is a French door model with two pull out drawers.  The lower/larger drawer is the freezer, and has a sliding tray inside it.  The upper drawer can be a fridge or a freezer.  We decided to use it as a fridge as we do not typically stock a lot of frozen items.


The sub-panel in the barn shop with the cover on and the labels in place.


Another look at the barn storeroom showing the ceiling lights with the interconnecting wiring nicely secured and dressed.  Entry door is at the left.  Some of the Kobalt (Lowes) heavy-duty shelving across the rear wall.


202305_01-31 – The Merry Month of May

This post consists of 21 photos with captions.  It is mostly about the installation of the barn electrical system, with a few family photos thrown into the mix.  The term “conduit” refers to Schedule 40 PVC Electrical Conduit.  Photos by Bruce, unless otherwise indicated.


Barn shop looking south towards door.  Shop sub-panel center left.  Laser Level (bottom left) being used to align PVC electrical conduit vertically and horizontally.

Some of the conduit components used in the wiring of the barn; shown are elbows/sweeps, outlet boxes, and conduit bodies.

Cabella (who is not our cat but hangs around our house) checks out the entry to our Airstream travel trailer while it is parked in front of our house.  (Photo by Linda)


A view of the south wall of the shop in the barn early in the process of installing the conduit.


The barn shop looking SE with a bit more conduit installed.  Note the electric heater mounted between the ceiling joists.


A view of the storeroom above the shop in the barn as seen from the door in the SW corner looking NE.  The vertical conduit at the right edge of the image comes up from the shop sub-panel to an outlet box for a 120V/20A duplex receptacle (not visible), then to an outlet box for a light switch (also not visible), and then to an outlet box on the ceiling where the wiring for the ceiling mounted LED lights ties in.


The program cover for the A2 (Ann Arbor) STEAM (Science, Technology, Engineering, Arts, and Mathematics) end-of-year 3rd and 4th Grade Vocal Music Concert. In addition to singing, the concert involved a lot of recorder playing. Our middle grand-daughter attends this school. (Photo by Linda)


The 4th grade vocal group for the A2 STEAM Vocal Music Concert.  Our middle grand-daughter is front/left in the photo (highly patterned dress).  (Photo by Linda)


Bruce working at ceiling height (16’) in the barn using the 14’ step-ladder.  He is probably working on the wiring, as there is no other reason to be at ceiling height in the NW corner of the barn, but it’s not obvious what he is actually doing.  This photo is mostly to show the ladder. (Photo by Linda)


Bruce holding some conduit components in position to show how they will fit.  Conduit will run horizontally to the upper T-body and then down through the double 45-degree elbows into the outlet box.  The horizontal conduit will pass behind the 6”x6” posts, penetrating the vertical 2”x4” spacer blocks located there (that space the horizontal girts).


A view of the E wall of the smaller (east) RV (trailer) bay.  The large conduit near the top of the image will carry the large (100 A) cables from the main electrical distribution panel (out of the frame to the right) to the south wall of the shop (out of frame to the left), and then across the wall to the entry point into the shop, just above the shop sub-panel.  The outlet box (center/left) is a special metal RV outlet box with a 120/240V / 50A RV shore power receptacle.  The conduit that supplies this outlet box will run along the top of the lower (horizontal) girt before sweeping up and into the box as shown.


A view of the SE corner of the barn showing the main electrical distribution panel.  The large conduit for the feeder cable to the shop/storeroom sub-panel comes out of the left side of the panel at the top.  The smaller conduit for the 50A RV receptacle comes out of the bottom left of the panel and sweeps down to the horizontal girt before running aft.  In-between these two conduit runs will be another one to supply the utility receptacles for this bay.


Bruce needed to bring the conduit and wires for the RV outlet boxes into one of the sides but the RV outlet boxes did they not have pre-punched holes for this fitment.  In this photo, the box for the west (bus) RV bay is clamped to the drill press table and a step drill is being used to drill the correct size hole.


Bruce maneuvers around the top of the 14’ step-ladder near the 14’ rollup door for the west (bus) RV bay.  He is installing conduit along the faces of the bottom cord of a roof truss to get power from the electrical distribution panel on the east wall (to the left in the photo) to the front and the west sides of the barn (to the right in the photo).  (Photo by Linda)


Our friend and fellow busnut, Marty, agreed to help Bruce run the wires through the conduit, much of which proved to be a 2-person job.  Here he is using the 7’/14’ Little Giant step/extension ladder in full extension mode to work at ceiling height directly above the main electrical distribution panel on the east wall (SE corner) of the barn.  The roll-up door for the east RV bay is visible.  The clear opening is the same as the west RV bay; 14′ high x 12′ wide.


Bruce (left) and Marty (right) pulling wires through conduit on the west wall of the barn. The vertical piece of conduit in-between them runs down the wall and then sweeps towards the rear of the barn (to the right) to carry the wires for the west (bus) 50A RV receptacle.  (Photo by Linda)


Linda’s sister (Sr. Marilyn, on the left) came up to visit and joined Linda for a walk at one of the Metroparks with our daughter (on the right). (Photo by Linda)


The main electrical distribution panel for the barn showing all of the wires terminated to appropriate circuit breakers.  The two large wires at the top are the 240VAC service entrance cables from the meter, which is on the outside of the wall behind the panel.  The large, light grey cable entering the center bottom of the panel is the service entrance cable from the meter.  There is also a large bare aluminum neutral wire terminated to the neutral bus just to the right of the red wire (not as easily seen in this photo).  The black and red wires are “live” (energized) at all times as an external disconnect was not required by the electrical code revision currently in use in our county and so the builder’s electrician did not install one.  Had I been paying closer attention when the electrician was on site, I would have asked for this external disconnect as an added cost feature.  The red and black wires feed a 200 A main circuit breaker that serves as the “main disconnecting means” for the entire barn.  When the panel cover is off, as shown here, this main breaker is usually open so that nothing else in the panel is energized and work can be safely performed.  The exception to the rule is when Bruce needs to perform diagnostics by taking voltage and/or current measurements.


The main electrical distribution panel with the cover installed and the door open, showing the circuit breaker labels along the left and right edges.  The device at the lower right of the image (the left edge is just barely visible) is the Type 2 Whole House surge protector.


Although most of the power to the west (bus) RV bay is fed overhead near the front of the barn, it made more sense for this outlet box to be fed from the east (trailer) utility receptacles circuit.  Although probably hard to see, an “outside corner conduit body” is used at the top/left to bring the conduit around the corner.  As will all of the conduit bodies, this one has a removable/gasketed plate which allows wires to be fed around the sharp 90 degree corner. 


The conduit for the east (trailer) RV bay utility receptacles runs across the south wall of the shop over to the east wall of the west (bus) RV bay (see previous photo).  Above the door to the shop, a T-body allows wires to branch off to the space under the storeroom stairs before continuing on to the west bay.  The wires under the stairs will feed under stair lights and utility receptacles on either side of the staircase.