Monthly Archives: July 2023

202304(16-30) – More barn work; painting, conduit, and wires, oh my!

This post contains some narrative but consists mostly of 17 photos with captions.  ]

SUNDAY 16 April

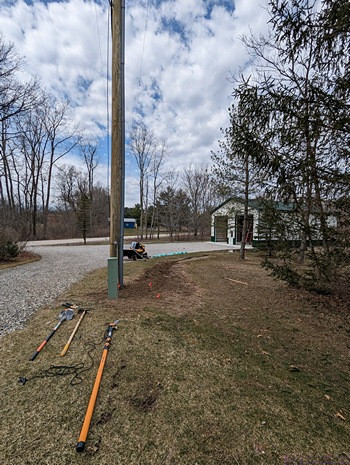
I finally started painting inside the barn today.  Priming actually, but first I finished masking off areas of the concrete floor where I would be painting, using a combination of red rosin paper and masking tape.  Before starting on the interior of the staircase, however, I removed the handrail leading up to the storeroom, removed all of the hardware, and set it across a pair of sawhorses in the driveway.  There was rain in the forecast, but initially the weather was okay, with a high temperature forecast of 74 degrees F.

I rubbed down the handrail with 0000 steel wool, and then opened a container of Kills2 primer that I had left from this past fall.  I gave it a good stir, and used a tapered trim brush to apply it the bottom and sides.  I then moved inside and did all of the “cutting in” in preparation for eventually using rollers for the large surface areas.  I used up the remaining Kills2, and opened the new 5-gallon pail.

These pails have a 3” (approx.) screw off cap, and I have screw on spouts that replace them to allow pouring the contents without removing the entire large snap on cover.  Not that it’s easy—these pails are heavy when full—but it is much less messy than removing the large lid and then trying to pour the contents.  I transferred a small amount of the primer into the old, smaller (~ 3 gallon) pail, and set about the work.

The rain did eventually come, and I had to move the handrail and sawhorses inside along the west shop wall.  As mentioned yesterday, Linda and I had already placed red rosin paper ~3’ wide, along the base of the two large walls that are inside the barn but form two of the exterior walls of the shop/storeroom in the NE corner of the building.

MONDAY 17 April

As forecast, a cold front came through yesterday, with high, gusty winds, and the temperature started falling noticeably by mid-afternoon.  The overnight low dropped below freezing, and we awoke this morning to snow.  In anticipation of this, I had moved all of the primer and paint into the shop portion of the barn yesterday, as it is well insulated and had warmed up nicely with the very warm weather of recent days.  The forecast was for three nights below freezing, but not by much, with highs above freezing, so I figured the paint should be okay.  Overnight lows in the 30’s were forecast again for four nights starting this coming Saturday, but from tomorrow on the weather should be amenable to the work I need to get done in the barn.

Given the weather forecast, today was a good day to work on blog posts, including the processing of photos.  I shot over 1,500 frames on our 15-night/16-day Panama Canal cruise, around 500 of them just on the day we did the transit of the Canal.  It takes a lot of time to go through that many images, select the ones I want to use (that support the narrative or tell a story in their own right), and post-process them.  It also takes a lot of time to craft the narrative, especially more than a month after the events.

TUESDAY 18 & WEDNESDAY 19 April

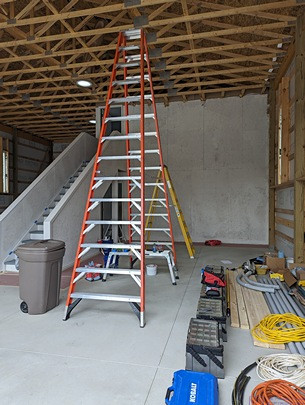
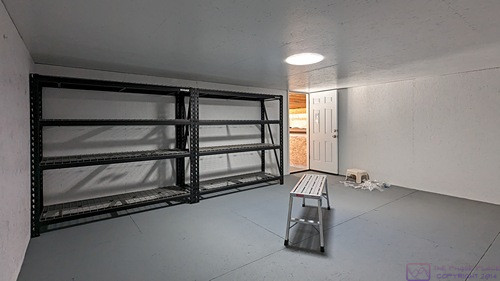
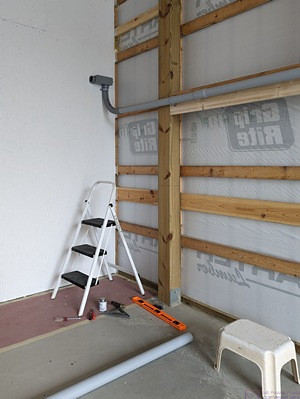
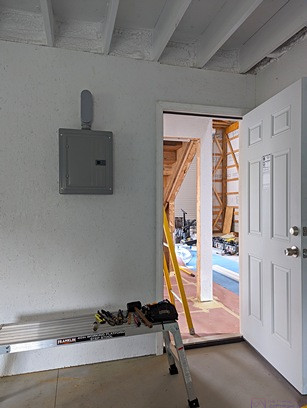
A view of the East (small RV) bay with equipment and supplies.  The wall behind the step-ladder and the walls of the staircase have been painted and primed.  Not yet done, and saved for later, is painting all of the staircase trim in a contrasting color, probably a green to match the lower exterior siding,


I managed to complete all of the cutting-in except for the a few spots high up at the exterior barn walls, as I need the 14’ stepladder to reach these, and I need someone to help me move it.  Linda was working on accounting for the bakery, and did not need to be interrupted.  The handrail dried, so I was able to turn in right-side-up and finish the first coat of primer.


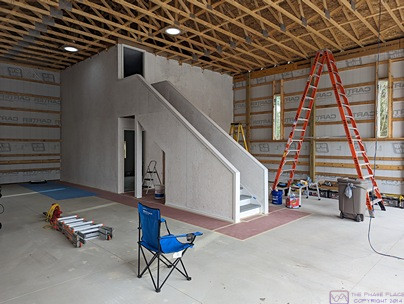
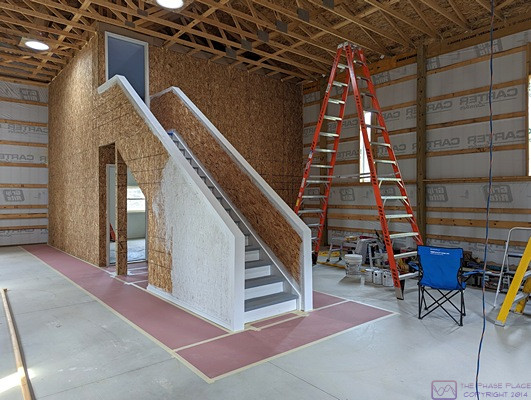
This is another view of the painted walls and staircase as seen from the SW corner the West (large RV) bay looking NE.


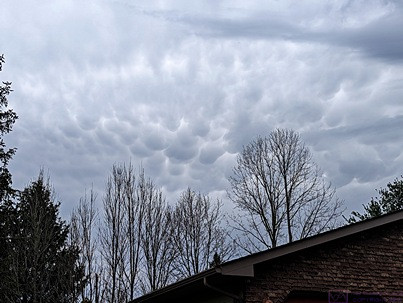
Mammatus clouds as seen from our center driveway looking N over part of the garage.


THURSDAY 20 – SUNDAY 30 April

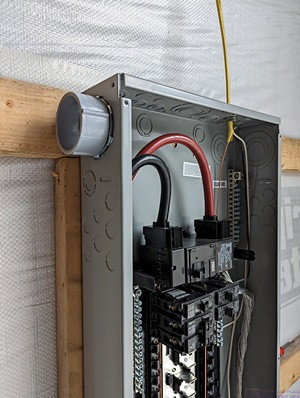
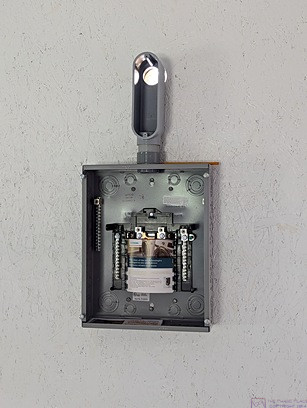
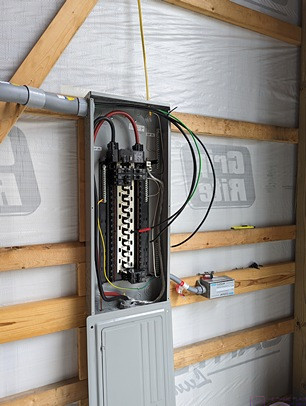
The box adapter has been installed in the upper left corner of the main panel.  The inside of the outer portion is smooth to accept the conduit tube.  The inner portion is threaded, and retained by a conduit lock-nut.  Note that in any photos of the main panel with the cover removed, the main breaker/disconnect is OPEN, so the bus bars are NOT energized.  The very large black and red cables at the top, however, are energized but the terminating lugs have safety covers.  Still, this is no place to get careless.  I am always extremely mindful of the location of these “live” terminals.


During this time period we installed the 2” Sch 40 PVC conduit from the main panel to the sub-panel in the shop, and ran the feeder wires.  It might not sound like much, but it was our first attempt at installing the conduit.  It was  a lot of work, and we took out time to figure things out as we went.  Here are some highlights of that work in photos with captions.


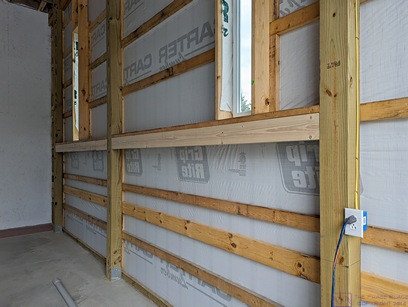
Starting from the post at the right of the frame, we installed a 1×6 board horizontally to the 2×6 boards that are on the flat just underneath the windows.  The 2×6 boards support the vertical framing for the windows and extend back for two more posts.


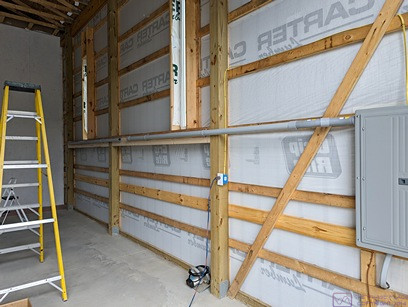
This is almost the same photo as the previous one, except that some of the 2” Sch 40 PVC conduit has been mounted to the 1×6 boards and tied into the main panel box adapter.  There is a gap in the conduit about mid-run.  An expansion coupling will eventually be installed there.


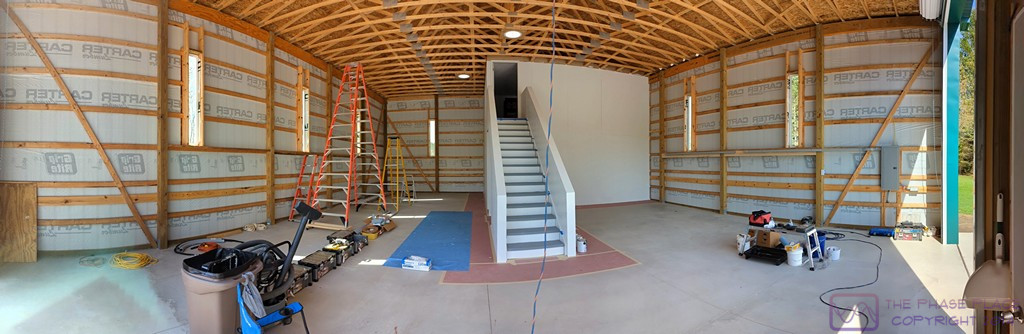
This panoramic image is 1024×334 pixels.  Clicking on the image might allow you to see it full size.

A 90-degree bend (elbow, sweep) has been used to turn the 2” Sch 40 PVC conduit up onto the wall of the shop and terminate it in a 2” PVC LL conduit body at the correct distance from the floor.


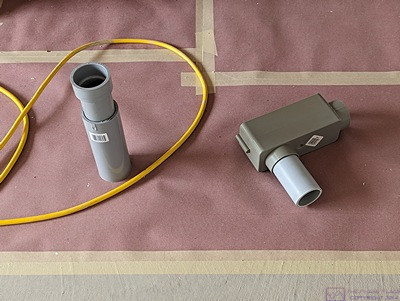
On the left is an expansion joint and on the right is an LB conduit body with a short piece of 2” conduit coming out of the back connection.  Two expansion joints were used for this run, one in the middle of the tube from the main panel to the shop wall and the other in the middle of the tube on the shop wall.  The stub in the LB conduit body will go through a hole in the wall and connect to another LB conduit body just above the top of the sub-panel in the shop.

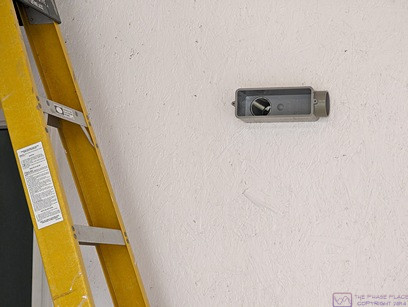
The LB conduit body positioned in the hole through the wall of the shop.


Another 2” PVC LB conduit body inside the shop above the sub-panel.  Light is coming through the connection on the back of the LB.  A short piece of 2” conduit connects the LB body to a box adapter in the top of the sub-panel.  The box adapter is secured from inside the sub-panel with a conduit lock-nut.


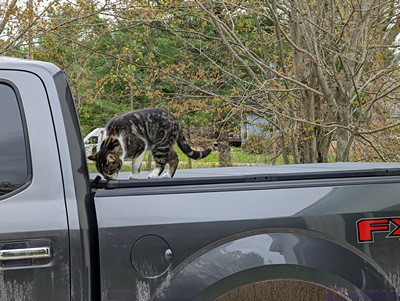
Time out for a cat photo!  On this particular day, Cabela decided to visit the barn while we were working and hang out on the bed cover of the F-150.  She was exploring at this point, but spent most of her time lying down and sleeping.


We fed a “fish tape” from the LL conduit body back into the main panel, being careful of the “live” terminals at the top of the enclosure.  We had already unwound and straightened the stranded copper feeder conductors—three #4 AWG (red, black, white) and one #6 AWG (green)—and laid them out in the driveway parallel to one another.  We attached all four wires to the end of the fish tape.  Linda pulled them into the 2” Sch 40 PVC conduit while I fed them in from the main panel.  Not shown is that when the wires emerged in the LL conduit body, we: 1) disconnected them from the fish tape, 2) fed the tape from the LB conduit body on the outside of the shop wall back to the LL conduit body, 3) reattached the wires to the end of the fish tape, 4) pulled the wires through the 2” conduit to the LB conduit body while guiding them in from the LL conduit body, and 5) detached them from the fish tape when they emerged form the LB conduit body.  This sequence of events would get repeated quite a few times before all of the wires were installed.


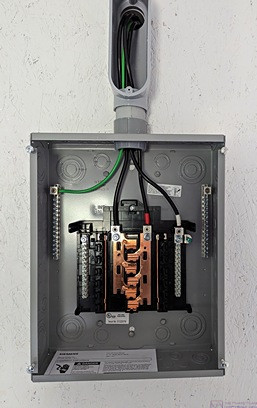
The feeder cables terminated in the shop sub-panel, from left to right: Equipment Grounding Conductor (EGC, Green), L1 (Black), L2 (Red), and Neutral (White).  All of the conductors have black insulation except for the EGC.  The L2 and Neutral conductors are color coded with tape near the lug connector ends.  Note that there is NO connection between the equipment grounding bus and the neutral bus in the sub-panel.  Neutral and Ground can only be bonded at one place in the system, and that is at the first disconnect, which in our barn is the main panel.  Note also that there is no main circuit breaker in the sub-panel.  The L1 and L2 feeder circuit conductors are protected by a 100 Amp, double-pole circuit breaker in the main panel.  This circuit breaker also serves as the disconnect for the sub-panel in the even that it needs to be opened and worked on.  Until we have final approval of the electrical installation, this circuit breaker has a lock-out device on it to prevent it from being accidentally closed and energizing the sub-panel.


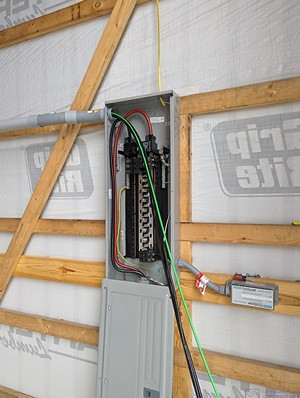
The feeder cables have been cut to the required length to be terminated in the main panel.


The L2 (Red) and L1 (Black) shop feeder conductors have been “landed” on a double-pole, 50 Amp circuit breaker (3rd and 4th from the bottom in the lower right of the panel).  The Neutral (White) feeder conductor has been terminated at the bottom of the neutral bus bar on the right side of the panel, approximate mid-way between the top and bottom of the enclosure.  The EGC (Green) has also been terminated in the ground bus, but is under other wires and not really visible.


The shop sub-panel with its cover reinstalled.


As of April 29th, the conduit and conductors for the shop feeder circuit were installed and I could finally move ahead with the rest of the conduit and wiring.  I decided that the best/easiest thing to do next was the shop and storeroom as I could do most of the work by myself standing on the floor or a short ladder.


202304(01-15) – Barn Project and General Update

In addition to the narrative, this post contains 17 photos with captions.  ]

MONDAY 3 – TUESDAY 4 April

The conduit trench that runs form the new utility pole along the inside curve of the driveway to the meter box at the SE corner of the barn.  Various tools are out as I get ready to move some dirt around to better fill-in the trench.

With all of the rain that came in March I finally had a day to continuing working on the trench for the conduit carrying the large electrical conductors from the pole to the barn meter box.  The soil was damp, so it was easy to dig but heavy to move.  I placed some of our surplus stacking landscape blocks in the trench every 5 feet of so to help retain the soil that I moved into the trench from either side.

The green bags in the following photo are 40 lb. topsoil, but I had been advised against using them as fill as it just washes downhill.  At some point I will probably get out the garden tiller and try to work this soil into the clay, but I would really like to wait until Phil can get back here and correct some of the grading.


I have managed to shovel/scrape most of the soil (clay dirt, really) from along the sides of the upper end of the trench into the cut, leaving it mounded up somewhat as it will eventually settle.

The stackable landscaping blocks are visible in the trench.  I used them as partial fill and to stop erosion of the newly place soil in the trench.

WEDNESDAY 05 – WEDNESDAY 12 April

The converted coach and the travel trailer in the barn.  We put them inside because the weather forecast included the possibility of large/damaging hail.  “Technically, they should not be in there as we do have the occupancy certificate yet (I need to finish the wiring first), but any fine we might get would be miniscule compared to the damage that large hail could do to either/both of our RVs.  We did get pea-sized hail, along with lots of rain and wind, but south of us there was ping-pong ball sized hail that destroyed fields of crops and badly damaged vehicles.  Note the standing water just off the right edge of the driveway at the SE corner of the barn.  I am waiting for our grading and excavating guy to squeeze us into his incredibly busy schedule and take care of the drainage.

Linda (Ama) was away from the house from mid-day on the 5th until late evening on the 12th.  She was providing live-in child care for our two younger grand-daughters while their mommy and daddy took a 1-week adult vacation to Iceland.  I drove down on the 5th to help get the 10-year-old to her rock-climbing class and then back home for dinner, before returning home myself.  I went down again on Saturday the 8th in time for dinner and stayed the night.  What fun that was!  Finally, I drove down on Wednesday the 12th to pick the 10-year-old up from school, take her to her rock-climbing class, and then get the two of us to the Ann Arbor area Buddy’s Pizza to meet up with Ama and the 4-year-old for dinner.  When I wasn’t doing those errands, I was home working on the barn, and other things.  I will get to those momentarily, but first, some highlight photos of the Ann Arbor events.

Sadie (L) and Madeline (R) with their aunt Meghan (C) at the butterfly exhibit at Meijer Gardens in Grand Rapids, Michigan on Friday, April 7.  (Photo by Linda.)


PXL_20230407_145529564_307x408(L)…  A lovely photo of a beautiful butterfly.  (Photo by Linda.)

A lovely photo of a beautiful butterfly.  (Photo by Linda.)


Saturday morning means ice skating lessons.  “Mads” (with her arms and one leg extended) seems to be doing pretty well.  (Photo by Linda.)


Easter weekend was upon us so on Saturday afternoon the girls decorated ceramic eggs.  (Photo by Linda.)


On Easter Sunday, aunt Meghan came over and the girls decorated actual eggs.  The Easter Bunny showed up while the girls were not looking, and the eggs got hidden in the back yard.  (Photo by Linda.)


Here I am with the crew after a successful egg hunt.  Note that one or two eggs disappeared between the time the Easter Bunny hid them and the girls went looking for them.  A squirrel was spotted from the house carrying at least one of them away.  (Photo by Linda.)


The Easter bounty on full display.  (Photo by Linda.)


Apa (me) and “Mads” discussing something in the her recently acquired book on the history of Algebra.  She’s 10-1/2 years old.  (Photo by Linda.)

The main “other thing” of particular note, was that the basement zone of our hot-water baseboard heating system quit working.  Our system has three zones, and the other two were working normally, so that strongly suggested that the zone valve had failed.


The hot-water baseboard heating system originally had 5 zones, each controlled by one of the zone valves shown in this photo.  The basement zone valve is on the far right.  The next two are for the main part of the house and the bedrooms.  The last two originally served a zone for the breezeway (now our library) and the water-heater, which is just out of the photo to the left.  The library zone was decommissioned when we had the new natural gas furnace installed in early 2016.  The water heater zone was also decommissioned at that time as the Bosch furnace controls the hot-water tank/function directly.

The zone valves are a Honeywell Home V8043F1036/U Motorized Valve.  It has a 24VAC 50/60 Hz motor with an integral end switch and the 1/4-turn brass valve has 3/4″ sweat fittings assembly.  The motor-actuator engages a small shaft that protrudes from the valve.  There is also a lever on the motor actuator that is supposed to allow the valve to be opened manually and secured in that position, but the lever would not budge.  Either the motor or the valve had seized, but I wasn’t sure which one.


This is the motor-actuator portion of the spare assembly removed from the valve body.

Well … it so happened that I had a complete spare zone valve on the shelves in the furnace room.  It was still in a box with directions, albeit the box was a bit tattered and the directions were in pretty rough shape.

The valve assembly came with the house, and had probably been there for many years before that.  Fortunately, it was fairly obvious that the motor-actuator could be separated from the valve by removing two small screws.

I shut of the furnace (“boiler”) and then shut off the power to the entire system, which is both 120VAC and 24VAC.  I took a photo of how the wires were currently connected to the existing motor-actuator and then carefully removed them from the terminal screws.  I removed the retaining screws from the existing unit and slid it off, with some difficulty.  I was able to turn the valve shaft easily, but I could still not move the manual lever on the motor unit.  Problem isolated.

I separated the motor-actuator on the “new” zone valve from the valve body, checked that I move it by hand (I could) and attached it to the existing valve body.  I was able to open it manually, so I reconnected the wires, turned the power back on, and then turned the furnace on.  I then turned the basement thermostat on and went away to do other things, one of which was to see if I could purchase replacement valve assemblies to keep on hand.  As it turned out, I was able to order two spare valve units on Amazon.

The reason for the wait was that this particular Bosch unit has an outside temperature sensor, which results in a strange system behavior during the spring.  At this time of year the sub-surface temperature of the earth around the house is still cool and thus the basement tends to be cool as well (most of it is not very well insulated).  But because the temperature outside is above some limit, the furnace refuses to operate any of the space heating zones.  It still makes hot water; it just won’t heat the house.  That’s not a problem upstairs where it tends to be warmed and we also have a forced-air heat pump, but for a period of time each spring the basement just ends up colder than I would like.  Worst case, I have been known to close the doors to my office and run a small fan-heater.

Another important “other thing” was that I finally had a chance to talk to the neighbor (Rebecca) across the street about Cabela (the cat).  Cabela is a lovely female cat that belongs to Dave and Rebecca (and their kids) but Cabela is afraid of their dog, Kenai, and will not go in their yard when the dog is outside, which is most of the day and evening.  (Cabela was actually hanging around our house all winter, and it was then that we learned she belonged to the neighbors).  As a result, Cabela spends most of her time around our house and in our yard, but (supposedly) goes home at night where she is fed and has shelter on their back deck.

Cabela does not come in our house and we are not adopting her.  She is not ours, and we have no plans to get any more pets unless/until we are no longer doing any extended traveling.  The main reason for the conversation was to make sure they were aware that Cabela was hanging out at our place, and that both we and they were OK with the situation.  I also let her know that I give Cabela some food (dry kibble) in the morning and wanted to make sure that was OK with them.  It was a very friendly chat, and yes, they had seen her over there, and no, it was not a problem.  If anything, they did not want us to feel like we had to take care of her.  I assured her that we did not, and since we were now kitty-less, we enjoyed being able to interact with her, without really being responsible for her.

Back on the barn project, the major tasks facing me were the wiring, and then the relocating of “things” (many things) from the garage to the barn shop and storeroom.  A “minor” task was that I wanted to paint the two exterior walls of the shop/storeroom that are inside the barn, but this had to be finished before I could run some of the conduit.  (I hope that makes sense.  The shop and storeroom are a 2-story enclosed space in the right rear corner of the barn.  The east and north walls are part of the shell of the barn.  The other two walls (south and west) are inside the barn.  All four walls are insulated with closed-cell foam.  There is also closed cell foam above the ceiling of the storeroom, and rigid foam under the portion of the concrete floor that constitutes the floor of the shop.)

I have been moving and staging tools and materials in the barn shop in advance of the painting and wiring work, and decided I needed to move all of it somewhere else as I will be doing a lot of wiring in the shop.  The storeroom was the obvious (?) place to move much of it, even if only temporarily.

This photo is out of sequence, but has the critical information about the heavy-duty shelving units.  With packaging they were more like 160 lbs. each.  I had to open each box and carry most of the parts up to the storeroom individually.

With that in mind, I checked around at Lowes and The Home Depot and decide to get two metal shelving units for the barn storeroom.  I bought two KOBALT, 4-shelf, black, units, each 77”W x 72”H x 24”D; 152 lbs. each including the box.  An associate at Lowes helped me load them into the F-150, but I had to unload them by myself.


As shown in this photo, I originally placed them against the south wall of the storeroom.  I eventually relocated them to the north wall.

The instructions indicated an assembly time of 20 minutes (not including the unpacking).  Yeah, right.  I had to unpack them and carry them up to the storeroom in pieces.  Unloading, unpacking, and transporting the pieces to the storeroom took about hour for each shelving unit (I did them one at a time).  My assembly time for the first unit was over two hours.  The second unit went a bit faster, but not that much.

A view of the staircase to the storeroom above the shop as I prepare the area to finish priming and painting the walls.  Note the red rosin paper on the floor to protect the concrete from errant paint.

A combination of illness, weather, trying to process photos and write blog posts about our Panama Canal cruise, and unexpected home projects had temporarily delayed getting work done on the barn, but by mid-April the pieces were finally falling into place.


202303(13-31) – Back Home & Back to Work

[  This post contains narrative along with 11 photos with captions.  ]

SUNDAY 12 March

We got back to our house on Sunday the 12th, but not without some minor issues.  Our daughter picked us up from DTW and drove us back to her house where we left our F-150 while we were away.  As soon as I turned the ignition switch ‘on’ I got a message on the info screen indicating that there was an electrical problem.  The engine started normally, but the battery icon remained on.  Linda Googled the issue and found information that indicated we might have an alternator failure along with some vague information about how far we might be able to drive before all of the electrical stuff stopped working.  We started for home anyway, but only a mile into the trip, decided it was an unwise decision, and returned to our daughter’s house.  She let us borrow her car to get home, and we transferred our suitcases to her vehicle, with the promise to return it in next couple of days.

When we got home we brought our suitcases into the house, but didn’t do much else.  I was still obviously ill, so we each took CoVID-19 tests.  Mine was positive, which was not a surprise given my symptoms, but Linda’s was negative, which was a relief.  Forthwith, all of my interactions with people outside the house included a face mask.  Paul and Nancy also eventually tested positive.

MONDAY 13 March

I returned to our daughter’s house the next day with my tools and multi-meter and tried again to resolve the issue, but the fault had not cleared on its own.  Okay then, something was definitely wrong.  I checked the voltage level on the battery, which was still okay, but decided to replace it and see if that was the problem.  The battery was original to the vehicle, which we bought in May 2019 (and was built some months prior to that), so the battery was approaching 4-years old, if not there already.  I drove to Varsity Ford in Ann Arbor, only 10 minutes from our daughter’s house, and got the correct replacement battery.  It was easy enough to do the swap, but it didn’t fix the problem.  Still, it never hurts to have a new battery.  I returned the old one for the core charge credit, and made an appointment to bring the car in the next day, figuring (hoping) it could at least make it that far.  I was not in the humor to have it towed.

TUESDAY 14 March

Linda drove our daughter’s car and I drove Linda’s Honda HR-V back to our daughter’s house.  I then drove the F-150 to Varsity Ford and Linda followed me in her car to pick me up and take us home.  I figured it might be several days before they could get to it, but I got a call back a couple of hours.  The service writer indicated that the alternator was okay, but an electrical cable had failed and needed to be replaced.  I approved the work, of course.  I got another call mid-afternoon that the repair was finished and I could pick up the truck.  Rather than wait until the next day, Linda drove us back down, I paid the bill, and we were on our way back home yet again.

WEDNESDAY 15 – SUNDAY 19 March

Given my positive CoVID-19 test, I didn’t do much else the rest of the week other than work at my desk.  My big accomplishment was the final preparation of the application for the electrical permit for wiring the barn.  By the 19th I finally tested negative and was free to move about (Lowes and Home Depot) and get back to work on the barn.

MONDAY 20 – THURSDAY 23 March

Here I am on the front porch with Cabela.  She is not our cat, but has effectively been abandoned by her owners across the street.  She craves human attention, and we feed her in the morning to make sure she is getting at least some food without having to hunt.

Today was a big day for me and the barn project; I went to the Livingston County Building Department and submitted my application for an electrical permit for wiring of the barn.  The application was processed and the permit issued while I was there, which was very convenient.


Our 2020 Airstream Flying Cloud 27 FBT travel trailer back home and parked in our guest site.

We had been thinking about replacing the kitchen refrigerator and when it started making occasional noises we were motivated to start looking in earnest.  This particular LG at Costco was larger than we wanted/needed but our visit there gave us a good idea of what sizes and features were available and at what price.

Tuesday the 21st was also a big day for us as we drove to Woodland Airstream in Grand Rapids, Michigan, to retrieve our 2020 Flying Cloud travel trailer, something we were originally scheduled to do last week.  The trailer had been there since October 22 for a long list of minor repair and maintenance issues, and one big repair issue (the ridge that had developed across the kitchen floor from side-to-side).

We had a pleasant drive over.  The trailer looked great, with no indication that there had ever been a problem, and we were pleased with the work.  We settled our bill (the ridge was a massive job done under warranty) and hooked up the trailer to the F-150.  The drive home was equally pleasant and uneventful, and it was nice to finally have our travel trailer back on our property.


FRIDAY 24 – MONDAY 27 March

We would a nice little vegan restaurant (Bombay Food Junkies) not far from our hotel for dinner on Friday evening.

Billie Teneau, a long-time family friend in St. Louis, Missouri had passed away back in late February.  She was in her late 90’s and was a bicyclist and successful Senior Olympian.  Her memorial service was this Saturday at the St. Louis Ethical Society.

We drove down on Friday and stayed in a hotel that was conveniently located relative to the Society as well as my sister and niece, and Linda’s sister.  We drove home on Monday.


My sister (Patty) and her grandson (Logan) doing some coloring at Mellow Mushroom while we wait for our food.

My mother was a life-long member of the Society, her parents having been members when she was born, and my father joined when they married.  My sister and I were also born into the Society and grew up there.  When I moved away from home to go to college I never again lived anywhere that had a Society.  Once we had children our Sunday morning ritual became tent camping.


My niece (Amanda, right) with her daughter, Lilly (left) while we wait for our food at the Mellow Mushroom.

The service was well-attended and very nice.  There were people there that that I knew, or knew of, but many more that I did not.  Billie, and her late husband Richard (Dick), had varied interests, each with its own associated circles of colleagues and friends, but I knew them mainly as two of my parents’ best friends over most of their adult lives.

My sister (Patty) and her daughter (Amanda) attended the service as well.  After the service, we went to a Mellow Mushroom restaurant convenient to where Amanda and her family live.  We visited with Linda’s sister (Sister Marilyn) on Sunday and returned home on Monday.

TUESDAY 28 – FRIDAY 31 March

The grand-daughters at a branch of the Ann Arbor Library.  The 10-year-old (Mads) in the small chair and the 4-year-old (Sadie) in the big chair.

Linda was busy the rest of this week babysitting the Ann Arbor grand-daughters and doing accounting work for the bakery.  In her absence, I turned my attention to the barn.  I continued trying to fill in the trench for the conduit from the utility pole to the barn, and started purchasing Sch 40 PVC conduit and various fittings that I would need to wire the barn.


Sadie on the rope climbing structure at the nearby elementary school.


This part of the conduit trench is also not completely filled it yet, and collects water.


Checking out availability and prices of conduit bodies at the big box stores.  Running individual conductors in conduit is not going to be less expensive than running NM-B (Romex) cable, but it will definitely be better.


Like plumping parts, electrical devices and fittings have code names and one of the things I had to learn was the proper names for various conduit fittings.  The ones that seemed to give me trouble were the LB, LL, and LR conduit bodies, but I finally figured it out.  Hold the conduit body with the cover facing me and the end connection pointing up.  If the other connection comes out the back, it’s an LB (L shape, Back connection).  If the other connection is on the left, it’s an LL (L shape, Left connection) but if the other connection is on the Right, it’s an LR (L shape, Right connection).