Linda was up before 6 AM to drive to the bakery ahead of the worst of the morning rush hour traffic. I was aware of her getting up but fell back asleep. She is very quiet as she goes about her preparations on such mornings, which I appreciate.
I got up around 8AM, fed the cats, and cleaned their litter tray. I made half as much coffee as usual and measured out a bowl of granola, probably a little more than usual. I took my coffee to the living room and turned on the fireplace, expecting to settle in with my cats and work on my iPad, but the iOS 9.0.2 update was available so I started the installation and read the last few pages of Number Theory and Its History by Oystein Ore. I read from screens more than from paper these days, but I still like to curl up with a printed book.
Jasper used to sit next to me on the sofa in the morning but seems to prefer sleeping on top of one of the back cushions these days. Juniper, who never used to pay much attention to me, has taken his place. She has always sought out warm places to curl up but has always preferred Linda’s lap to mine.
My bus project for today was reassembling the plumbing to the two fan-coil heat exchangers that go in the bases under the two desk pedestals. Yesterday I cut new holes for the supply and return hoses. My first task was to remove the hoses from the bleeder valves and install barbed plastic plugs in the ends to prevent coolant from coming out. I then pulled the hoses back and out through the new openings.
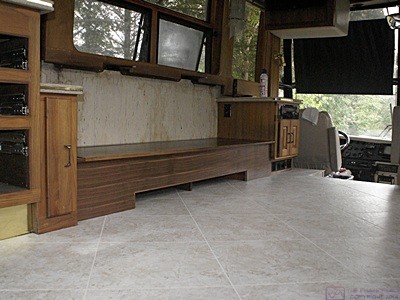
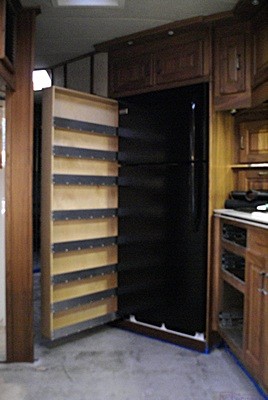
The area behind the desk where the heater hoses emerge from the passenger side OTR HVAC duct.
I worked on the hose for the right hand (rear most) heat exchanger first. I positioned the base, routed the hose to the lower fitting, and marked where to cut it. I put a plastic paint tray liner under the hose before I cut it but more coolant came out than I expected. I got as much of it in the liner as I could and grabbed a bunch of paper shop towels. I got the liner outside without spilling any antifreeze and poured the used antifreeze in a one gallon jug that I keep for just this purpose. I used a funnel that is also reserved for use with antifreeze.
I took the cut off piece of heater hose outside, plugged end down, and set the open end in the tray liner. We already had a bucket of soapy water in the bus as we had planned on hanging wallpaper yesterday. I wrung out the sponge and then squeezed some of the soapy water on the floor and cleaned it up with paper shop towels.
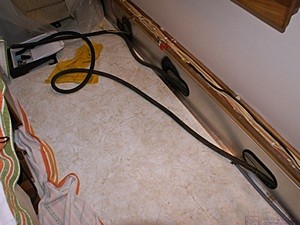
The left and right desk bases and center cover/spacer set in place. The heater hoses are not yet connected.
With the mess cleaned up I slipped two hose clamps over the end of the hose and worked it onto the lower fitting on the heat exchanger. If only it had been as easy to do as that description! The 3/4″ i.d. rubber heater hose did not just “slip” over the 3/4″ o.d. copper pipe even with some residual antifreeze lubricating the inside of the hose and the outside of the pipe. Indeed, it took considerable and simultaneous pushing and twisting to get the hose on. It was also a lot harder than I expected to work with the heat exchangers installed in the bases, even without the desk pedestals in place.
I was interrupting my work as needed to take photographs and as I finished up the first hose the camera refused to trigger the shutter. The LCD screen indicated that the compact flash memory card was full so I went to my office to offload the images from the last few days. My other CF card was empty so I put that in the camera and set it aside. I had not backed up my photos to the Network Attached Storage units in quite a while so I decided to take the time to do that. While I was at it I backed up my blog posts from December of 2014 through July of this year along with several issues of The Gypsy Journal.
As long as I was at my computer I checked my e-mail accounts, logged into RVillage, and logged into my account at B&H Photo. My new Sony alpha 99 and accessories were on their way from New York and due to be delivered by the end of the day tomorrow. I am excited to finally be getting a new digital camera with a full frame (35mm) sensor that will work correctly with all of my old Minolta A-mount lenses.
By this point it was lunchtime so I cleaned up (antifreeze is definitely NOT good eats) and scrounged around the kitchen for something tasty but easy to fix. My “go to” meal is usually roasted red pepper hummus and sourdough pretzel nibblers. We had a little hummus left, which I finished, but I was still hungry so I made a bowl of popcorn. I would probably not make a good bachelor.
I went back to the coach and contemplated attaching the other hose to the left heat exchanger. While I was thinking about it Linda called to let me know she was on her way home. It was 1 PM so I decided to wait for her to get home to help me install the second hose. I had some phone calls to make and used the time for that.
I called Karen at Bratcher Electric to schedule the upgrading of our 60 Amp sub-panel in the garage to a 100 Amp main panel. While I had her on the phone I asked if Mike would itemize the quote. I also mentioned that they had picked up two or three whole house generator customers through my referrals and perhaps Mike could provide some consideration for that in the pricing. Next I called Ferman Miller at Countertop Plus in Shipshewana, Indiana to check on the Corian desk top and table. Ferman answered the phone and said he had called Josh this morning to let him know the pieces were ready for pickup. I then called Josh to see what his plans were.
We originally agreed that he would pick them up and bring them to our house on his way to visit relatives in the northeast side of the Detroit metropolitan area. His plans had changed and he won’t be visiting his relatives anytime soon. He is leaving on Tuesday for a FMCA area rally in the Carolinas and will be gone for a week. Before he leaves he needs to get something to a customer in Cleveland in addition to getting our stuff to us or deciding that we will have to drive to Shipshewana to get it ourselves. One option is that we meet him somewhere on Sunday. Ann Arbor is a possibility but Toledo or Defiance (Ohio) are more likely rendezvous points.
Linda got home around 2 PM and changed into her work clothes. With Linda’s help I was able to avoid the mess I had with the first hose. The second hose was even harder to get on than the first one but we managed to do it. In part because of the arthritis in the joints at the base of my thumbs I do not have as much grip strength as I would like and often need. The twisting and pushing was hard on my hands and the confines of the base and proximity of crisp wooden edges resulted in lots of small cuts. This was not something I anticipated in the design and construction of the bases and the installation of the heat exchangers.
I took a break and drove to Northwest Plumbing Supply to see if they had a bleeder valve like the ones in our bus system. They did not and had never do seen anything like it before. The showed me a couple of things they did have but I did not buy anything. I got a call from Brighton Honda that my car was ready for pickup so I headed home to get Linda. She drove me to the dealership and then went on to Meijer’s for a few grocery items.
I drove to Lowe’s in Howell and was fortunate to find Lars in the plumbing department. The store was not very busy and he took an interest in showing me various plumbing options that might allow me to replace the bleeder valve with something that would do the same thing while also giving me a way to add antifreeze to the system. What I ended up with was 3/4″x3/4″X1/2″ copper sweat T and a 1/2″ sweat ball valve with a waste port.
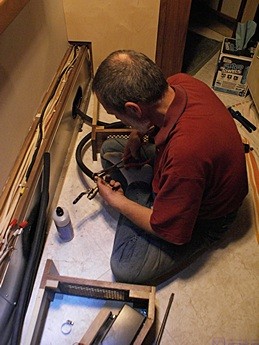
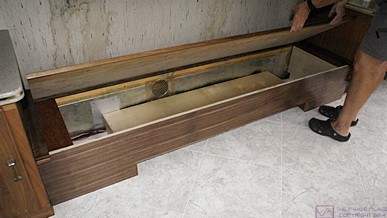
Bruce works on attaching the heater hoses to the fill/bleeder valve T assembly he built. (Photo by Linda.)
Back home I cleaned some 3/4″ and 1/2″ copper pipe with 120 grit plumbers sandpaper. I cut two pieces of the 3/4″ pipe about 3″ long and one piece of the 1/2″ pipe about 1-1/2″ long. I brushed the inside of all the fittings and test fit the pieces. I then applied flux to all of the surfaces to be soldered, inserted the two 3/4″ stubs into the run fittings, inserted the 1/2″ stud into the bull fitting, and put the ball valve on the other end of the 1/2″ pipe. I used the lever on the ball valve to mount the assembly in my bench vise. I removed the waste port cap to protect the neoprene seal and opened the ball valve so as not to trap heat inside. I then heated the T and the end of the valve and applied the solder.
I figured there had to be an easier way to get heater hose onto the heat exchanger and that Butch was the guy who would know what it was. I called and he said antifreeze can obviously be used and works fairly well but that a small amount of dish soap would also work as a lubricant and not harm the antifreeze or the Aqua-Hot and its components. As long as we were on the phone I caught up on their activities.
They were still there at the RV Park in Bouse, Arizona but only until the 15th of this month. The terms and conditions of their employment as managers of the park had not turned out to be as described during the interview process and they are wrapping up after only a month on the job. They will move their bus back to Quartzsite and spend at least part of the winter at Joe and Connie’s place where we both spent last winter. I know it was a big disappointment to them that the situation in Bouse did not work out, but their situation in Q will be familiar, comfortable, and inexpensive, as well as convenient to the Quartzsite Gem and Mineral Club which they joined this past winter.
For dinner Linda made a blend of onions, garlic, mushrooms, and power greens and served it over a baked potato topped with Daiya cheese. It was very yummy, and the potatoes kept the dish warm all the way to the end. The weather had turned cloudy through the afternoon and we got the first raindrops during dinner.
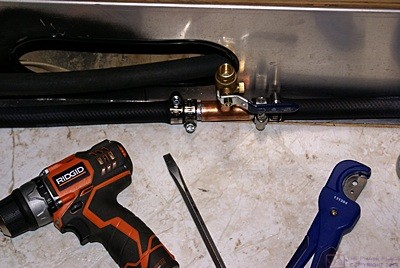
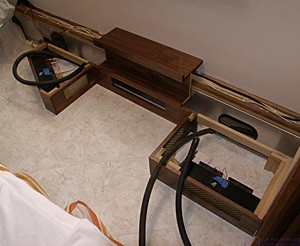
The fill/bleeder valve T assembly with the heater hoses connected. The assembly is located between the bases at the floor and will be hidden by the center connector/cover.
I had really hoped to have the hydronic heating system reassembled today so we went back out to bus after dinner to hook up the heater hose that runs between the two heat exchangers. This was actually two pieces of hose with my homemade bleeder/fill valve half way between the two exchangers. Even with dish soap the two hoses were very difficult to get onto the heat exchanger fittings and the bleeder/fill stubs, but I got them on. Linda took pictures while I grunted, groaned, and moaned and I took a few more when I was done.
It was 8:45 PM when we finally quit working, secured the bus, and went inside. I cleaned my hands as best I could but I could not get all of the black from the rubber hoses to come off. We sat for a while in the living room and had the last of the frozen chocolate torte that Linda made a couple of weeks ago. We finally turned in around 10 PM and watched Rick Steve’s Europe, Travel in the Americas, and a couple of cooking shows while I worked on this post.