We were up at 8 AM and had breakfast but I did not take the time to make coffee. I gathered up the laundry and started a load. I then headed to Lowe’s to buy an outlet strip that I could easily hardwire. I looked at angle iron to support the upper back edge of the interpedestal desk cover at the wall but did not buy any. The iron has holes and slots manufactured into it that I thought might allow me to adjust its location vertically without having to move the location of the screws. Alas, the slotted openings were horizontal rather than vertical.
Linda was cooking a batch of granola when I got home and made a pot of coffee. I decided to tend to some travel preparation items before getting back to work on the remodeling project. I wanted to check/adjust the tire pressures while it was still cool. The tires were all down about 1.5 PSI, which was very good given how long it has been sitting. I used the new 6-gallon air-compressor to bring them up to the pressures I like to run and it worked OK. I will have to pause a little more often while it re-pressurizes but it is less than half the size of the 15-gallon DeWalt and will travel with much more easily.
My next task was to unload the front bay which I did while Linda continued to work on our food for the week. We find it much easier to deal with food at rallies if she “cooks ahead” and “reheats to serve.” I set everything in the driveway in front of the bus and tried to sort it into two groups; things were staying home for this trip and things that were going with us.
I then opened the drain valve on the fresh water tank, which goes through the floor of the water bay, and let the water run onto a container lid so it wouldn’t dig a hole in the gravel driveway. I was getting ready to deploy the fresh water hose(s) when I noticed that they were in need of some serious cleaning. Linda agreed to take care of that and cleaned their storage tub too. Ditto for the waste water (sewage) hoses and their storage tub. Her taking on this task allowed me to return to working on the installation of the desk.
I had a 12″ long piece of 1/8″ aluminum angle and decided to use it to support the upper back edge of the interpedestal shelf/cover. I drilled and countersunk five holes in one of the flanges. Linda finished cleaning the hoses and then got our wireless thermometer from the house. It has a base thermometer and two wireless remotes so she put one remote in the freezer and the other one in the fresh food compartment. We wanted to monitor the temperature and dial it in to where we needed it before loading the refrigerator with food.
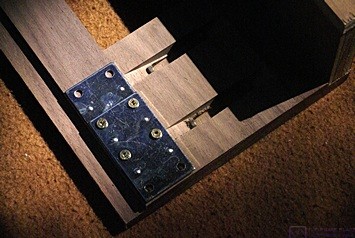
The stacked mending plates used to create a tongue-&-groove alignment system between the center cover and both the left and right desk pedestals/bases.
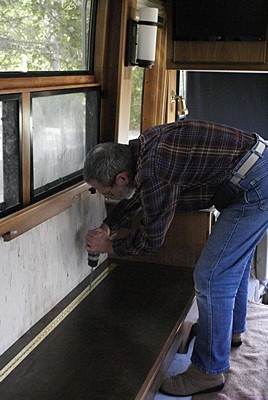
I removed the interpedestal cover and set the left pedestal aside so I could complete the AC wiring connections. I mounted the outlet strip to the wall centered between the two pedestals and about two inches below the level of the underside of the plywood that will support the Corian top. The outlet strip had a 15 foot cord. I determined how much of that length I needed to get through the right pedestal and forward along the wiring chase to where the other wires were located. I cut off the extra length, routed the power cord into the right pedestal at the left upper rear corner, down the inside left rear corner, and out the left end of the upper base. From there it ran forward to the other wires where I connected them. I turned on the circuit breaker and then turned on the outlet strip. The switch lit up, indicating the presence of 120V AC. I used my Etcon tester to check the duplex outlet by the passenger seat. It also had power so the wiring was good.
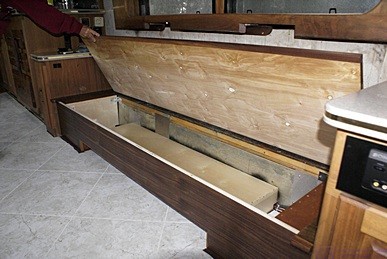
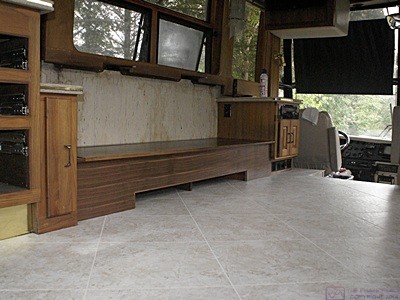
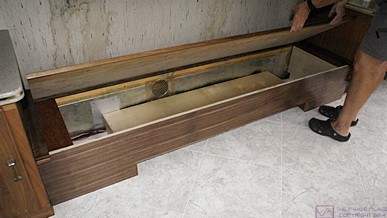
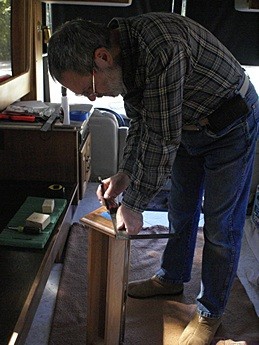
I set the interpedestal shelf/cover back in place, aligned with the right base, and then aligned the left base to it. I checked the distance from each end of the base to the HVAC duct and adjusted it to be the same. We then adjusted the position of the left pedestal until we were satisfied with the alignment with the interpedestal cover. We checked the alignment of the front top edges of the pedestals with a 6′ metal ruler. Everything looked OK so I secured the pedestal to the base using two screws that will be hidden by the laser printer in normal use.
I needed to screw the pedestal to the wall in the two upper corners to minimize the visibility of those screws. It was not flush to the wall at those points so I used a shim in the upper right. We will have to cover the vertical gap at the left rear with molding.
Bruce finds the center of a drawer front by finding the point where the diagonals of the face intersect. The handle mounting holes were located horizontally 1-1/2” to either side of this center point.
We put the removable plates back in the bottom of each pedestal. I drilled the holes for the pulls in the four desk drawers, installed the pulls, and put the drawers back in the desk. To find the correct location for the holes Linda suggested that we put a piece of painter’s tape in the center of the face and then draw a small segment of the two diagonals to find their intersection. For the two small drawers that was all we needed as they got single knob style pulls. For the two larger drawers we needed to locate the holes 1-1/2″ to either side of the center on a line through the center parallel to the top and bottom edges. I measured carefully and I think we did a pretty good job.
Sometime during the morning I texted Jarel the dimensions for a 3/4″ thick piece of walnut 1-7/8″ high by 34″ long to use as a face for the edges of the three layers of plywood under the refrigerator. He texted back and said “no problem” which lead to an exchange of a dozen e-mails clarifying just exactly what I wanted. I did not mind, better that than assumptions that result in wasted time making parts that don’t fit. Jarel is an experienced cabinet maker and is meticulous in his work. He knows all the questions to ask about things I did not specify and does so before cutting any wood.
Our last construction task before departure tomorrow was rehanging the bathroom door. I measured the distance from the bottom hinge to the bottom edge of the door and compared it to the distance from the hinge in the door frame to the floor. It looked like it should fit without rubbing so we hung the door. (The old ceramic tile rubbed as the door was swung to its fully open position, but the thickness of the underlayment and vinyl tile is less than the ceramic and thinset, at least in that area.)
Linda was still trying to prepare our food for the rally as there will be very little of the included food that we can eat. She made a grocery run while I returned to emptying out the front bay of the bus. I plan to leave most of the stuff that was stored in that bay at home so Josh has access to the ceiling to see if we can through-bolt mount the two captain’s chairs in the living room. I might also store all of the GLCC stuff down there as Linda will be coming down on Wednesday in the car with the cats and we want to minimize the amount of other stuff in the car.
I thought about sanitizing the fresh water system by using the 12V DC water pump and the winterizing valves/tubes to draw a dilute chlorine solution from a bucket and pump it through the fresh water pipes. I decided against it based on available time and higher priority items that needed to be done. I connected the clean fresh water hoses to the coach and started filling the tank. I checked that the fuel polishing pump was off and checked the air springs and latch on the generator. I made a mental note that the aft air springs (front of the Yanmar diesel engine) needed air and made sure the slide tray was latched in place. I was going to start the generator and let it power the air conditioners but decided to forego for now that as well.
We had unlatched and removed the towbar from the bus receiver earlier in the summer. I used one of our hand trucks to move it over by the car. I put the passenger side rear seat down and loaded the towbar in behind it along with the bag that holds all of the other pieces. That left plenty of room for the two cat carriers, litter tray, and any miscellaneous things she may bring along on Wednesday.
We put the mattress back onboard and Linda made the bed, but forgot the electric heating pad. Linda did some cleaning and then we loaded clothing and food. Computers, cameras, and other technology will go on first thing tomorrow morning. We then got the various GLCC items out of the garage and staged them by the passenger side of the bus. I loaded our personal items onto the driver’s side half of the slide tray and loaded the GLCC stuff onto passenger side half.
Our goal was to be done by 5 PM but it was 6 PM when I finally had the pressure washer ready to use. It took me a little over an hour to spray the car and the coach and I wrapped up for the day at 7:30 PM. We had seitan stroganoff for dinner with the 2013 Egri Merlot and had watermelon for dessert. It was another long day but we got a lot accomplished and most it did not require me to work on my hands and knees, for which I was grateful.