Tag Archives: swivel seat pedestal base (H3-40)

2015/11/17 (T) Drivable Again

Linda set her iPad alarm for 5:45 AM.  I heard it go off and got up shortly thereafter even though I did not turn out my light last night until 12:30 AM.  She got up at 6 AM and was showered, dressed, and out the door by 6:20.

I tuned in Weather Nation on WILX TV out of Lansing while I folded the clean laundry.  Of all the stations we can pick up this is the only one with a dedicated weather sub-channel.  The current forecast was for two more days with high temperatures near 60 degrees F but high humidity and rain as moisture races north from the Gulf in advance of a cold front.  By the weekend we are looking at highs at or barely above freezing and lows in the low 20’s.  The 10-day forecast has us back in the 40’s by Tuesday so we should not have any weather difficulties for Thanksgiving and the following day when we head south.

We planned to re-install the two front seats in the bus late this afternoon and I plan to take it on a fueling run tomorrow so I can run the Aqua-Hot diesel-fired hydronic heating system instead of running electric heaters.  I will also drain and refill the fresh water tank, but those are tomorrow’s tasks.  I had other things to do today, starting with the laundry.

I needed to wait until late morning to do the final cleaning of the tile in the cockpit and had several things to do that had to wait for the cleaning to be done first.  To make good use of my time I decided to measure, cut, drill, and paint the 1/2″x3/4″ aluminum angle that will serve as a retaining bracket for the refrigerator.  I will install it tomorrow after the front seats are re-installed and out of the way.

With that done I got the 3/4″ piece of walnut that Jarel cut and shaped for me to cover the front edges of the plywood under the refrigerator.  The piece sticks up a little above the top of the top layer of plywood so I wanted to install it in a way that will allow it to be easily removed.  That precluded the use of nails, even small ones.  I did not want the appearance of screw heads and wasn’t interested in drilling deep countersunk holes and using plugs.  (The woodwork in the bus was essentially assembled this way and most of the plugs have come out.  We will probably put them all back in once we are done reconditioning the wood even though I would rather not.)  That left Velcro as the only reasonable option, so I started a shopping list.

My next mini-project was to attach the 1/4″ walnut veneer plywood to the face of the pull-out pantry.  Jarel had ripped two pieces to the proper width for me but neither one was quite long enough to fully cover the front of the pull-out pantry.  Step 1 was figuring out where to have the two pieces meet and then determine how long each piece needed to be.  The next problem to solve was how to attach them.  I decided to use glue, clamp the walnut panels to the front of the pantry, and then secure them using screws from behind.  I looked for my large wood clamps but could not find them so I added face clamps to my shopping list.

The front structure of the pantry is 1/2″ thick ash and I planned to drill countersunk holes from the inside so the screw heads would be flush.  That meant I needed #6 5/8″ screws, which I did not have, as 3/4″ screws would probably puncture the veneer.  I added the screws to my shopping list.  I selected a small drill bit and drilled holes from the inside just below the top board and just below each shelf plus one just above the bottom shelf.  Because of the metal side plates these locations were easier to reach on the inside.  I then switched to my countersink bit and drilled the holes out from the inside.

Back in the garage I sprayed a second coat of black paint on the aluminum angles for the refrigerator retaining bracket, moved a load of laundry to the dryer and put another load in the washer, and then took my shopping list and went to Lowe’s.  Lowe’s had a very clever Automax self-adjusting face clamp with a 6″ reach.  It was a little pricier than the 3″ version which was a little pricier than the 3″ manual adjust version, but the size and auto adjustment feature swayed my decision.

On the drive back to house I had a nice QSO with Steve (N8AR) on the South Lyon 2m repeater.  When I got home I had some wasabi/soy almonds and sourdough pretzel nibblers with hummus for lunch.

Returning to the bus work I cleaned the tile in the cockpit using Armstrong Once ‘n Done and rinsed it with a clean sponge and warm water.  I then returned to working on attaching the walnut veneered plywood to the face of the pantry.  I decided which piece to use for the longer bottom section and which portion of the other piece to use for the top section.  In the shop I clamped each piece in turn to a 2×4, set the Boca saw guide, and trimmed them to length.

The 1/4" walnut veneered plywood clamped to the front of the pull-out pantry.

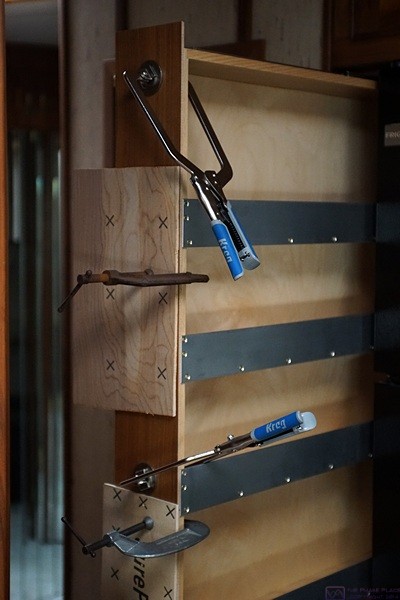
The 1/4″ walnut veneered plywood clamped to the front of the pull-out pantry.

Back in the bus I applied the bottom piece first.  It was slightly curled, lengthwise, so after applying Titebond II glue to the back I positioned it using the two Automax face clamps and then used C-clamps with scrap pieces of underlayment to hold it flat while protecting the veneer.  I then installed #6 5/8″ SR screws from the back to secure the face plywood.  I installed the upper panel using the same procedure.

We are using the same handle for the pantry that we have used throughout the bus.  Jarel made a 4-1/2″ by 8″ piece of 3/4″ walnut with coved edges to serve as a decorative base for the handle and to cover the joint between the upper and lower pieces of veneered plywood.  I marked the vertical centerline on the back and then marked two holes on 3″ centers, centered vertically.  I selected a 1/8″ drill bit, which was slightly larger in diameter than the #8-32 machine screws used to secure the handle, and drilled the holes from the back side using a block of 2×4 as a drill guide to make sure I went straight through the board.  (A drill press would obviously have been the correct way to drill these holes, and I have one, but it is buried behind other things where I cannot get to it.)

I clamped the decorative base to the front of the pantry centered horizontally and vertically on the joint between the two veneered panels.  Using the handle mounting holes I drilled all the way through the front of the pantry.  I bought special handle mounting screws the other night that are 2″ long but can be broken off at 1/4″ intervals.  I needed a 1-3/4″ length, so I inserted the screws through the holes from the back and broke off the first section with a pair of pliers.  I screwed them into the handle, temporarily securing the block.  I then drilled four countersunk holes from the inside of the pantry into the back of the decorative block and secured it with 1-1/4″ self-drilling screws.  I left all of the other clamps in place while the glue dried.

The only thing I did not get done on the pull-out pantry was attaching the door stop to the bottom of the face.  I will take care of that tomorrow.

Linda called at 3:30 PM to let me know she was on her way home.  I started working on remounting the accelerator pedal.  I got the pieces of old tile that were installed in that area and used them as templates to mark the location of the mounting holes.

Yesterday I discovered a grease fitting on the steering column.  It is located towards the center front of the bus about 8″ up from the floor.  Joe has never put grease in this fitting when he has serviced the chassis and for all I know it may not have been greased since it left the factory.  I wanted to get some grease into this fitting before I remounted the steering column shroud but I did not have a grease gun so I put that on my next shopping list.

Linda got home a little quicker than usual due to lighter than normal traffic.  After changing into her work clothes and grabbing some pretzels for a snack she came out to the bus to help.  I set the accelerator pedal upside down on top of the brake pedal to get it out of the way and drilled holes at the three points I had marked.  Linda handled the vacuum cleaner as we are trying to keep the coach clean.  I set the accelerator pedal where it belonged and started the three lag screws by hand.  Linda then held the pedal up while I tightened the three screws with a socket and ratchet.  I also drilled a small hole for a screw to secure the cable clamp on the accelerator wiring harness and installed that by hand as there was no room for the Rigid drill/driver.

I did not want to install the steering column shroud until I had greased the fitting but I went ahead and installed the base bracket.  Again using an old tile as a template I lightly marked two of the five holes.  I removed the old tile, set the bracket in place, and lined it up with the two marks.  I then marked the other three holes.  I selected a suitable drill bit, smaller than the diameter of the screws, and drilled through the tile and a little ways into the plywood below.  The screws were 5/8″ pan head Philips so I installed them by hand.

It was finally time to install the two front seats.  We got the base/pedestals from the library and checked to make sure the paint was dry.  It was, so we moved them to the bus.  I was going to install the driver’s seat first but the 3/4″ holes I had drilled in the tile when I installed it were not big enough.  Actually, they were exactly the right size if they had been in exactly the right place.  I needed to enlarge them to 1″ but did not have a 1″ drill bit.  I added that to my shopping list and we proceeded to install the passenger seat.

I set the base over the four captive mounting bolts and put a large/thick washer over each one followed by a substantial lock washer and finally a nut.  I ran the nuts down by hand as far as I could and then used a socket and ratchet to snug them down.

By now it was half past dark.  We needed dinner and stuff for the bus so we headed to Lowe’s where I bought a 1″ twist drill with a 1/2″ shank.  We then went to the new Panera, on the same property as Lowe’s and Walmart, for dinner.  This Panera had a different look and feel than the older ones, which a much smaller bakery section, but the food and coffee were the same and were good.  After dinner I drove across the street to O’Reilly’s Auto Parts and bought a grease gun.

On the drive home I decided to defer greasing the steering column until tomorrow. Our priority was getting the driver’s seat installed.  I used the 1″ twist drill bit in our 1/2″ Craftsman drill to enlarge the four holes.  The base/pedestal has 1″ long alignment tubes on the underside so the holes in the tile and underlying plywood had to be big enough to allow for less than perfect positioning.  With the holes enlarged I dropped the base in place, set a large washer over each hole, and threaded the new bolts into holes in the structure of the bus.  That was the end of the bus work for today.  We retired to the basement recreation room and watched NCIS and NCISNOLA before going to bed.


2015/11/16 (M) Tiling the Cockpit, #3

Linda planned to go to the bakery today but decided yesterday to stay home and help me instead.  Based on the 10-day forecast this looks like our last decent weather day to work on the bus and we wanted/needed to make the most of it.

We had breakfast at 8 AM (granola with blueberries and a banana) and had a cup of Stash China Black tea.  I had a text message from Kristine Gullen regarding getting together with her and Jim on Saturday and replied in the affirmative.  We finished our tea by 8:30 and got to work.

I really wanted to finish tiling the cockpit of the bus, or at least as much of it as we could.  That meant cutting and fitting tiles for the stair treads and risers and the two side walls of the entry steps, gluing them in place, and then grouting all of them.  We needed to mount the table if possible and I also needed to build a new step for the platform.  That was a lot to get done in one day and even before we started I doubted that we would get it all done.

When we opened the bus we were surprised to find that the tiles on the walls of the platform had slipped all the way down to the floor tiles.  Obviously I should not have removed the spacers right after installing the tiles and should have to left them in place for any horizontal grout spaces on vertical surfaces.  Oh well, not much to do about it now.

Keith called to see if he should come and mulch the leaves one last time.  The weather the last few days had been very nice, unseasonably warm and dry.  Today was also a beautiful day but the forecast going forward was for much cooler and wetter conditions, so this was an ideal day for our last lawn mowing of the 2015 season.

We measured and cut the tiles for the face of the platform and out to the door.  At that point I evaluated what I needed to do to complete the job.  Basically, I needed to cut all of the tiles for the entry steps and walls and then install them from the bottom up.  Every piece of tile was going to be smaller than a full 16″x 16″ tile and custom cut so even though the square footage was not that much there would be more pieces than usual and it was obviously going to take quite a bit of time to get all of the pieces ready to install.  I thought we could be ready for adhesive in two hours but Linda figured it would be at least three.  It also meant working with the door open which would make it difficult to keep the interior as warm as we needed.

Phil showed up with his excavator and a dozen bales of straw.  I knew the excavator was for a different job as he did not have anything left to do at our place that required it.  He was here to finish covering the topsoil and grass seed with the straw.  We took a break to go talk to him and confirmed that he was done with the driveway and French drain projects except for the straw.  He staged the bales where he needed them but said he had to leave to dig a perk test hole at 1:30 PM and would be back mid-afternoon to finish spreading the straw around.

Linda suggested that we go ahead a grout all of the tile we had already installed.  I was more emotionally invested in completing the tile work than Linda but had to agree that this was the prudent thing to do.  Until the tile was grouted we could not reinstall the accelerator, the steering column shroud, the seat bases, and the seats, so grouting the tile was clearly a critical path item and that is what we did.  It was after noon by the time we finished so we took a break for lunch.  Phil had taken off by this time to go dig the test pit.

Lunch was grilled vegan Italian sausage on a bun with mustard and relish and black grapes on the side.  Keith finished up mowing the yard while we were enjoying a cup of Rooibos tea.  We paid him and chatted about next year.  I gave him our approximate timeframe for returning home from Florida and asked him to go ahead and start mowing next spring whether or not we were here.  We have had Keith take care of our lawn since we bought our house in the country and he has been very good about doing that when we are away and allowing us to catch up with him when we get back.

By the time we got back to work on the bus it was after 1 PM and I had to concede that we were done working on the tile until next spring except for cleaning them, which had to wait until tomorrow as the grout has to cure for 24 hours before final cleaning.  With that decision made we considered what else needed to be done and in what order.

The first order of business was painting the two front seat bases black.  We spread out painter’s plastic on the driveway and taped it down.  We set the bases there and then masked off the top portion with the swivel bearings and mounting bolt.  We wire brushed the bases to remove rust and then went over them with a sanding sponge.  I used a cleaner/degreaser and water to clean them and then gave them a coat of black rubberized undercoating paint.

The next order of business was getting all of the tools and materials that we no longer needed out of the bus to give us room to work on other things.  On Saturday I re-installed the bump out on the walnut cover for the passenger side HVAC duct.  The duct needed to have two 4″ holes drilled in it to match the holes in the metal duct, so that was the next task.  I measured very carefully and transferred the measurements to the face of the cover with equal care.  Even so, I was off slightly and had to use the sheet metal nibbler to enlarge the bottom of each hole.  At least I had a relatively straightforward way to fix this problem; I am not always so lucky.

With the holes enlarged we put the cover in place.  The 4″ round plastic registers fit through the wood into the duct but not all the way due to two tabs.  I trimmed the tabs off using the Porter-Cable oscillating saw and trimmed a little bit off of one of the outer mounting flanges to make it fit flush.  I drilled holes through the two mounting holes on each register using the #5-6 self-centering drill bit and secured them with #6-5/8″ SR screws.  We then removed the two temporary black plastic registers from the front of the built in sofa.  I trimmed the tabs off of two new brown ones and installed them using the same procedure as the first two.

In the grand scheme of things getting the cover in place and the four registers installed was a small task but it needed to be done and stood in the way of other things.  The cover has been stored on top of the two front seats, which have been lying on their backs on the kitchen floor of the bus for weeks.  We plan to re-install the seats late tomorrow afternoon.

Two more small, but critical, tasks were securing the pull-out pantry and the refrigerator.  I have assumed for quite a while that we would secure the pantry for travel with some form of sliding latch but had not thought about it in any detail.  We also needed to secure the refrigerator but I had not thought about this in any detail either.  As we pondered the pantry latch it slowly became obvious that we did not have enough wood for a strike plate to receive a pin and we did not have two unobstructed surfaces that were in the same plane, which would be required for the kind of latch I had been thinking about.

As for the refrigerator, one of our bus nut friends secured their unit by running mounting bolts (machine screws) through the floor of the cabinet above the fridge and threading them into the unused tapped holes provided for the upper door hinge (if it was reversed) .  After looking at it for a while we realized that we could attach a section of small angle to the inside of the right alcove wall with the other side just against the face of the fridge case but not over so far as to interfere with the door gasket.  My measurements indicated that a 1/2″x3/4″ angle would be just right.  It looked to me like two 12″ pieces, one by the freezer door and one by the bottom of the fresh food compartment door, would be more than adequate to keep the refrigerator from rolling out as it cannot shift sideways or twist due to the aluminum angle on the left/hinge side at the floor.

About this time Phil returned in a red pickup truck.  He finished distributing the straw and loaded three unused bales into the back of his truck.  He pulled up in the main drive and we invited him into the bus to see what we had been working on all summer.    It is always a pleasure working with Phil.  If/when we build a barn we will have him do all of the site prep and finish grading.  He will figure out the final cost for the driveway extension and French drain and send us an invoice.

Linda prepared an easy but tasty dinner consisting of a nice green salad, mixed frozen vegetables (corn, peas, and carrots) suitably reheated, and mac-n-cheese that was both dairy-free and gluten-free.  After dinner we went to Lowe’s and The Home Depot.  At Lowe’s we bought a 1/16″ thick 1/2″x 3/4″ aluminum angle and three 8 foot lengths of brass colored nose edging but did not find a latch that we liked.  At The Home Depot we bought some screws for securing the handle on the front of the pull-out pantry and a solid brass door stop to keep the pantry in place.  The door stop folds up when not in use and should work to keep the pantry closed while traveling.

Although the new Panera on the southwest corner of Grand River Avenue and Latson Road was finally open for business we stopped at Teeko’s Coffee and Tea on the northeast corner of that intersection.  Jeff was there and took our order for eight pounds of coffee beans.  We got two pounds each of Ethiopian Yirgacheffe, regular and decaffeinated, the Seattle Blend (regular), and the Sweet Dreams blend (decaffeinated).  They will roast the beans and then let them outgas for a few days before vacuum sealing them in half-pound portions.  This allows us to take them with us in the bus and keep them very fresh until we are ready to use them and to change what we are drinking more often.

We got home just after 8 PM and took our iPads downstairs to use while we watched our Monday evening CBS TV programs.  We caught the weather forecast and then headed to bed.  It looks like we will have two more days with unseasonably high temperatures near 60 degrees F but with intermittent rain and then a serious cooling trend with highs this weekend barely above freezing.  Our time for working on the bus and being in Michigan is definitely running out.


2015/11/08 (N) SLAARC Elections

Madeline was in bed last night at 8 PM and fell asleep quickly.  We were in bed before 10 PM.  Linda fell asleep right away and I put my iPad away and turned off the light at 10:30 PM.  Good thing, too, as Madeline started coughing at 5:30 AM.  Linda got up at 6 AM and brought her into our bed.  I don’t know if she ever fell back asleep but we all stayed there quietly enjoying the warmth of the covers until 7:30 AM, by which time the house was warming up.  Hurrah for programmable thermostats!

Being Sunday morning, and having Madeline here, we were in no hurry to get up, get dressed, or get busy.  Not that we had nothing to do, we just were not in a hurry to do anything.  Linda prepared baked French toast last night, with a little help from Madeline, and let it sit overnight in the refrigerator.  She got up at 6:45 to pre-heat the oven and again at 7 to put the dish in to bake.

I got up at 7:30 and made coffee.  The downlight over the end of the counter where I make the coffee burned out last night so I replaced the bulb.  Linda set the table and took the French toast out of the oven at 8.  When she cut into it and served out pieces for each of us it was obvious that something was very wrong.  Instead of baked French toast we had inedible goo.  Linda has had very few recipe failures since we switched to a whole-food plant-based (WFPB) vegan diet but this one took first place.  She mentioned that it was a different recipe than she has used in the past and that she used an egg replacer she has not used before which did not seem to dissolve correctly last night.

Linda was willing to make vegan pancakes but I did not see any reason for her to go to that trouble.  We still had plenty of granola, part of a loaf of cinnamon raisin bread, and fresh berries, all of which made for an easy but tasty breakfast.]

Madeline plays (at) the organ.  It is one of her favorite “toys” at our house.

Madeline plays (at) the organ. It is one of her favorite “toys” at our house.

After breakfast I cleared the table and then read a book to Madeline while Linda cleaned off the dishes.  I turned on the fireplace and we drank our coffee in the living room while Madeline found various things to play with, ultimately ending up at the organ.

By 9:30 AM we were feeling like getting dressed.  I put in my work clothes and finally got to work in the bus at 10 after turning up the thermostats in the library, garage, and bus.  The first thing I needed to do was screw down the last/top layer of SurePly underlayment in the landing and driver area.  I used #6 SR (square recessed) self-drilling wood screws in three different lengths based on what was underneath the underlayment.  I chose to use screws rather than staples for several reasons.  The main one was that I needed the ability of the screws to pull things together.  The other reason was that I did not want to get the air compressor and stapler out for this relatively small number of fasteners.  (The SurePly underlayment for the main floor of the bus was stapled with approximately 350 staples per full 4’x8’ sheet.)

I pulled up the larger piece of SurePly one last time, measured the location of the boundary between the original bus floor and the new patch, marked the boundary on the top of the large piece, and put it back in place.  I carefully aligned the smaller piece to the stair edge and along the front and made sure the larger piece also fit correctly.  The smaller piece sits entirely on the new landing, which is 3/4″ plywood, so I secured it with 1″ screws, spacing them 2-to-3 inches apart along every edge and about 4 inches apart in the field.

The 1/2″ piece of plywood just forward of the driver’s seat was partially unscrewed and needed to be screwed back down.  Since it was installed over the original 1″ thick plywood bus floor I replaced the existing screws with 1-1/4″ screws and added more, especially along the edges.

To secure the larger piece I used 1-1/2″ screws over the patch, which was already about 1-1/4″ thick.  Over the original 1″ thick plywood bus floor I used the 1-1/4″ screws and over the 3/4″ thick landing I used 1″ screws.  I ran out of the 1″ length before I got the larger piece secured.  As much as I did not want to spend time driving around today I could not finish this task without the proper screws so around 11:15 AM I headed off to Lowe’s.  As long as I had to make the trip I looked for washers to space up the mounting bolts for the passenger seat pedestal base and nylon washers to go under the nut on the main mounting stud for the two swivel bases.  I found something that might work for the former but not the latter.

Linda and Madeline were getting ready to leave as I returned home just before noon.  Madeline was upset because Linda made her wear a sweater under her coat and she did not want to.  She is generally a cheerful and pleasant little girl but we never know when or why she is going to draw a line in the sand.  She doesn’t always or even usually get her way but she is persistent.  The tears, of course, are not the result of genuine injury and are usually quickly enough wiped away by focusing her attention on something else.  They finally pulled out of the driveway at 12:15 PM for an outing at Kensington Metropark.

I finished securing the larger piece of SurePly over the landing and then started on the next task.  I had decided to patch in an area at the end of the passenger platform where it drops down into the back of the driver area.  The area to be patched was only 12-3/4″ long and less than 4″ wide but the underlying metal was rounded over in this area and there wasn’t much I could use to attach new wood.  The area was also deep and not level.  I ended up making a sandwich with two layers of SurePly, two wood shins on top of those, and a piece of 3/4″ plywood on top.  I got all of the pieces cut and fitted and then marked them with pencil lines down the exposed edges to act as alignment marks.

I carefully assembled the sandwich upside down in the shop and screwed it together from the bottom.  I then put it in place in the bus and measured for a vertical piece with an angled rear edge to catch the outside edge of the patch and hold it up.  I secured the patch with one 1-1/2″ screw near the front and secured the vertical piece with one screw into the same piece of wood.

Building and installing this patch took a while and I was just finishing it when Linda and Madeline got home around 3:30 PM from their trip to Kensington Metropark.  By this time it was too late to start working on the underlayment for the passenger seat platform as I needed to stop working at 4 PM and get cleaned up for our amateur radio club meeting this evening.  With the little time remaining I unscrewed the top of the step and removed the two screws that held it to the rear and side walls of the co-pilot/navigator platform.  I then removed a half dozen flat head wood screws that held a piece of metal trim to the front edge of the platform.

The screws were rusted but came out.  The issue for my work was that the heads were not countersunk and stuck above the metal in a way that would interfere with installing the sheet of underlayment.  I used a 7/16″ drill bit to create tapered holes and may go back tomorrow and use my countersink bit.  I looked, but did have any appropriate screws to replace the ones I took out.  That meant another trip to Lowe’s which I could do after dinner on my way to the ham radio club meeting.

I put the two swivel pedestal/bases back in the landing and locked the bus.  I made sure everything was in the garage that needed to be and closed the overhead door.  I showered and shaved and put on clean clothes.  I then sat on the living room sofa with Madeline while Linda fixed dinner.  I worked on this post while Ms. M played games on Linda’s iPad.  It’s amazing to watch a 3-year old manipulate an iPad.  Their use of the touch screen is intuitive, which is cool, and it holds their attention in a way that other activities do not, almost to the point of obsession or addiction, which can border on troubling.  In spite of how much Madeline likes to eat, Grandma Linda had to gently take the iPad away and get her to come to the table for dinner.

As part of her food planning for this weekend Linda had picked up some mock turkey patties with gravy.  She also picked up some vegan heat-n-serve mac-n-cheese.  Those were the main course this evening along with a nice green salad and the rest of the fresh pineapple.  Dessert was going to be cake but I had to leave before it was served.

I left at 5:30 PM and drove to Lowe’s in New Hudson.  I monitored a QSO between Mike (W8XH) and Steve (N8AR) until Steve reached the meeting location in South Lyon.  I then called for Mike and we chatted until I reached Lowe’s.  I bought a box of 1-1/4′ long # 12 flathead wood screws and picked up three 40 W appliance light bulbs for the microwave in the house as the installed ones had burned out.

I got to the Witch’s Hat Depot at 6:35 PM so I had a chance to visit with my fellow hams before the meeting started at 7 PM.  Steve (N8AR) had a display set up with several different DC power meters he ordered off of EBay.  The business meeting was longer than usual because we had to elect officers for 2016.  The process was very smooth, surprisingly so actually, but still took 10 minutes.  The meeting was done by 7:20 after which the club president, Harvey (AC8NO), did a presentation on his Icom IC-7200 portable base station transceiver.

I was back home by 8:40 PM.  Madeline had already gone to bed so Linda and I had some quiet adult time to enjoy a cup of hibiscus tea.  We were both tired after long days of work and play but we did a lot today and felt good about the things we accomplished.


2015/11/07 (S) Measure One, Cut Twice 

We were all up at 7 AM.  I got dressed and left at 7:25 AM for the SLAARC breakfast in South Lyon.  Linda and Madeline had toaster waffles and fresh berries for breakfast at home.  The main reason I went to breakfast was to talk with Larry (K8UT) about a plug-in for WordPress that he recently found and though I might want to use for the SLAARC website.  He purchased a five site license for the full version of a survey plug-in and was willing to donate one use to the ham radio club.

When I got home at 9:30 AM the girls were getting ready to leave.  Linda’s plan for the morning was to take Madeline to the Howell Public Library.  The library has a very nice play area for younger children and a good selection of children’s books.  Apparently they planned to be gone for a while because they had a bag packed with snacks and other things for an extended outing.  I changed into my work close and when they left I resumed working on the bus.

My first objective was to cut the final piece of SurePly underlayment for the entry landing and area under the driver’s seat.  It was a large and complex piece that took me a long time to lay out even using the piece that goes under the driver’s seat as a template.  When I finally had it cut and drilled with the holes for the seat mounting bolts I took it to the bus to see how it fit.  Unfortunately I could not get it in.  It had to go under something on the front and back and also had to fit around curves and angles, and it just was not physically possible to get it in place in one piece.  It was immediately obvious that I would have to cut the piece into two parts but not so obvious how best to do that.

Linda and Madeline returned about this time (12:30 PM) and I was ready for a break.  They brought in their “haul” from the library—eight books and five videos—and laid it out on the living room coffee table.  The play market that Madeline likes so much had been replaced by a play kitchen.  The librarian told Linda they rotate the playsets every three months to keep it interesting for the children.

After going to the library Linda drove to the Brighton Mill Pond so Madeline could play at the Playscape.  Linda reported that Madeline has figured out how to pump a swing and is able to keep it going once someone helps her get started.  As a special treat they went to the ice cream shop nearby and Ms. M got a scoop of ice cream.  She did not tell me what flavor, but she said it had sprinkles on it.

It was going on 1 PM and seemed like a good time to have lunch, so Linda made hummus sandwiches with sliced onion for us and hummus on bread for Madeline.  She washed off a big bunch of grapes and we all enjoyed some of those too.  After lunch I read one of the library books to Madeline and then Linda read her a different one.  At that point I excused myself and went back to work on the bus.

I pondered the situation with the piece of underlayment and finally saw what appeared to be a natural cut line.  After considering where the tile would go, however, I decided against it.  Unlike the tile on the main floor of the bus, which is installed on the bias, the grouted joint lines in the cockpit/entry are going to run straight fore-and-aft and side-to-side.  I was not sure, however, exactly where they would fall.  I needed to avoid having a grout line fall on a joint between two pieces of underlayment so I ended up cutting the piece that covers the landing at an angle.  This gave me a smaller piece that tucked under the center console on the dashboard and a larger piece that tucked under some metal trim behind the driver’s seat.  I was now able to get both pieces in but they did not fit properly.

I had used my last large piece of SurePly to make the original single piece, and it had taken me hours to do, so I did not want to remake it.  I made any trips between the bus and the garage/shop, trimming a little bit at a time and rechecking the fit, until I finally got the piece to fit correctly.  In the process the piece had changed enough that the smaller piece was now too small and could not be trimmed to fit.  I searched through my scrap pieces of SurePly and found one that was almost big enough to remake the smaller piece, but not quite.

It was now 3:30 PM, and I still had some good daylight to work by, so I secured the floor patch under the driver’s seat.  The patch consisted of a 1/4″ thick layer of SurePly with a 3/4″ thick layer of oak veneered plywood on top of it to make a 1″ thick piece.  The SurePly was screwed to the 3/4″ plywood from underneath.  With the patch in place I installed another piece of 1/4″ SurePly that covered the patch and extended out over the old surrounding wood, which was still sound, and filled in the area once occupied by a 1/2″ thick piece of plywood.  I used 1″ self-drilling screws to secure the top layer of SurePly to the underlying wood, slightly countersinking the heads and pulling the underlying patch up tight while pulling the SurePly down tight to the old wood.  I walked on it and it felt secure.  There will be one more layer of SurePly and a layer of tile before the seat base gets re-installed.  Bolting down the base will obviously pull everything down tight to the structure of the bus if it isn’t already.

Linda and Madeline spent part of the afternoon baking vegan cupcakes.  Linda usually makes chocolate ones but I requested white/vanilla ones this time.  She found a recipe that looked promising and used it.  They needed frosting to finish the cupcakes so they bundled up and went to Meijer’s.  They got back a little before 4 PM, frosting and sprinkles in hand.

I needed more SurePly to continue working, not that I was eager to; I had spent most of the day trying to make one stupid piece of wood and still wasn’t finished.  The temperature had been dropping all afternoon and it was down to 55 in the garage, which was open so I could go back-and-forth to the bus.  I still had the antique SUN distributor tester in my car and determined that I could not get 4’x8′ sheets of material in the car with the machine in there.  Linda and Madeline put on their shoes and coats and came outside so Linda could help me get the tester out of the car.  I then went to Lowe’s.

I had a nice QSO with David (W8DRD) from our ham radio club on the way to Lowe’s.  At the store I was struggling to get the SurePly off of the top of the stack, which was above my head at the limit of my reach.  A customer stopped and helped me which I appreciated.  I needed one sheet to finish the driver/landing area and get the piece I need for the passenger seat platform floor, but I bought two sheets just in case the various scraps I have are not large enough to do the walls of the passenger seat platform.

I was back home by 5 PM and unloaded the two sheets of SurePly.  I put one on the 2x4s across the sawhorses and the other one in the small bay with the other sheet materials.  Linda and Madeline put their shoes and coats on once again and came outside so Linda could help me load the distributor tester back into my car.  Linda said we would eat dinner around 6 PM so I started working on remaking the small piece for the front portion of the landing.

I used the original piece as a pattern for the edges that fit properly but cut it larger than needed for the edge that needed to match the other piece where I cut it into two parts.  After getting it trimmed to fit correctly on three sides I put the larger piece in place overlapping the smaller one and traced the edge on the smaller piece.  I took it back to the garage and used the clamp-on saw guide to get a clean, straight cut.  When I took it back to the bus and set it in place it fit.  Success at last.

By now it was dark and getting close to dinner time.  I decided to leave the securement of this last layer of SurePly until tomorrow when I was refreshed and had better light.  I had hoped to get this landing/driver floor finished today, as well as the floor for the passenger seat platform, but given the difficulties and frustrations of today I felt like I had ended at a good place.  I locked up the bus and closed the garage door on my way in.  I expect tomorrow to be another good day, but then if I didn’t, why would I bother?

I changed out of my work clothes and put on my sweats.  Dinner was vegan cheeseburgers with a vegetable medley on the side and fresh pineapple.  Dessert was vanilla frosted white cupcakes with sprinkles.  After clearing the table I interacted with Madeline while Linda cleaned up a few dishes.  She and Madeline then prepared the baked French toast, which has to sit overnight.  As promised, once all of the stuff was done we went to the basement and watched one of the Daniel Stripped Tiger videos.  When we had seen enough episodes we turned off the TV set and went upstairs.  Madeline got into her pajamas and went to bed.  I put a load of laundry into the washing machine and then settled in to my usual evening routine.  I pulled the laundry out of the dryer at 9:45 PM and we turned in for the night at 10 PM.


2015/10/27 (T) The Pilot’s Seat

My morning started at 8 AM in its usual fashion.  I fed the cats, made coffee, started a load of laundry, made/ate breakfast (orange/grapefruit juice and granola with fresh blueberries), drank my coffee in the living room with the fireplace on and Jasper at my side, day-dreamed about high quality used Sony alpha lenses, and finally got to work on the bus a little after 10 AM.  Rain is coming tonight and forecast to stick around into Thursday so today would be a good day to do some more trimming, felling, and cutting up of dead trees.  The temperature this morning was still in the 40’s, however, and there is still much to be done in the bus.

A few days ago I installed a new AC outlet on the forward side of the cabinet behind the driver’s seat.  I wired it into the outlet on the aft side of the cabinet and then discovered that the original outlet was cracked.  I had also used an oversized cover plate on the new outlet and it interfered with the Corian cabinet top.  I finally got around to replacing the cracked outlet this morning.  I also switched the cover plates.  The regular size one still interfered slightly with the Corian top so I cut 1/8″ off of the top edge and added strips of felt on the three edges of the cabinet to raise the Corian top slightly and cushion it.  Everything fit nicely.  I turned the circuit breaker on and checked for power.  The outlets were good to go and I checked this mini-project off my (mental) project list.

I took a break and called the Escapees RV Club to register Linda and me as staff for the July 2016 Escapade.  I then called Josh at Coach Supply Direct regarding extra brackets for our MCD shades/brackets, the wiring of the passenger seat switch, and the correct orientation of the swivel bearings.  I learned that the flange, which wraps around the other piece on the inside of the ring, goes down.  (I had puzzled out that it should go the other way so I am glad I asked.)  When I was done with my phone calls I had a quick lunch of Sabra Roasted Red Pepper Hummus and Snyder sourdough pretzel nibblers.

My next task was unbolting the driver seat pedestal base from the floor.  The pedestal is secured by four large carriage bolts that go through holes at the four corners of the base plate and thread into nuts that I presume are welded into the floor structure.  The base had to be removed in order to remove the old vinyl floor tile which was installed under the base.  To get the old tile out I also had to remove a plastic cover around the steering linkage and a floor mounted bracket that retained the bottom if it.  Last, but not least, I had to unscrew the accelerator bracket from the floor by removing three small lag screws.  The accelerator is electrical, with a cable that runs through the floor, but other than limited access it was easy to detach.

Removing the old vinyl tile from the driver’s area of the cockpit was relatively straightforward.  It’s somewhat flexible and wasn’t glued down that tightly.  When Creative Mobile Interiors installed the tile they laid it out in a way that allowed the pieces to be trimmed in reasonable ways to fit around the steering column and brake pedal.  The brake pedal is mechanically linked to a complex multi-port air valve in the compartment under the floor and any finished floor has to be installed around it.

The plywood under the driver’s seat area was depressed directly under the base.  It seemed unlikely that this was the result of the base being bolted down.  It may indicate that this area also got wet like the area under the passenger side seat base.  I plan to install SurePly underlayment on the floor under the passenger seat but not the under the driver’s seat so I will either have to replace this piece or use floor leveling compound to fill the depressed area.  Replacing the plywood is probably the correct, but more involved, solution.

I started thinking about installing the new tile so I laid out all of the old tiles on the floor in the garage, kind of like putting a simple jigsaw puzzle back together.  I plan to use them as a pattern to cut the new tiles.  With a clear view of the whole driver’s area I became intrigued by the lower sidewall counsel next to the driver’s seat.  The more I looked at it the clearer it became that Royale Coach had cut the top off of a bumped out area, removed the upper three inches of the wall of the bump out, replaced the top piece, and tried to fill in the three inch gap in the side wall.  They had also cut out an access plate and then screwed it back in.  It eventually became obvious to me that they had done this to create horizontal space for the wide Villa driver’s seat that was in the coach when we bought it.  Had Royale Coach left the ISRI seat in place these modifications would not have been needed.  They were originally hidden under carpet but once the carpet was removed the really poor quality of the workmanship in this area was all too apparent.

I probably should have applied adhesive remover to the stairs and walls around the cockpit but it has to sit for 1 to 3 hours and the timing wasn’t right.  The weather was still decent and I needed to finish working on the trees at the west end of our property.  The adhesive remover can be left on for up the 24 hours so applying it at 5 PM with the intent of removing it the next morning might be ideal.  The weather forecast for overnight, through tomorrow, and into Thursday, however, is for rain and colder temperatures, so they will not be good mornings for working with the door of the bus open.

Around 3:30 PM I had a banana nut muffin and then called Phil at Precision Grading.  I got his voice mail and left him a message.  I was getting ready to use the chainsaw to cut down a small dead tree at the west end of the property when Linda texted that she was leaving the bakery.  A few minutes later Chuck called.  He had some carpet remnants for us and was nearby so he came over.  He could not stay long but took the time to look at what I was working on in the bus before he left.  It would still be awhile before Linda got home so I took the chainsaw to the west end of the yard, cut down the tree, de-limbed it, and cut it up into manageable size pieces.  I then cut up another tree of similar size that has been on the ground for a while and cut up some of the larger branches that I trimmed off the trees yesterday.

Linda got home while I was finishing the tree work and started fixing squash and a lentil/quinoa pilaf for dinner, both of which would take some time.  After cleaning the saw and putting it away I took one of the carriage boots from the bus driver’s seat and went to Lowe’s to see if I could find slightly longer replacements.  The old ones were somewhat rusted and some of the threads were in less than ideal condition.  The new Armstrong vinyl tiles are also a bit thicker than the old ones and I wanted to make sure I had bolts that were long enough to completely thread into the retained nuts.  It turned out that the bolts are metric, specifically M12-1.75×80.  Lowe’s had Grade 8 M12-1.75×90 bolts (10 mm longer than the 80s) so I bought four.  I also bought some thick M12 fender washers that were larger than the old ones.  While I was there I picked up a role of red electrical tape.

Dinner was excellent.  The squash was baked without butter (vegan) or brown sugar but was very tasty.  The pilaf had onions, garlic, and mixed greens and was very good.  We finished the Witch’s Brew wine from Leelanau Cellars that Linda used to poach the pears on Saturday.  The squash did not look that big, but neither of us was able to finish our half so we saved it for tomorrow’s lunch.

I checked e-mail after dinner and then we settled in to watch our Tuesday night TV programs.  We caught the weather report at 11 PM and then turned off the television and lights.  I turned down the brightness on my iPad display and worked for another 30 minutes before going to sleep.  I did not hear back from Phil this evening but I already knew he would not be here on Wednesday if the rain came as forecast as he had another job to work on that was better suited to working in rainy conditions than ours.


2015/10/25 (N) Bus Dinner

It was 44 degrees outside when we got up this morning but cozy in the house.  We were out of Linda’s homemade granola so we had oatmeal for breakfast.  It’s a nice change of pace on occasion and was a hot, hardy start on a chilly day.  I made a pot of Sweet Seattle Dreams coffee and we had a quiet morning in the living room.  We talked about going to the Howell Farmers Market, as today is the last day of the 2015 outdoor season, but did not need anything and given the temperatures decided not to go.  I changed into my work clothes at 10:30, went out to the bus, and turned up the thermostats to raise the interior temperature.

My focus in the bus today was tasks that I could not do alone.  I got my 15/16ths closed-end ratcheting wrench and removed the main retaining nut from the driver’s seat and from the front passenger seat.  Each of these nuts threads over a vertical stud that is fixed to the pedestal/riser which is in turn bolted to the floor.  In between the top of the riser and the bottom of the 6-way power base is a ball-bearing swivel plate which is centered on the mounting stud.  To get to these nuts I had to move the seats forward using the motorized bases and reach in from behind but I had good access and the nuts were not hard to loosen and remove.  I bought this closed end ratcheting wrench specifically for removing/installing these seat mounting nuts and it was worth every penny I paid for it.

With the nuts removed I unplugged the 12V DC power supply wires to each seat.  Linda and I were then able to lift the seats off of the pedestals without too much difficulty, carry them back into the kitchen (of the bus), and lay them down on their backs on the floor, which was protected with blankets.

The reason for removing the seats was two-fold:

  1. We were going to hang wallpaper on the living room walls where they merged into the cockpit and needed better access to those areas, and
  2. I plan to tile the floor and walls in the cockpit and entry this coming week and needed these seats out of the way in order to be able to do that.

Our next task, preparatory to hanging wallpaper, was to remove the walnut cover (half box) from the front eight feet of the passenger side OTR HVAC duct and wiring chase.  We set it across the two seats we had just removed to get it out of the way.

Bruce marks a piece of wallpaper on the dining room table in the house before cutting it.

Bruce marks a piece of wallpaper on the dining room table in the house before cutting it.

When we were finally ready to start wallpapering we needed three relatively short pieces; two to finish the driver side and one to finish the passenger side, at least as far as we intended to go.  I made a sketch for the shape of each piece, took measurements, and added them to the sketches.  The wallpaper is 26.5″ wide on the roll and the longest piece we needed was only 24″.  I got the 3′ and 6′ rulers from the shop while Linda got the roll of wallpaper.  We used the dining room table in the house to measure, mark, and cut each piece.  Although relatively small these pieces took some additional, careful, attention because they had to fit over, under, and around cabinets and window trim.  To make the installation easier I trimmed away as much of the waste material as possible before hanging the piece.

Linda partially filled two 5-gallon buckets with water, added soap to one of them, and brought them out to the bus while I retrieved the paint tray and liner and the 6″ pasting brush.  We laid out all of the wallpaper tools, put a towel on the floor, and set the paint tray/liner on the towel.  I poured the amount of wallpaper paste I thought we would need into the tray and started with the piece of wallpaper at the right end of the built-in sofa (towards the front of the bus).

As we had done previously everywhere else in the bus I applied the paste to the wall rather than to the back of the wallpaper.  The wall behind the sofa had been primed but the small strip above/behind the end cabinet and around into the cockpit had not been, so I used more paste in the unprinted areas.  This first piece required a lot of trimming so it took a while to hang but it looked good when we were done.  As I got each piece installed, with Linda’s help, she rolled the seams and then washed off the excess paste with a large sponge using the soapy water followed by a second sponge with clean water.

We continued along that wall towards the front of the bus with the second piece.  It did not require as much trimming as the first piece and went in a little faster and easier.  I overlapped the thin strip above/behind the cabinet with the first piece and cut through both of them to create a clean, tight seam.  When we hung wallpaper in our house many years ago all of the seams were done by overlapping adjacent panels and cutting through both pieces.  The paper we are using in the bus, which is actually vinyl, is installed by butting the factory edges together.  This certainly simplifies installation, and speeds it up a bit, but it is harder to get a perfect seam.  Still, it was the right choice for our motorcoach as it is washable and scrubbable and goes very well with the interior.

On the passenger side of the coach I pasted up the last section of the living room wall and part of the small section of wall under the trim on the window next to the front passenger seat.  I ended up cutting off a small part of this piece and installing in separately as the trimming required was intricate and awkward to do.

After installing the two parts of this third piece we decided to go ahead and paper a small triangular section of wall above the bottom window trim.  I got a scrap of wallpaper from the house that was big enough to cover the right triangle shape and cut it approximately to size.  I pasted the wall, set the bottom edge flush to the sill, pressed the back edge into its vertical corner, and trimmed off the excess.  This little section of wall was capped by a piece of walnut that ran at an angle along the bottom edge of the glass.  I trimmed off the paper at the bottom edge of the wood trimmed and tucked the paper in under the walnut.

The reason we did not wallpaper all of the small wall section below the window is that part of the plywood wall is severely water damaged and a piece of it rotted and is missing.  There is no practical way to replace the plywood and the only practical way to repair this area is to panel over it.  We could use thin plywood and wallpaper it but we have enough of the 1/4″ walnut veneered plywood that we salvaged from the old refrigerator to panel this area.

We were done with the wallpapering by 2:30 PM.  Linda cleaned off most of the tools and then took the two buckets of water out of the bus to pour them out and clean them.  I took the paint tray/liner, pasting brush, and some of the tools to the laundry room and cleaned them.  There was very little paste left in the tray liner so I had estimated quite closely on the amount I needed for today’s work.

The swivel mechanisms for the two front seats consist of two rings separated by ball bearings and interlocked around the inside edge.  They have an ‘A’ side and a ‘B’ side and one of them was installed ‘A’ side up and the other ‘B’ side up.  They also have a large washer.  The driver seat was installed with the washer between the swivel bearing and the power base.  The passenger seat had the washer directly beneath the retaining nut inside the power base.  Given these differences I could not tell the correct orientation and order of assembly by casual inspection of the pieces involved.  It is possible that the swivel plates are, in fact, symmetrical and thus can go in either way, but one of the washers had to be in the wrong place.

My interest in all of this was motivated, in part, by the fact that both of these seats have always wobbled since we bought the coach.  The new seats are firmly attached to the power bases which seem tight but may have some play.  I was suspicious of the swivels, however, as the main source of the play.  I studied the design for a while and came to some tentative conclusions.

When the swivel plates are installed the ring on the bottom (that sits on the pedestal) is not going to move as the pedestal is bolted to the floor.  The top ring, which will be in contact with the power base, is going to move relative to the fixed bottom ring when the seat is tuned.  I decided that the larger ring, which wraps around the inside edge of the smaller ring, should go on the bottom.  With regards to the washer it seemed to me that it should go directly under the retaining nut, allowing the power base to swivel relative to the nut without loosening it.  Further, placing it between the swivel plates and the power base would potentially prevent the base from fully resting on the swivel plate and allow the whole seat to wobble.

I will examine all of this again more carefully when we are ready to reinstall the seats.  For now, I took the two swivel bearings to the garage to clean and lubricate them.  After wiping them off I sprayed them with WD-40, worked them around, and wiped them off again.  I then sprayed them with garage door lubricant, worked then around again, and wiped them off.  Finally, I worked Red Tack ‘grease’ into the ball bearing race, spun the rings to distribute it evenly, and the wiped the outer surfaces clean.  After cleaning the grease off of my hands I took the swivel plates back to the bus, wiped the pedestal plates clean, and set them back in place.

We quit working around 3 PM so Linda could cut my hair and beard.  I then shaved, showered, and got dressed for dinner.  Linda showered after me but was dressed and ready to go before I was.  We made plans yesterday to meet Bruce (W8RA) and Linda (K4YL) at Carrabba’s in Novi at 5 PM for dinner.  We left at 4:30 and arrived in Carrabba’s parking lot just after 5.

The parking lot was not full so we knew there would not be a wait for a table.  Bruce and Linda were already there and had opted for a booth.  The booths will seat six adults so they have more table space than a table for four. They also offer a bit more privacy for conversation in an otherwise not very private setting.

Carrabba’s had changed its menu since we were last here.  The one dish they had before, Tag Pic Pak (seriously), was no longer on the menu.  It was Linda’s favorite dish and one of only two that we could eat.  They had something with a different name that the waitress said was the same but it included chicken.  She said they could leave the chicken out but the price would still be $14.95.  The Tag Pik Pak was $10.95 as I recall.  We have come to resent paying for animal products that we don’t eat.  Linda ended up getting whole grain spaghetti with Pomodoro sauce and I got whole grain spaghetti with olive oil and garlic.  Linda said the sauce lacked flavor.  My dish was “off menu” and was unimpressive.  Our salads, dressed with vinegar and oil, were OK and the bread was very tasty.  Linda had a glass of wine and I had blackberry sangria.  Sangria is Spanish, not Italian, but it was good.  The meal overall was disappointing but we had a great time chatting with Bruce and Linda over dinner.  The manager stopped by to ask how our meal was (as a courtesy) and ended up having to talk to us for 20 minutes.

Back home Linda made vegan banana nut muffins.  The organic bananas we bought at Meijer’s two days ago must have been bruised because they were going bad very quickly.  Banana bread or muffins was a great way to salvage what we could.  While she made the muffins I went to my office, checked e-mail, and off-loaded the photos we took today.

At 8 PM I turned on the Yaesu FTM-400 ham radio and participated in the SLAARC Info Net.  When the net was over I came back upstairs, reviewed the items in my B&H Photo shopping cart, and placed the order.  I then spent a little time researching DC distribution panels on the DX Engineering website and doing a Google search for cantilevered table supports and legs.  We each had a muffin for dessert and went to bed at 10 PM.  I put on the Detroit PBS Create channel, turned down the volume, and worked on this post for a while before finally going to sleep.