My morning started at 8 AM in its usual fashion. I fed the cats, made coffee, started a load of laundry, made/ate breakfast (orange/grapefruit juice and granola with fresh blueberries), drank my coffee in the living room with the fireplace on and Jasper at my side, day-dreamed about high quality used Sony alpha lenses, and finally got to work on the bus a little after 10 AM. Rain is coming tonight and forecast to stick around into Thursday so today would be a good day to do some more trimming, felling, and cutting up of dead trees. The temperature this morning was still in the 40’s, however, and there is still much to be done in the bus.
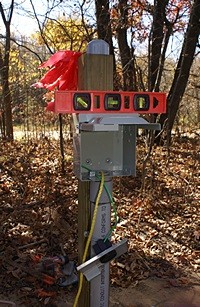
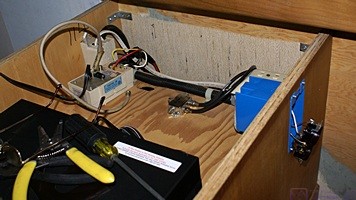
A few days ago I installed a new AC outlet on the forward side of the cabinet behind the driver’s seat. I wired it into the outlet on the aft side of the cabinet and then discovered that the original outlet was cracked. I had also used an oversized cover plate on the new outlet and it interfered with the Corian cabinet top. I finally got around to replacing the cracked outlet this morning. I also switched the cover plates. The regular size one still interfered slightly with the Corian top so I cut 1/8″ off of the top edge and added strips of felt on the three edges of the cabinet to raise the Corian top slightly and cushion it. Everything fit nicely. I turned the circuit breaker on and checked for power. The outlets were good to go and I checked this mini-project off my (mental) project list.
I took a break and called the Escapees RV Club to register Linda and me as staff for the July 2016 Escapade. I then called Josh at Coach Supply Direct regarding extra brackets for our MCD shades/brackets, the wiring of the passenger seat switch, and the correct orientation of the swivel bearings. I learned that the flange, which wraps around the other piece on the inside of the ring, goes down. (I had puzzled out that it should go the other way so I am glad I asked.) When I was done with my phone calls I had a quick lunch of Sabra Roasted Red Pepper Hummus and Snyder sourdough pretzel nibblers.
My next task was unbolting the driver seat pedestal base from the floor. The pedestal is secured by four large carriage bolts that go through holes at the four corners of the base plate and thread into nuts that I presume are welded into the floor structure. The base had to be removed in order to remove the old vinyl floor tile which was installed under the base. To get the old tile out I also had to remove a plastic cover around the steering linkage and a floor mounted bracket that retained the bottom if it. Last, but not least, I had to unscrew the accelerator bracket from the floor by removing three small lag screws. The accelerator is electrical, with a cable that runs through the floor, but other than limited access it was easy to detach.
Removing the old vinyl tile from the driver’s area of the cockpit was relatively straightforward. It’s somewhat flexible and wasn’t glued down that tightly. When Creative Mobile Interiors installed the tile they laid it out in a way that allowed the pieces to be trimmed in reasonable ways to fit around the steering column and brake pedal. The brake pedal is mechanically linked to a complex multi-port air valve in the compartment under the floor and any finished floor has to be installed around it.
The plywood under the driver’s seat area was depressed directly under the base. It seemed unlikely that this was the result of the base being bolted down. It may indicate that this area also got wet like the area under the passenger side seat base. I plan to install SurePly underlayment on the floor under the passenger seat but not the under the driver’s seat so I will either have to replace this piece or use floor leveling compound to fill the depressed area. Replacing the plywood is probably the correct, but more involved, solution.
I started thinking about installing the new tile so I laid out all of the old tiles on the floor in the garage, kind of like putting a simple jigsaw puzzle back together. I plan to use them as a pattern to cut the new tiles. With a clear view of the whole driver’s area I became intrigued by the lower sidewall counsel next to the driver’s seat. The more I looked at it the clearer it became that Royale Coach had cut the top off of a bumped out area, removed the upper three inches of the wall of the bump out, replaced the top piece, and tried to fill in the three inch gap in the side wall. They had also cut out an access plate and then screwed it back in. It eventually became obvious to me that they had done this to create horizontal space for the wide Villa driver’s seat that was in the coach when we bought it. Had Royale Coach left the ISRI seat in place these modifications would not have been needed. They were originally hidden under carpet but once the carpet was removed the really poor quality of the workmanship in this area was all too apparent.
I probably should have applied adhesive remover to the stairs and walls around the cockpit but it has to sit for 1 to 3 hours and the timing wasn’t right. The weather was still decent and I needed to finish working on the trees at the west end of our property. The adhesive remover can be left on for up the 24 hours so applying it at 5 PM with the intent of removing it the next morning might be ideal. The weather forecast for overnight, through tomorrow, and into Thursday, however, is for rain and colder temperatures, so they will not be good mornings for working with the door of the bus open.
Around 3:30 PM I had a banana nut muffin and then called Phil at Precision Grading. I got his voice mail and left him a message. I was getting ready to use the chainsaw to cut down a small dead tree at the west end of the property when Linda texted that she was leaving the bakery. A few minutes later Chuck called. He had some carpet remnants for us and was nearby so he came over. He could not stay long but took the time to look at what I was working on in the bus before he left. It would still be awhile before Linda got home so I took the chainsaw to the west end of the yard, cut down the tree, de-limbed it, and cut it up into manageable size pieces. I then cut up another tree of similar size that has been on the ground for a while and cut up some of the larger branches that I trimmed off the trees yesterday.
Linda got home while I was finishing the tree work and started fixing squash and a lentil/quinoa pilaf for dinner, both of which would take some time. After cleaning the saw and putting it away I took one of the carriage boots from the bus driver’s seat and went to Lowe’s to see if I could find slightly longer replacements. The old ones were somewhat rusted and some of the threads were in less than ideal condition. The new Armstrong vinyl tiles are also a bit thicker than the old ones and I wanted to make sure I had bolts that were long enough to completely thread into the retained nuts. It turned out that the bolts are metric, specifically M12-1.75×80. Lowe’s had Grade 8 M12-1.75×90 bolts (10 mm longer than the 80s) so I bought four. I also bought some thick M12 fender washers that were larger than the old ones. While I was there I picked up a role of red electrical tape.
Dinner was excellent. The squash was baked without butter (vegan) or brown sugar but was very tasty. The pilaf had onions, garlic, and mixed greens and was very good. We finished the Witch’s Brew wine from Leelanau Cellars that Linda used to poach the pears on Saturday. The squash did not look that big, but neither of us was able to finish our half so we saved it for tomorrow’s lunch.
I checked e-mail after dinner and then we settled in to watch our Tuesday night TV programs. We caught the weather report at 11 PM and then turned off the television and lights. I turned down the brightness on my iPad display and worked for another 30 minutes before going to sleep. I did not hear back from Phil this evening but I already knew he would not be here on Wednesday if the rain came as forecast as he had another job to work on that was better suited to working in rainy conditions than ours.