2014/10/16 (R) More Wiring
Butch had to go to Logansport this morning for parts and groceries. I stayed behind to continue working on the AC wiring for their bus conversion; after breakfast, of course.
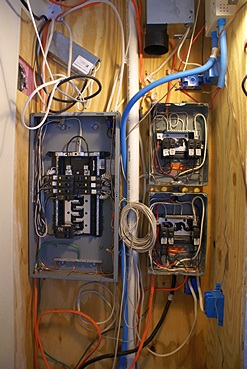
I mounted two 6-position AC main lug panels, one above the other, to the right of the 20-position panel we installed yesterday for the inverter circuits. The panels I installed today were for AC circuits that only run on shore power or the generator, not the inverter. The reason for two panels was: A) Butch already had them, and B) they were narrower than the larger panels and would fit in the available space on the right rear wall of the closet.
I had tied the main shore/generator power line to the inverter AC input line last night so the refrigerator, which is wired through the inverter panel, would have power overnight. I left those tied together for most of the day so the lights would work. I pulled all of the existing circuits that we disconnected yesterday into the boxes, dressed the wires, and connected/mounted the circuit breakers. By the time I finished Butch had returned from his morning errands. He connected the shoreline and I checked to see that we had 240 VAC between L1 and L2 and 120 VAC from each line to the neutral conductor. He then disconnected the shoreline and made sure the generator was off. Using the inverter to power a work light, I pulled the main power cable into the lower box and secured it. I then pulled the cable that feeds AC power to the inverter into the lower box and connected it to a 30 Amp breaker.
MC-9 house wiring. Inverter panel on the left, shore/genset panels on the right. DC upper left, solar upper right.
I plugged the shoreline back in but got a low voltage with no current on L2 and an Error Code 6 on the Progressive Industries EMS remote monitor display. Butch checked the plug and I just did not have it fully inserted into the outlet. Once he fixed that we got the correct voltages and no errors. We checked each circuit and everything checked out perfectly.
(Note: The shoreline is wired for “50 A” RV service, which is 240 VAC service from L1 to L2 but with an active neutral that provides two 50 A, 120 VAC power feeds with L1 and L2 180 degrees out of phase. As a result the currents in the neutral wire from L1 and L2 cancel rather than add. Butch has his generator wired for 120 VAC output and has L1 and L2 tied together on the generator side of the transfer switch. This makes the full 100 A output of the generator available to be shared between L1 and L2 in any proportion. Although this system can supply a full 50 A of current on both L1 and L2 at the same time, it could also supply 70 A or one and 30 A on the other unless this is prevented by circuit breakers. Also, regardless of the distribution of current between L1 and L2 the currents will add in the neutral as much as 100 A of current. Although sensible load management would prevent this from ever happening it is entirely possible to draw 30 or 35 A on each leg and end up with 60 – 70 A in the neutral. Thus, when designing your house AC electrical system this way, provision should be made for a neutral conductor that is sufficient to carry this amount of current. The advantage to doing your system this way is that the voltage regulation will be better under load than with a 240 VAC generator powering imbalanced 120 VAC loads on both legs as the 240 VAC configuration regulates the voltage between L1 and L2 but the voltage from L1 to N and L2 to N can be off substantially.)
Butch needed another non-inverter circuit for the front of the bus so we pulled a 10-2+g Romex cable from the electrical closet along the driver’s side wall/ceiling area and down into the cabinet at the front end of the kitchen counter. He and Fonda spent a bit of time cutting openings in the end of the cabinet for a two-gang outlet box and a single-gang outlet box. The two-gang box was for a pair of duplex outlets fed from the inverter panel and the wires were already run. The single-gang was for the new circuit we just pulled. When they were done I disconnected the shoreline so I could safely tie the new circuit into the lower panel. I then installed the cover plates on all three boxes and plugged the shoreline back in. We had the breaker turned off for the new circuit while I wired the outlet. I then energized it and it tested OK.
I repositioned a 12 VDC fused distribution box above the inverter panel and mounted it. I then moved a terminal strip for their solar panel wiring to a slightly different location to open up a space for Butch to drill a hole. At that point we were done working for the day. I changed into my non-work blue jeans and relaxed for an hour before dinner. During that time Butch called Jaral Beatty, a cabinet maker in Logansport and personal friend of Butch’s, and put me on the phone with him to see if he could come to Twelve Mile and finalize plans for a custom desk and printer cabinet for the bus. The weather forecast for tomorrow is for mild, mainly sunny, conditions and Jaral said he could come out mid-afternoon.
Butch and Fonda’s younger daughter, Brittani, and her husband, Sterling (Rock), were expected for dinner at 7:00 PM so I fixed a salad and heated some Amy’s chili for my dinner. Dinner was jovial and the first time I have eaten with Butch and Fonda at home on this latest round of working visits. Butch called Joe Leibherr and put me on the phone with him. Joe and Connie own the lot in Quartzite where we plan to spend part of the winter and I had a few questions for him. (Dale and Sherry Leibherr bought most of Butch and Fonda’s business assets. Dale is Joe and Connie’s son.) I had a nice long chat with Joe and was satisfied that it will be an OK place to spend part of the winter. Besides the full hookup 50A sites there is a laundry on site and Wi-Fi. Verizon cellular service is also apparently very good. Joe filled me in on some of things to do in town and suggested we bring our passports and visit Los Algodones, Mexico while we are in the area. Brittiny and Rock stayed until 11:30 PM so it was a nice, long visit. We were all really tired by the time they left and immediately turned in for the night.
2014/10/17 (F) VDO Air Power
After Brittani and Sterling (Rock) left last night I retired to the guest bedroom immediately but was up for a couple of hours responding to e-mails and writing my daily blog entry. I do not shut my computer down every night but I do shut it down occasionally, especially if there are updates available. Last night there were 28 updates. I was not up at the crack of dawn today, which was a shame as it was the nicest weather day we’ve had for the week just past and looks to be the nicest of the week ahead. Butch was up late last night as well, so we were both dragging a bit this morning.
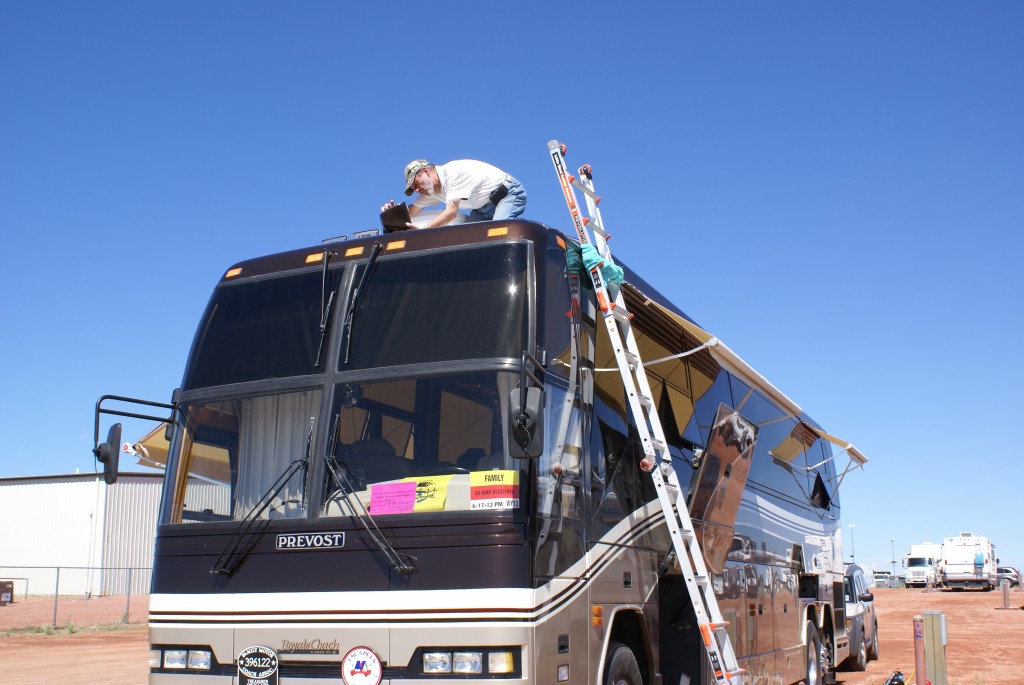
Following breakfast I readied the coach for travel, securing loose objects inside and checking that all of the bays were shut tight and locked. I switched on the chassis batteries and air valves, unplugged the shorepower cord, and went for a short test drive to calibrate our new VDO electronic speedometer. Butch mentioned that there was a funeral home on the northwest corner of SR-16 and US-31 where he had easily turned their bus around in the past. That turned out to be just what I needed for my test run as it kept me from having to go south on US-31 in order to make a U-turn to get headed back to Twelve Mile.
I had driven the coach last Sunday from Elkhart to Twelve Mile with the new speedometer set to its default pulses per mile and it indicated less than 1/8th of the actual speed as shown on our Rand-McNally 7710 RVND GPS. When I got to Twelve Mile I calculated the pulses per mile I thought would be close to correct and programmed that number into the instrument. On the first leg of my test drive this morning the indicated speed was still about 1/8th of actual. Either my programming did not “stick” or I based my calculation on a grossly inaccurate assumption.
I pulled into the far entrance to the funeral home parking lot and made a broad turn to get lined up with the other entrance. I switched off the ignition, held down the button on the face of the VDO, turned the ignition back on, and started the engine. The speedometer cycled through its three calibration modes and I stopped it on ADJUST and then selected UP as the direction the needle needed to move. The adjustment was a little tricky, especially while driving, but I figured out how to switch it between up and down. I got it adjusted to my satisfaction before getting back to Twelve Mile and after not adjusting it for a minute or so it reset and reverted to its standard speedometer/odometer display, only this time showing the correct speed and recording the correct mileage.
When I got back to Butch and Fonda’s house I pulled the bus around, blocking the street temporarily, and backed it in next to theirs. Fonda helped spot me for the final few feet. Instead of shutting the engine off I let it idle while I got my four chassis stands out of the warehouse and positioned them at the four corners of the bus. I put the engine in high idle and raised the body as high above the axles as it would go. I slid the stands into place under four frame members, dropped the idle to low, and gently lowered the bus until it was resting firmly on the stands. With the bus sitting on the stands it will now be safe to work underneath it when we get around to those projects.
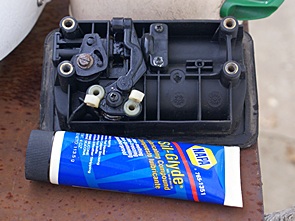
The next project was to replace the air filter / water separator for our auxiliary air system. Butch did most of the work on this project. He disconnected two air lines from the existing filter assembly, which includes a pressure regulator and a Schrader valve, and then unscrewed the mounting bracket from the rear wall of the bay under the driver’s seat where a lot of the auxiliary air system is housed.
With the old unit out of the bus he was able to work in his shop to remove the inlet and outlet fittings and clean them up on a wire wheel before reusing them. He installed the old fittings in the new housing using pipe thread compound and matched the alignment of the old unit so the air lines would fit back on to them. The two machine screws that were used to mount the old unit’s mounting bracket to the wall were too big for the slots in the new unit’s mounting bracket so Butch used his Bridgeport vertical mill to slightly enlarge the upper slots.
With the shop work done I took everything back out to the bus and installed it, which consisted of attaching the two air lines (with compression fittings), attaching the mounting bracket to the housing, attaching the mounting bracket to the rear wall of the compartment, and then tightening the two air line nuts. Butch checked my work and snugged the air line nuts another partial turn.
I turned on the auxiliary air compressor but it seemed to take a long time to start to build air pressure and Butch heard and felt a leak at the unloader valve coming out of the auxiliary air compressor. I shut of the aux compressor and he hooked up his portable air compressor to the air hose fitting in the passenger side engine bay which brought the pressure up in the auxiliary system very nicely. We turned his compressor off, turned the aux compressor back on, and bled enough air off to cause the aux compressor to run. It finished bringing the pressure up to the cutout value without difficulty. I sprayed all of the fittings with Simple Green and did not detect any leaks. We had noticed earlier that the lower half of the filter housing, which locks and unlocks in only 1/8th of a turn, had a loose fit. Once the system was pressurized, however, it tightened up.

Norgren auxiliary air filter / water separator (lower right).
The old unit had to be replaced because it was no longer made and the replaceable filters were no longer available. Once we had it out of the coach and disassembled I was surprised by how badly deteriorated it was internally. Aluminum, by definition, does not “rust” but it certainly can and does corrode (oxidize).
Butch and Fonda spent part of the day building and installing a slide out tray for one of the passenger side bays. It will hold his tool box on top and have room for miscellaneous storage underneath.
I got the Zena power generating module wiring diagrams for Butch to study while I ate lunch. We were just getting ready to start working on this when Jaral showed up. He and Butch and Fonda talked for quite a while about personal stuff while I started probing around in the driver side rear electrical bay for a place to tap into an ignition switched source of 24VDC power. I located a relay that looked like it would do the trick (R53). I broke off working on this to spend time with Jaral, who rode his scooter from Logansport to discuss some cabinetry project.
Jaral looked at Butch’s projects first as they are immediate. He then looked at what we want to do with the front part of our coach. We need to have a desk and a printer cabinet built out of walnut to match the woodwork that is already in the bus and Jaral is our cabinetmaker of choice. It sounds simple enough, but the reality is more complex. After talking it through with him (again) and taking some measurements we agreed that I need to make very careful dimensioned drawings of exactly what we need. I may try to do that over the winter but worst case is that it will have to wait until next spring and probably after we have removed the current furniture.
Butch and I worked on the Zena wiring for a little while after Jaral left. We determined that the two blue wires in the electrical bay ran to the Zena control modules in the engine bay and to the fan terminals on the Zena rectifier assembly in the house electrical bay. He had a tandem spade lug adapter that we used to tap into the power to the coil of relay 53. With the coach batteries on but the ignition off we did not have power to the fans on the rectifier assembly or the control modules in the engine bay but with the ignition on we did. That was a small but important success.
The weather had turned cloudy, windy, and chilly as the afternoon progressed. We spent a little while studying my house electrical bay and discussing how I might get the large battery charging cables from the ceiling-mounted rectifier to a Class T fuse and then to the batteries. I decided that was a problem I was not going to solve in the remaining hour of daylight and called it a day. By then it was 6 PM so I went to my coach to have dinner which consisted of a salad, tofu hot dog, apple, and a glass of Franzia Moscato. I retired to the guest bedroom around 9 PM, worked on my computer and iPad until about 10:30, and then turned off the lights.
2014/10/18 (S) Cold Wet & Windy
Even though I went to sleep at 10:30 last night I did not get out of bed until 8 AM this morning. Today’s weather forecast was for a 50% chance of rain with winds out of the WNW shifting to N at 15+ MPH and a high temperature of 50 degrees F. The 50% chance of precipitation turned out to be an all-day drizzle; not an ideal day for working outside. Nonetheless, I spent the late morning (post breakfast) working in our house electrical bay on the wiring for the Zena 24 VDC power generating system.
The only thing I actually accomplished was mounting a Class T fuse holder (with a fuse) to the ceiling of the compartment. That was a bigger accomplishment than it seems, however, as its location determined the lengths of the cables needed to finish the project. With a nicer day on tap for tomorrow I expect to get those cables made and installed. A final check of the wiring and installation of the drive belts on the alternator will complete the project, which I stated almost exactly two years ago.
Zena rectifier (upper left) and Class T fuse (upper center).
Butch and I went to Logansport in the early afternoon. He needed plumbing parts for his fresh water tank and ITR Oasis Combi project. I needed 2/0 lugs for my battery cables, some 3/8 compression nuts and sleeves, and some duplex outlet expanders. I found the lugs at Rural King (where we also got some free popcorn) and everything else at Home Depot. These stores happen to be conveniently located across the street from one another. The nuts and sleeves will be used to rig up a hose or tube so we can test the water flow coming out of the pipes that feed the kitchen faucet. The flow is much lower than it should be and we want to determine if it is due to the faucet or upstream in the piping. I found a small duplex to 6-out expander that would fit under the thermostat on the end of the kitchen counter based cabinet. I also found a duplex to 6-outlet expander with integrated surge protection and two USB charging ports. I bought two, one for the outlet on my side of the bed and one for the outlet on the outside wall just behind the passenger seat. This model is not illuminated like the one I installed on Linda’s side of the bed, but that’s OK.
We stopped at Butch’s parents’ house to investigate the source of a mechanical noise. It turned out to be a dehumidifier in which the fan motor bearings were squealing. Butch loaded it in his truck to take back to his house where he could more conveniently try to oil the bearings. We chatted for a while and then headed to Martin’s Supermarket so I could pick up a few grocery items.
When we got back to Twelve Mile I unloaded and stored my groceries and then installed two of the three outlet expanders. I could not install the one by the passenger seat as the outlet was too close to a wooden structure. There is an outlet box with a solid cover plate next to the duplex outlet and I will see if the outlet can be moved over. If not, I will install this unit behind Linda’s night stand at our sticks ‘n’ bricks house.
Butch’s brother, Tom, showed up and the two of them worked on installing the Blue Ox base plates on Butch’s Suburban. I spent the afternoon making a scale drawing of the passenger side of the front half of the coach showing the two Lambright Comfort Chairs, custom printer cabinet/table, and custom desk with pantry. I checked in with Butch and Tom and helped them a little bit with the base plate project. When they reached a stopping point, or at least a point where my assistance was no longer needed, I returned to my coach and fixed dinner.
I had a salad of power greens with cranberries and peanuts, some apple sauce, and the leftover Mjadra from La Marsa, the last of my frozen leftovers from our dinner at the Brighton location with Bruce and Linda Whitney. A glass of Franzia Moscato was quite agreeable. Butch and Fonda had not eaten their dinner yet, so I worked in the guest bedroom at my computer while they ate.
Linda called around 8:45 PM and chatted with Butch about an accounting issue related to their business and then chatted with me about our grand-daughter, Madeline, who is finally pronouncing words clearly enough to be understood and quickly developing a spoken vocabulary. Brendan and Shawna brought her to our house around 11:15 AM this morning and stuck around through lunch to get her down for her nap and then took off. Grandma Linda had her all to herself the rest of the day and will have her tomorrow until they pick her up. I chatted with Butch and Fonda for a while after that and then retired for the evening, checking and responding to a couple of e-mails, doing a little web-surfing, and working on this post.
2014/10/19 (N) Of Mice And Men
Although I really enjoy Linda’s homemade granola I decided to make toast with some of the Brownberry Country White bread I bought. I was surprised to discover that someone, or something, had chewed a hole through the plastic bag and eaten some of my bread. A mouse, no doubt, but I only bought this bread on Tuesday, so it was a recent visitor. The surprise was that the bread was in a cabinet that I assumed was inaccessible to mice.
I emptied the cubby and discovered a hole in the back wall big enough to stick my finger through for some distance, which meant it was plenty big enough for a mouse to get through. The walls are covered with the same thin carpet that is used to line all of the other cabinets in the coach. In this case it was applied to fairly thin wood with space behind it. Butch looked at it with me and we found that the glue used to install the carpet had lost much of its hold. We lifted it up and found a 2″x2″ cutout in the wood with the hole in the carpet roughly centered on it. There was a Romex electrical cable coiled up behind the wall with the ends taped. We presumed the wire had once passed through the hole into the cubby but was now a way for the mouse to travel vertically through the cavity and get to the back entrance.
I threw the bread out, of course and cleaned the counter surface, which forms the floor of the cubby, with Lysol. Mouse proofing the bread cubby will have to wait until tomorrow but my plan is to feed the wire through the hole in the carpet and then lift the carpet at the bottom and run a bead of caulk (or hot glue) along the joint between the counter and the wood walls. I will then install a surface mounted outlet over the hole. At a minimum it will seal the hole and it might prove useful someday for plugging in an appliance, assuming the wires are still energized.
Although it was in the low 30s when we got up this morning, it was finally a decent day for outside work. The high temperature only made it to the mid-50s but it was sunny most of the day with a light breeze. Appropriate layers of clothing made for comfort while working.
My main focus today was completing the installation of the Zena 24VDC power generating system in the bus. I started this project two years ago this month and today was the day to finish it. I had also written a complete draft of an article about this project for Bus Conversion Magazine but held off finishing and submitting it pending completion of the project. Now that the work is completed and the system functions correctly I hope to finish the article in the next few weeks.
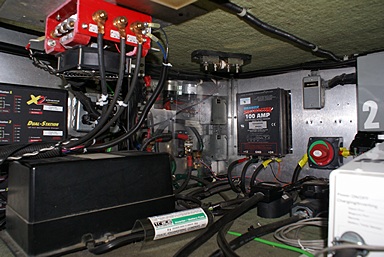
The purpose of the system is to charge/maintain the 24VDC house battery bank while we are driving the bus, during which time the refrigerator, and other minor loads, are being powered by the inverter. The system consists of a high-output, continuous-duty, 24VAC, 3-phase alternator driven by the main bus engine (Detroit Diesel 8V92TA). The alternator feeds a large rectifier assembly in the house electrical bay and is controlled by three interconnected modules mounted in the engine bay near the alternator. Redundant voltage sense wires run from the rectifier back to two of the three control modules. The system is activated by ignition switched 24VDC power which we wired up a couple of days ago.
The unfinished part of the project involved the connections between the DC output of the rectifier and the 24VDC house battery bank. I mounted a Class T fuse on the ceiling of the electrical bay yesterday which then allowed me to determine several cable lengths. On the +24VDC side I made three cables from 2/0 welding cable as follows: 1) Rectifier DC positive to ceiling fuse terminal A; 2) Inverter/charger fuse terminal B to ceiling fuse terminal B, and; 3) Ceiling fuse terminal B to +24VDC battery disconnect switch. With this configuration both the rectifier and inverter outputs go through separate fuses to a common point (ceiling fuse terminal B) and that point is connected to the battery disconnect switch. I also made a cable to go from the rectifier DC negative (ground) to the house DC electrical system ground lug; again using 2/0 welding cable.
I used a metal blade hacksaw to cut the welding cable to length and cut through the heavy rubber sheath 1/2 inch from the end to expose the copper conductors. I attached crimp style through-hole terminals to the ends of the cables and held them in position to get the alignment correct. I made reference marks to ensure the alignment and then crimped the lugs onto the wire using a very large hand-operated press in Butch’s shop. Projects like this are a lot more fun with access to the correct tools.
I attached as many cable ends as I could without touching any live voltages. I turned off the Aqua-Hot, the UPS, and the inverter/charger before disconnecting the main AC shore power. I then turned the +24VDC disconnect switch to the off position, isolating the coach/inverter from the 24VDC battery bank. (Note, however, that I did not disconnect the 12VDC center tap.) With power off I completed all of the needed connections, including the small ground wire for the 24VDC fan on the rectifier, turned the 24VDC batter disconnect switch to ‘on’, and turned the inverter back on. It immediately started supplying power so I knew my wiring was correct.
Back in the engine bay I checked all of the wiring against my diagram and everything was good to go. I taped off two wires with bullet connectors on the ends to prevent accidental shorting. One of the wires is used to reset the system by grounding it and the other wire is tied to chassis ground. With all of the electrical connections verified I got Butch to help install the two drive belts from the DD8V92TA pulley to the alternator (power generating module). That was when we discovered that the lower side of the belts were in contact with a pressurized oil hose for the Spinner II centrifugal by-pass oil cleaner.
The hose was secured with zip ties in several places so I clipped and removed those. I disconnected the hose from the Spinner II and re-routed it to avoid the drive belts and other rotating parts on the front of the engine (which faces the rear of the bus). I reattached the oil hose to the Spinner II and secured it with zip ties.
Butch used a pry bar to move the alternator and put tension on the drive belts while Tom and I tightened the alternator mounting bolts. The inverter had been supplying AC power to the coach for a while and a check of the house battery voltage showed +24.5VDC. I turned on the chassis batteries and engine accessories air valve, started the DD8V92TA, and put it in high idle. I re-checked the voltage at the rectifier output and it was 24.8, higher than before and rising, but not too high; an excellent set point at least for now.
DD8V92TA with Zena 3-phase alternator lower right.
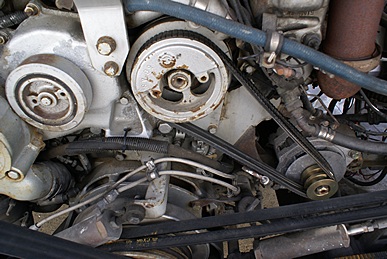
We observed that some of the belts on the engine seemed loose and floppy. Butch also noticed what appeared to be a stone embedded in the outside surface of the Gates Hi-Power II PowerBand A92 triple V drive belt that runs from the DD8V92TA crankshaft pulley to the drive pulley for the engine cooling fan. Butch called O’Reilly’s in Logansport but they were unable to locate the 2.125″ wide triple-V belt in their system.
The oil dipstick tube was also too close to the new drive belts but when I tied to move it (bend it slightly) I noticed that it was very loose. The fitting at the block was not tight and it was obvious that some oil had leaked out from there. I slid under the engine from the rear of the bus and tightened it at the block. (It is nice having the bus supported on stands so I can work under it without concern.)
While I was working on the Zena system Butch installed an outlet fitting on their fresh water tank. He and Fonda, and eventually Tom (Butch’s brother), re-installed the tank in their bus and then mounted the ITR Oasis Combi next to it, securing it to the floor of the bay. To accomplish that they had to drill holes, align holes, and determine a location for the water pump, which required more information regarding allowable pump orientation. Sometime during the day Butch shifted his focus towards an antenna project on the roof of their bus. He had previously purchased a Tarheel motorized fold-over mount for his large Tarheel screwdriver antenna and wanted to at least get the fold-over mount attached to the roof before they left for the southwest.
The key lock on our passenger side engine bay door was getting difficult to turn so I removed an access panel on the inside of the bay door to investigate the mechanism. As I loosened the access panel water ran out the bottom. We determined that the gasket surrounding the handle/lock assembly was dried out and cracked, allowing water in at the top. I removed the handle/lock assembly by pulling it out of the door from the outside, dried it out, and lubricated it. I reassembled it for now, but I need to apply some kind of sealant behind the gaskets or get new ones from Prevost (if they are still available).
Prevost H3-40 keyed, non-electric, door lock mechanism.
Butch shifted his attention yet again, this time to their Suburban where he and Tom re-attached the front bumper. It was removed a few days ago so he and Tom could install the Blue Ox base plate kit which will allow them to tow it with the bus.
As the sun dropped low in the western sky the temperature dropped along with it. I buttoned up my coach and helped Butch get his tools and supplies moved inside. I then went to my coach to have dinner which consisted of an Annie’s Spicy Mongolian noodle bowl with added peanuts and a tofu hotdog with mustard, onion, and relish. A glass of Moscato with the meal and a cup of Oriental Treasure green tea afterwards provided a soothing and warming end to the meal. I returned to the house and we chatted for a short while before I retired to my room to check e-mail and write.
2014/10/20 (M) Bad Timing
I have settled into something of routine on this extended visit to Twelve Mile, Indiana; up late, sleep late, eat breakfast, get to work. Usually. Butch spends the early morning on his computer and is usually ready to work about the same time I am. Usually, but not always. Sometimes he gets to work earlier than me, and sometimes much later. Although we had a beautiful weather day (except for the brief thunderstorm around 10 AM) we were not able to take full advantage of it for various reasons. I had left the Aqua-Hot turned off over night to see if it would start reliably when cold. The burner fired after a short 10 second purge. It was smokey at first, but ran its full cycle and eventually cleared up. I turned it off and will test its cold start capabilities again tomorrow morning.
We discovered yesterday that the triple V fan belt on my bus engine was worn and had something embedded in it. The belt was a Gates Hi-Power II PowerBand A92. We spent some time looking for one online but were not sure we had found exactly the right one so I decided to see if Prevost had it in stock. They did, and it was only a few dollars more, included free shipping (as always), and would be at my house before I got home. I ordered two. This belt drives the engine cooling fan and if it breaks the bus isn’t going anywhere until it is replaced.
Bread cubby with AC outlet base plate.
Butch and Fonda worked on re-conditioning a pair of fan-coil heat exchangers that will get tied-in to their new ITR Oasis Combi hydronic heating system on the bus. Butch and I had both been assembling shopping lists and I was at the point where I needed to get some small parts in order to move forward with some small projects. We left around 11:30 AM and drove to Logansport where we visited NAPA, O’Reilly’s, Rural King, Aldi’s, Home Depot, and Walmart. All of these stores are located close to one another on the east end of town except for the O’Reilly’s and NAPA which are just a bit farther down the main road towards downtown. When it comes down to it, Logansport is just not that big.
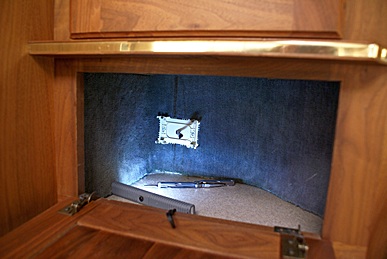
By the time we got back it was after 3 PM and we were suddenly very busy as we tried to take advantage of the few remaining hours of daylight. Butch and Fonda worked on installing the Tarheel fold-over mount and I worked on sealing the bread cubby, installing a Wiremold surface mount outlet over the hole in the back wall, and installing a small battery powered LED puck light in the back closet to illuminate the inverter sub-panel. I cut a small triangle of thin aluminum for the hole in the corner floor of the bread cabinet and then sealed the joint between the floor (counter) and three walls with a silicone-based paintable tub and tile caulk in a convenient squeeze tube.

LED puck light in rear bedroom closet to illuminate the inverter sub-panel.
When I finished those tasks I checked in with Butch and Fonda and found out that they had run into problems with the Toggler(R) bolts Butch was using and had to undo what they had already done and seal up the holes in the roof for the night. There wasn’t anything I could do to help at that point, so I started working on the wiring that will allow me to relocate the Magnum ME-ARC remote control/display module from the electrical bay to the house panel next to the refrigerator. Rather than try to route the 4-wire telephone cable between the inverter/charger and the house panel, John Palmer had suggested two years ago that I re-purpose one of the existing cables that had previously connected the Heart Interface inverter/chargers to their remote displays. All that was required was to attach RJ-11 plugs on each end to four off the nine available wires. As long as I used the same four wires on each end, and got the colors in the same order, it should work fine. Butch already had the necessary crimper and I bought a small bag of the plugs today at Home Depot.
Sunset is just before 7 PM these days. It not only comes earlier, it comes quickly. We were done working by 6:30 PM and I withdrew to my coach to have dinner. I had a nice salad of power greens with sun-dried tomatoes, olives, garlic, artichoke hearts, dried cranberries, and peanuts with peanut butter and crackers on the side and a small glass of Franzia Moscato. I cleaned up from dinner, closed up the coach, set the two small electric cube heaters for around 60 degrees F, gathered up a few things and went back to the house for the evening. Butch and Fonda were just getting ready to eat their dinner so I retired to my room to work on my computer.
2014/10/21 (T) Fair Weather Ahead
One of the first things I do each morning, even before I have breakfast, is to check the current and forecasted weather. The guest bedroom at Butch and Fonda’s place is an interior room with no windows and is well insulated, including the ceiling, so I have no visual or auditory reference to what is happening outside. If not for the clock on the headboard of the bed (or my various communications and computing technologies) I would have no idea what time it was, or even if it was day or night.
There was widely scattered light rain across northern Indiana at 7:30 AM with single digit precipitation probabilities through the day dropping to zero chance of rain for Wednesday and Thursday with high temperatures in the mid-to-upper 50s. That is about as good as it gets for the fourth week in October. Hopefully it bodes well for our project work and will be a very productive few days.
Butch plans to attend a gun show on Saturday morning and needs to spend most of Friday getting ready. Butch and Fonda’s family members (parents, siblings, children, etc.) are gathering at their house on Sunday to celebrate the holidays early since Butch and Fonda plan to be in the southwest with us this winter. Given the weather forecast I will probably work the whole day on Thursday, spend the night, and then head for home early Friday morning, or at least as early as I can manage.
Butch’s main focus today was re-mounting his Tarheel antenna lift to the roof of their bus. He figured out last night what parts he needed to make the installation work after his Togglers(R) broke yesterday.
My main focus was diagnosing and repairing the very low water flow from the kitchen faucet but before I got too deep into that project I called Prevost’s U. S. parts office in Elgin, Illinois to check on a couple of things. They had the CX-96 cogged fan belts in stock in the U. S. but wanted $90 for a pair (they only sell them in pairs). I found them last night online for $21 each, so that was a big difference. They also had the bay door handle/lockset gaskets I needed but they were only stocked in Canada. They were only $4 each, so I ordered the 12 I need to redo every door.
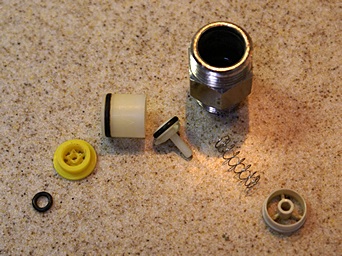
The disassembled kitchen faucet flow restrictor.
I found the installation and instruction manual for the Kohler kitchen faucet in our conversion binder. It said that the handle and cover should slide straight off of the body once the handle set screw was removed. Butch and I both tried this but we could not get it off. While studying the diagram and parts list I noticed a “restrictor” that also served as an adapter from the 8mm outlet pipe on the faucet to the 1/2″ NPT fitting on the retractable hose assembly. At Butch’s suggestion I shut off the bus fresh water pump, shut the valves on both the hot and cold supply lines that feed the kitchen sink faucet, and disconnected the supply lines from the inlet tubes that are part of the Kohler faucet. I inserted the barbed end of the 1/2″ NPT adapter into a piece of rubber hose that I got from Butch and threaded the pipe thread into the cold supply line. I placed the end of the hose in a bucket, turned on the pump, and then opened the cold supply valve. I had lots of flow. I closed the valve, shut off the pump, and repeated this for the hot supply which also had good flow. That meant the problem was either in the restrictor, in the valve cartridge, or somewhere in the faucet body. The good news was that the restriction was not in the upstream plumbing.
By mid-morning Butch was ready to make a parts run so I grabbed my short shopping list and rode into Logansport with him. When we got back I disconnected the kitchen faucet hose from the restrictor/adapter and then disconnected the restrictor/adapter from the 8mm outlet tube. The garbage disposal was in my way so I disconnected and removed it temporarily. Initial inspection revealed that the restrictor was clogged so I started taking it apart and Butch finished the disassembly. I reinstalled the adapter without the restrictor parts and tested the flow. It was now very strong, which meant that the valve cartridge and valve body were OK and did not need to be serviced or replaced. That was a good thing as we had not been able to remove the cartridge earlier when we tried. With the water shut off I removed the flow restrictor/adapter cleaned out the entire assembly, and removed one small rubber O-ring. I reassembled all of the pieces, turned the water on, and checked for leaks. I did not see any so I turned off the water and cleaned up the area.
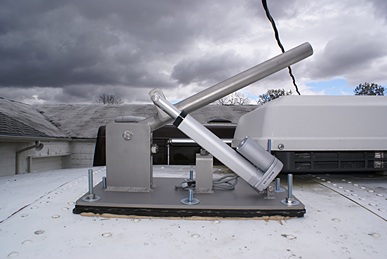
The Tarheel roof mount antenna lifter.
It was early afternoon by the time I finished the faucet project—too early to stop working on such a perfect weather day—so I started working on the wiring for the Magnum ME-ARC remote, which I want to relocate from the electrical bay to the house panel in the kitchen. Because of the difficulty of running wires between these two locations I decided to follow John Palmer’s advice and re-purpose one of the two nine-conductor serial cables that connected the old Heart Interface EMS-2800 inverter/chargers to their remote panels in the house panel.
I decided to use the cable labeled #2. I removed the snap-together Amphenol DB-9 connector from the house panel end and cut the molded DB-9 connector off of the inverter end. I tried using Butch’s RJ-11 strip/crimp tool and discovered that the wire in the cable was one size too large to fit in the stripper so I stripped and trimmed them by hand. The wires were stranded so I twisted them tightly but found that I could not get them inserted and lined up properly in the RJ-11 connectors I bought at Home Depot the other day. Ugh. Time for Plan B.
While we were working today plans got made for dinner at the Hibachi Grill Supreme Buffet in Kokomo, Indiana at 6:30 PM. I decided to drive myself and leave early enough to go to Discount Tire in Kokomo and have them balance all four of my tires. They closed at 6 PM so I stopped working around 3:30 PM, changed into cleaner clothes and headed for Kokomo at 4:15 PM. Kokomo is about 30 miles south of Twelve Mile and takes about 45 minutes with speed limits and stop lights. It used to be on US-31 but Indiana has made significant changes (improvements) to US-31 so that it is now a four lane divided limited access highway in many places and bypasses a lot of towns, including Kokomo. What was US-31 is now SR-931. Why they named it that instead of “Old US-31” as they have done in other spots is a mystery to me.
Before I got to Discount Tire I passed a Gordon Food Service (GFS) and a Menard’s located next to one another. I needed things from both but wanted to get the car taken care of first. Discount tire said it might be 90 to 105 minutes before they could get to me. I could not wait that long but had them write it up anyway. They took my car in about 25 minutes later and had it done in another 15 minutes, so I had time to do some quick shopping.
I got a package of 25 16 oz. hot cups at GFS to go with the lids we already had. At Menard’s I got two surface mount 4-wire phone jacks and a double-ended phone cord for my Magnum inverter/remote project. Butch and Fonda also stopped at Menard’s looking for dryer vents to use with their bathroom and shower ventilation fans.
Dinner at the Hibachi Grill Supreme Buffet was a family gathering. Beside Butch and Fonda (and me) we had Butch’s mom and dad, his sister Robin and her mother-in-law Betty, Butch’s brother Tom and his wife Tracey, their son Brock and his wife, and another young couple and their kids. I think the wife was Tom and Tracey’s daughter. There were four or five kids whose names I did not get. We all ate too much. The food was OK, but Butch’s family and the conversation were more interesting. It was 9 PM by the time we got back to Twelve Mile and I headed off to bed to take care of correspondence and writing.
2014/10/22 (W) Plan B
You always need to have a “Plan B,” or be prepared to come up with one on short notice. Backup plans are not a sign of indecision or a lack of commitment to a primary plan. Rather, they are an acknowledgement of the reality that things do not always work the way you thought they would no matter how brilliantly conceived, carefully planned, and skillfully executed. So it was with my inverter/remote re-wiring project.
I spent most of the day working on the wiring that would allow me to move the Magnum ME-ARC remote from the electrical bay, where it was plugged directly into the Magnum MS4024 inverter/charger, to the house systems monitoring and control panel next to the refrigerator. It was simple enough in concept, but I had to make sure it was correct as I did not want to damage the inverter or the remote unit.
I used four of the nine wires in one of the old serial cables (#2) that runs from the electrical bay to the house panel. Since the phone line cables with the RJ-11 plugs on the ends used Black, Red, Green, and Yellow I decided to stick with those colors all the way through. However, because of the way the RJ-11 connectors are assembled onto the cable the signals move back and forth between pins. I ended up wiring the cable end in the electrical bay to the same color wires in the baseboard outlet and mounted it to the ceiling of the bay. I cross-wired the other end of the cable to another baseboard outlet and mounted it to the side of the cavity behind the house system panel. Fortunately the back side of the panel is accessible via a removable panel in the back of the closet that is on the other side of that wall.
With all of the wiring done I used a jumper with alligator clips on each end to bridge two of the wires in the electrical bay outlet and do a continuity check at the house panel outlet to verify the wiring. Everything looked good so I unplugged the remote, brought it inside, and plugged it in. It worked! Now all I had to do was mount it.
There were already two cutouts at the bottom of the house systems panel from the old Heart Interface EMS-2800 remotes (the coach had two of these inverter/chargers when we bought it and each one had its own remote). The cutouts measured 4.625″ W by 2.875″ H. The housing on the ME-ARC was slightly wider than the opening but not as high. Depth was not an issue. I borrowed a small roto-tool from Butch with a small router bit and carefully opened up the left hand edge of the right hand cutout. Using the remote as a template I marked the locations for the four corner screws, moved the remote out of the way, drilled out the holes, moved the remote back into position and attached it to the house panel using four #6 machine screws and Nylok nuts that I got from Butch.
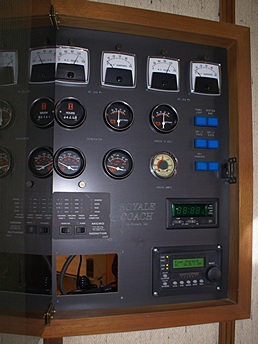
The house systems panel with Magnum ME-ARC remote installed at lower right.
While I was working on my project, I periodically asked Butch if he needed any assistance, but Fonda was providing the needed help. They managed to mount an 18″ H by 24″ long piece of 3/4″ plywood to the back wall of the Oasis/water bay with a 1/4” heavy rubber separator between the wood and the metal. Butch then mounted their Shur-Flo 4048 water pump to the plywood. This should cut down considerably the noise and vibration transmitted from the pump to the structure of the bus and into the living quarters, but only experience will prove if that is the case. Butch moved their fresh water tank slightly to make room for their portable water softener. They also installed the two dryer vents, one on each side of their bus, which they picked up at Menard’s last night. Their final project for the day was to cut a hole in the roof and install a right angle cable junction box that will be used to route coaxial cable and other lines from the roof into the passenger-side cabinet in the bedroom at the rear of their bus.
I looked at installing the remote readout for our Progressive Industries EMS-50 and decided it was more work than I wanted to start late in the day. Butch suggested that I do it the same way I did the Magnum remote, re-purposing some of the wires in the old serial data cables. That was going to require additional parts, so I started a list for my next trip to town.
My final project for the day was to try and fix the lighted entrance handle and the non-functioning patio light. The lighted entrance handle had a badly deteriorated gasket behind the top securement so I fashioned a replacement from a piece of heavy vinyl shower pan liner that Butch and Fonda had. The bulb was an LED I installed some time back. It was still working but the socket was loose so I tried to squeeze it down a bit. Butch pushed the spring loaded center section out, stretched the spring, and put it back in. The bulb is now nice and tight.
The patio light proved to be more difficult. The lens was cracked and difficult to get out but I finally did. It’s a florescent fixture with two F8T5 bulbs. I tried turning them in their lampholders but that did not help. I pulled the wires far enough out of the wall to find two butt connectors. I was able to get my multimeter probes far enough into one end of each connector to verify the presence of 13 VDC that was controlled by the same switch as the lighted door handle. I removed the two bulbs and tested them in the fixture over the kitchen sink. They both worked fine, so the problem appeared to be the ballast.
The way the fixture is designed there was no way to get to the ballast to replace it so I put the bulbs back in and got them to glow faintly. I tried to replace the lens, which was already cracked, and the top inch split off all the way across. Fonda though she could fix the cover and epoxied the two pieces back together. While the epoxy was setting up I noticed that both lamps had come on full bright. By the time Butch reinstalled the lens they had both gone out. Definitely a bad ballast.
As it turned out, Butch had an almost identical brand new fixture that he did not intend to use. The only difference was that his fixture had an on/off button on the underside whereas the one on our coach has a plastic plug in that hole. His fixture has black end caps, which is fine, and is not painted to match the color of our coach, which is also fine. Removing our current light fixture will be a bit of project and will have to wait until next week.
I ended up going to Logansport at 7:15 PM for a few parts that I would need tomorrow. I got back around 8:30 PM and it took me 20 minutes to get my dinner ready and take it into the house. I was straightening up the bus after dinner and looking for a new roll of paper towels for the kitchen when I discovered a mouse nest in the small cabinet between the sleeper/sofa and the kitchen base cabinets. I put on nitrile gloves and cleaned it up and then inspected the compartment. It was open at the back to the area above the HVAC chase that is part of the bus. The more I have peaked in and under cabinets the more I have come to realize that our coach is a lot like Disney World; there is a network of passageways that are hidden from view but interconnect the bays with the areas behind and under cabinets and furniture, providing an subterranean road system for small critters. It’s always something when it comes to bus conversions. The long term challenge will be to figure how where the critters are getting in and see if we can plug those ports of entry.