The DTE Energy appliance recycling program called yesterday and left a message indicating that they would pick up our old refrigerator between 8 AM and noon today so we got up at 7:30 AM to make sure we were ready if they arrived early. I was cold last night so I put on my sweats when I got up. For breakfast we had our usual granola with fresh blueberries and split a banana, had a little glass of juice to wash down the vitamins, and then had coffee in the living room. I turned on the gas fireplace to chase away the morning chill while I put the finishing touches on yesterday’s post and Linda did her morning check-in with the world beyond our immediate boundaries (and concerns).
The DTE Energy pickup truck called at 9 AM to let us know they would be here around 9:30. We finished our coffee, got dressed, and awaited their arrival. Ever since a delivery truck almost took out the telephone trunk line over our driveway last August I try to be in the driveway anytime a truck is headed our way.
Two guys showed up in an Enterprise truck. Our new refrigerator for the bus was delivered by two guys in an Enterprise truck. It must make more sense than buying one. When they opened the back it already had used appliances in it. The guy handling the paperwork said they usually pick up 30 appliances a day but were scheduled for 32 today. I signed the acknowledgments and releases on his cell phone and they then unplugged it, cut off the power cord, stuck a hand truck under it, rolled it onto their lift, raised it up and rolled it in next to another side-by-side fridge that was very similar to ours. They closed the rear cover and were on their way. I don’t think they were here more than 15 minutes. It’s nice to have it out of the garage and to know that it will be recycled. We will also receive a check for $50 in 4 to 6 weeks which beats having to pay someone to haul it away.
Linda picked up where she left off on Wednesday with the woodwork in the bedroom of the bus while I got the tools and supplies ready that we needed to install the Patriot Lumber SurePly underlayment on the floor. That included getting out the 15 gallon air-compressor, 60 foot air hose, Butch’s Central Pneumatic air stapler/nailer (that I borrowed on our most recent visit to Indiana), and a package of #18 1/4″ crown 3/4″ long staples
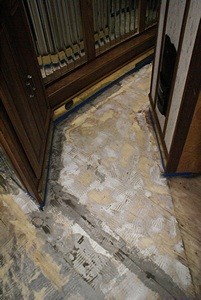
Linda finished wiping off the residual Touch of Beeswax from the bedroom woodwork and then helped me get the 4’x8′ sheet of underlayment out of the bus and over to the driveway. We put this sheet in the bus yesterday so I could determine where to make needed cuts. I had marked several places where I needed to make notches or take some material off of part of an edge. I did not want to do the cutting in the bus, however, because we need to keep the floors clean and avoid airborne dust. I made the cuts and then we moved the sheet back into the bus.
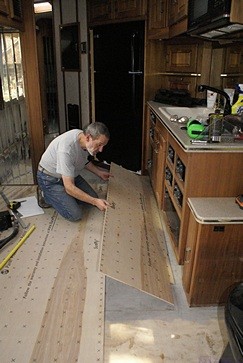
Bruce positions the second piece of underlayment.
Per the instructions, we positioned the sheet of underlayment in the corner across from the kitchen sink with the long dimension running fore and aft across the floor joists. It fit nicely so I connected the air hose to the air stapler and inserted a set of 3/4″ staples. The instructions for the pneumatic stapler indicated a working pressure range of 70 – 100 PSI, with the pressure controlling the depth of drive, and suggested adjusting it on some scrap material. It turned out that I had to set the regulator on the air compressor to 100 PSI to get the right depth of drive.
The instructions for the underlayment were very clear about the order in which the sheet should be stapled so that’s what we did. Linda stood on the sheet to keep it flat while I stapled and we both wore proper safety glasses, of course. From the corner I put a staple every two inches along the edge by the HVAC duct. Working out from the same starting corner I then put one every two inches along the short edge. Working out from the same starting corner I stapled it along the diagonal to the opposite corner. Again working from the starting corner I stapled the “field” on either side of the diagonal. The last staples were 2″ apart along the other short edge and up the other long edge.
A week and a half ago we had this same sheet of underlayment in the bus and I screwed it down temporarily with a dozen screws to see how it felt. I counted the number of fasteners needed for one full sheet and I think it was 352. That’s when I decided I would staple them. After installing the first sheet I think it was the right choice.
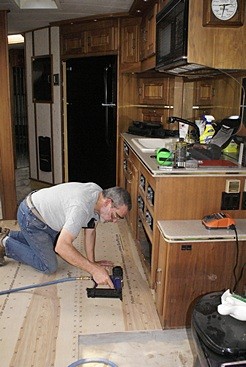
Bruce staples the second piece of underlayment.
I got a phone call from my sister so we took a break and while I talked to her Linda started preparing lunch. She made grilled cheese, with mock turkey, onions, and greens on rye, all vegan of course. We each had a deliciously ripe fresh pear. Yum.
The next piece of underlayment to go in filled in the space between the first sheet and the base of the kitchen cabinets. But first we had to remove the painter’s tape we had put on the base to protect it. It turned out to be cemented on from the floor leveling compound so I had to chisel it loose. Linda vacuumed up the debris and then I went over the area with 120 grit sandpaper on the oscillating sander. Things like this are what cause project timelines to stretch out; when we put the painter’s tape on we assumed we would be able just peel it off.
This second piece was less than half the width of a full sheet and involved a tricky angle cut and a notch so I measured carefully, made a drawing (not to scale), and rechecked the dimensions with Linda verifying them. We cut the piece outside and brought it in. It was a very good fit so we stapled it down.
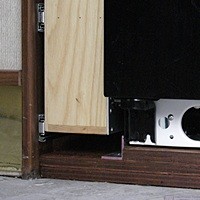
A detailed view of the bottom front end of the pantry and refrigerator showing the aluminum angle that keeps the fridge from shifting to the left into the pantry.
The third piece was much more difficult to figure out and will probably prove to be the trickiest piece overall once we are done. It was essentially a big triangle with two corners cut off and complex notches along the hypotenuse. I took a lot of measurements with Linda’s help and made a diagram. When I laid it out on the underlayment things did not quite line up. I figured out and corrected one problem but had to go back in the coach and make two more measurements.
At the point where it was close, but not close enough, I decided to cut along the hypotenuse, trim off the two corners, and take it back in the bus to mark the locations of two notches. With the notches marked we took it back outside and I finished cutting it. We took it back inside and set it in place. It was as good a fit as could have hoped for so we stapled it. Although we had worked for most of the day and only gotten three pieces installed our careful work had paid off and we were very satisfied with what we had accomplished. It was 5 PM, we were tired, and we were getting hungry so we decided to quit while we were ahead.
I took a shower while Linda prepared dinner. She made a very tasty whole grain rotini pasta dish with garlic, onion, olive oil, broccoli, sun-dried tomatoes, carrots, mushrooms, and greens. Now that, Alton Brown, is “good eats.” We had nice big wedges of fresh watermelon for dessert.
After dinner we went to Lowe’s to buy three more sheets of underlayment and some wallpaper stripping spray. By the time we got home it was after 8 PM and we settled into the living room to read and write, much the way our day began, minus the coffee.