Tag Archives: drawer faces (H3-40)

2015/08/29 (S) Up and Down

When we arrived at the South Lyon Senate Coney Island just before 8 AM there were only five other SLAARC members there but we had 16 by the time the last two people showed up.  Linda (K8LMF) got to sit next to Linda (NF8C) for the first time in quite a while and they had a long chat.  All but one person stayed until 9:45 when we got up to leave and everyone else followed suit.

We were back home by 10:15 AM, changed into our work clothes, and got back to work on the bus remodeling project.  It was a very overcast and cloudy day with a high probability of rain that was forecast to be an all-day event.  That altered our plans a little in that we did not want the pieces of underlayment to get wet and our air-compressor could not be out in the rain as it has an electric motor.

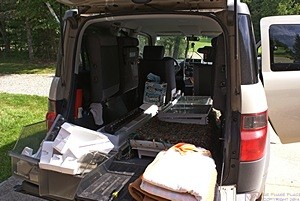
Yesterday we marked and cut the underlayment panels in the driveway, laying them across 2x4s to create space for the circular saw blade.  In order to keep the project moving forward we decided to use the temporary “workbench” in the garage for this work.  Since the workbench was covered with drawer fronts that had to be moved we decided to take a little time to put the new handles on them and reattach them to the drawer boxes.  Sometimes it’s true that “there’s no time like the present” to get something done.

Linda has worked hard on cleaning and waxing the walnut drawer fronts and fixed cabinetry in our motorcoach.  The results so far are amazing and we are feeling like all of our work will be worthwhile as the interior of the coach is going to look very nice when we are done with this project.

We had cut the piece of underlayment for part of the hallway last night but needed to trim it to get it to fit correctly.  I think we took it out of, and back into, the bus at least four times, each trip requiring us to go up and down the seven steps in the entryway/cockpit plus the stool outside the door.  I do not know how many times we went up and down those steps today but it was a quite a few.  To add to our enjoyment and bus conversion physical fitness program we were usually carrying something and it was often heavy and/or large.

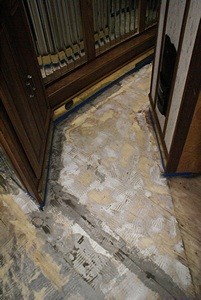
The next pieces of underlayment to be cut would fill out most of the living room.  I had planned to cut them a certain way but changed my mind after talking it through with Linda.  We took measurements and I made drawings that were close to scale.  We ended up using the full 48″ width of a 4’x8′ sheet and about 86″ of its length for the piece that fills the alcove where the built-in sofa and storage base will go.  It had two large corner cutouts, one to make it fit with two other installed pieces and the other to go around the base of the media cabinet that doubles as an end table for the forward end of the sofa.  After test fitting it we had to trim a couple inches off of a back corner because of a wire bundle and create a notch for several wires that ran through the floor just in front of the driver’s side HVAC chase.  We waited for a lull in the rain and took it back into the coach.

It fit just right but unfortunately there were defects in the subfloor, such as small gouges and depressed screw heads, that needed to be repaired.  Since we could not use the air-stapler today I did not have a good excuse for not patching the floor correctly so I worked on that while Linda resumed working on the woodwork.  The quart of “ready to use” floor patch was not as ready to use as I would have liked.  The directions said to stir thoroughly and when I opened the container there was a half inch of milky white liquid on top of somewhat drier and stiffer material with the consistency of fine wet sand.  The directions also said the open (working) time was about 15 minutes.

I set the timer on the microwave for 20 minutes, spent five of those trying to stir and mix the floor patch ingredients, and then tried to patch everything that really needed it in the allotted time.  I did not care for this material and wish I had used the Universal Patch and Skimcoat that I used everywhere else.  It was gritty and did not feather out or finish as smoothly as I wanted, but there was nothing to do now but wait for it to dry which would take three hours.

Linda decided to work in the house and eventually fix dinner while I worked in the bedroom (of the bus) trying to remove very old masking tape from the subfloor using a 1.25″ putty knife.  After an hour I had about half of it off but called it quits as my hands were sore.

For dinner Linda cooked a couple of ears of corn-on-the-cob, heated some vegetarian (vegan) baked beans, and cooked two vegan “burgers” topped with vegan cheese.  Mustard, ketchup, pickle relish, and four large leaves of romaine lettuce made for a tasty sandwich.  We each had a glass of the Cupcake Black Forest Decadent Red wine with the meal.  Dessert was fresh sliced strawberries with non-dairy (vegan) peach mango “yogurt.”  It was a tasty summertime meal.

After dinner I tried sanding the floor patches even though the directions said not to sand the dried material.  I used a very old piece of 120 grit sandpaper in my orbital sander and went over the entire area.  I vacuumed the whole area but I could still feel a residual grit on the floor.  I got Linda’s vacuum from the house and tried that.  I then got the Revel wet/dry mop and tried wet moping the area, but it was still gritty.  I was preparing to go over the entire area with the new 80 grit sandpaper but Linda managed to get it clean using the brush attachment on the house vacuum cleaner.

With the area cleaned up we put the piece of underlayment for the sofa nook in place and it fit very nicely but we did not staple it.  We redid our measurements for the passenger side front piece and made some minor adjustments to the dimensions on the drawing.  What I have tried to do wherever possible is to keep at least two factory edges with a common vertex (corner) and use that point and those sides as the basis for my measurements.

It looked like heavy rain was going to hit us from the west but must have tracked north of us.  We continued to get rain, off and on, but nothing heavy every materialized.  Working in the garage we measured and cut the last piece for today.  We made extensive use of the circular saw running it along a saw guide.  By the time we had the sheet cut there was a lull in the rain so we took it to the bus to test fit it.  The fit was close but needed minor trimming in the front outside corner.  By now it was 8:30 PM and we did not want to haul the sheet back out of the bus and into the garage to work on it.  That will be our first task tomorrow followed by stapling the three pieces that we cut today, weather permitting.

We turned in at 10 PM.  There wasn’t anything on TV that interested us, so Linda read for few minutes before falling asleep and I wrote until 11:30.


2015/08/26 (W) Delux Delay

We were a bit sore last night, and needed a good night’s sleep, so we both took some Advil PM right before going to bed.  As a result we did not wake up until almost 8 AM this morning.  The Advil, combined with the very cool temperatures, made for good sleeping.

Our son had called yesterday to see if Linda could watch Madeline today while he did some work on the rental property that he and Shawna own.  It was Shawna’s house before they got married, and is a nice little place, but with Madeline on the way they wanted a slightly larger place.  They also wanted to be on the other side of Stadium Boulevard in the attendance area for Burns Park Elementary School and walking distance to both the school and adjacent Burns Park without having to cross any major streets.

Ann Arbor is a major rental housing market because of the University of Michigan and the local government is very involved in this market.  Rental properties must be inspected at least every 30 months and meet code requirements.  The rental house was scheduled for inspection on Friday and needed some minor repairs, so Brendan set aside today to take care of things.  What I find interesting about this inspection requirement is that most of the rental houses our son and daughter lived in while at U of M looked to me like they had not been inspected in over a decade.

Linda was due at Brendan and Shawna’s house around 10:30 AM so she left our house at 9:15.  She took the three books of wallpaper samples with her and went directly to Delux Drapery and Shades in Ann Arbor to return them and placed the order for four bolts (double roll packs) of Sellers and Josephson Just Textures Lamar paper.  Not long after she left Delux I got a call at home from the store.  They were looking for Linda to let her know the wallpaper was back ordered until September 11.  (I’m not the least bit superstitious but September 11.  Really.)  To cancel the order we would have to let them know today but I told them to let it ride.  I then texted Linda to let her know and she agreed with my decision.

I had a feeling this might happen and it’s what we get for waiting so long to look for, select, and finally order a wall covering.  But it is what it is and we were not going to settle for something that wasn’t “right” for our interior just because it was available more quickly.  If the paper actually comes in on the 11th we will have the 12th and 13th to at least install it in a few critical areas before the new seating goes in.  If it doesn’t arrive by then we will deal with it when it does.  Either way the only big issue is that we wanted to paper the wall behind where the desk will go before the desk is installed.  As things stand we will either uninstall/reinstall the desk or paper around it.

The pantry supported by plywood and 2x4s.

The pantry supported by plywood and 2x4s.

There were several small tasks that I could have worked today but the thing that needed to be done was the installation of the pull-out pantry, so that is what I did.  The pantry was already in the coach, which was a good start.  I got two of the small leftover pieces of 3/4″ oak veneered plywood and set them in front of the alcove base.  I then set a 5′ length of 2×4 on the flat in the space where the pantry goes and extending out beyond the alcove by more than the depth of the pantry.  I then set the pantry on the 2×4, pushed it snug to the side of the alcove, and slid it towards the back of the alcove until the front was approximately one inch behind the vertical front edge of the left side panel.

There were two main reasons for using the 2×4.  First, the lowest slide attached to the pantry box extends below the box so the bottom of the box needed to sit on something that was thicker than the amount by which the slide hung down.  Second, a 2×4 on the flat is 1.5″ thick and that turned out to be a good thickness for positioning the pantry vertically in the alcove.

The reveal between the front of the pantry and the front edge of the alcove side panel was wider at the top than the bottom so I placed two wood shims side-by-side under the back end of the 2×4 to raise it slightly and tilt the top of the front out.  I fussed with this for quite a while and each time I adjusted the shims I had to pick the pantry up, set it aside, and put it back.  I eventually got the reveal to be the same along the entire length (height) of the front.

Once I knew where I wanted the pantry to be when it was closed I had to figure out how to mount the slides to the side panel of the alcove.  I pondered this for quite a while.  If nothing else, I have learned that when it is not clear how to proceed the best course of action is to do nothing.  I have also learned that if I ponder long enough I will eventually see a way forward.  Sometimes that takes days or weeks of conscious and subconscious thinking, but luckily the solution came to me relatively quickly.

The pantry box is 27″ deep.  The full extension slides are 26″ deep and they are mounted so they are flush with the front of the pantry box when they are fully closed.  I wanted a 1″ reveal along the front, so I needed to place the back edge of the slides 27″ back from the front edge of the alcove side panel.  With the pantry box out of the alcove I used a metal ruler to measure back at three points and make very fine scratch marks.  I then used the metal ruler to draw a fine pencil line through the three scratch marks.

I returned the pantry to the alcove, pushed it tight to the alcove side panel, and then pulled it out about three inches.  Measuring on the back side outside the alcove I made final adjustments to the shims to get a consistent reveal.  I then pulled each of the nine slides back, carefully aligned the back edge of the slide to the reference line, drilled a hole with a self-centering VIX bit, and secured it with a #6-3/4″ SR (square recessed) screw.  (I was not able to initially secure the bottom slide as the 2×4 was in the way.)  I pulled the pantry out a little farther until the next mounting hole in the top slide was visible and then drilled that hole on all eight slides and secured it with a screw.  I proceeded in this way until all but the bottom slide were attached to the alcove side panel through every available mounting hole; 88 screws in all (11 screws for each slide x 8 slides).

The pantry with the installation boards removed from underneath it.

The pantry with the installation boards removed from underneath it.

To secure the bottom slide I needed to get the 2×4 out from under the pantry.  I slid the pantry all the way in, slid the two pieces of 3/4″ plywood out from under the 2×4, and tried to slide the 2×4 out.  Unfortunately I used a 2×4 that was too long to just slide out as part of the original pantry cabinet is directly across from the pull-out pantry.  So I got my circular saw and cut about 4″ off the end of the 2×4.  Close, but not quite, so I cut off another 2″ and was finally able to slide it out.

With the pantry all the way out I was able to drill and secure the mounting holes for the back half of the bottom slide.  The holes for the front half were a bit tedious as I had to move the box to reveal each one.  To avoid going back and forth between the drill and the screw driver bit I drilled all of the holes first and then put in the screws.  I should also mention that I used the Shop Vac to vacuum up any debris that got in the slides as a result of the drilling.  I also wiped the slides out (carefully, they have sharp edges) with a paper towel.

The pantry slides all the way in and out but is a little tight the closer it gets to being fully closed.  I know that Jarel was very meticulous in attaching the slides to the pantry box so they were all parallel.  My working hypothesis is that either I did not get them attached to the alcove exactly parallel (entirely likely) and/or there is more drag on them because of the one-sided installation (probably, but no way for me to quantify) than there would be if they were installed on both sides of a drawer.

All of the slides are on the same side, which is not how they are normally used.  A pair of these slides is rated to support 100 pounds when used on both sides of a drawer, so four and a half pairs would, conservatively, support 400 to 450 pounds in a normal application.  Even if they will only support 1/3 that much weight in a single-sided application that is still 133 to 150 pounds for our nine slides.  I think the box weighs about 30 pounds so that leaves at least 100 pounds for stored items and I doubt that we could get 100 pounds of stuff in the pantry even if we loaded it with canned goods.  Because the pantry is narrow and tall with lots of slides I suspect most of the load on the slides is vertical, which is what they are designed for, rather than sideways, which would tend to pull them apart, so I suspect that it can safely carry considerably more than 100 pounds of staples.

The piece of aluminum angle that will prevent the refrigerator from sliding sideways into the pantry.  It is not installed yet as the plywood refrigerator base is not stained yet.

The piece of aluminum angle that will prevent the refrigerator from sliding sideways into the pantry. It is not installed yet as the plywood refrigerator base is not stained yet.

I had just finished installing the pantry and was cleaning up my tools and materials when Linda got home around 3 PM.  I had skipped lunch and she had a PB&J sandwich while she was out so we agreed to have dinner at 5:30 PM.  Linda picked up where she left off yesterday cleaning and waxing the drawer fronts and the woodwork in the bedroom.  I decided that the oak veneered plywood base in the alcove needed to be painted or stained and then sealed so I went to Lowe’s and got a small can of Rustoleum American Walnut stain, a small can of Rustoleum satin finish polyurethane, and two foam brushes.

I brushed the stain on liberally, working in sections, let it sit for two minutes per the instructions, and then wiped it off with a lint-free cloth.  The stain required mineral spirits for cleanup so I threw the brush and cloth away.  The instructions said to wait one hour before applying a finish.  It was 5 O’clock by then so I went to my office to check e-mail while Linda prepared dinner.

She made a nice salad and grilled a couple of vegan burgers and added some vegan cheese.  Mustard, ketchup, pickles, onions, and lettuce on a nice bun made for a tasty sandwich.  Two deer, a doe and her young fawn, came to our deer block while we were eating and a ruby-throated hummingbird stopped at our plants and feeders.  For dessert we had half of a small, very sweet watermelon.

By the time we were done with dinner it was 6:30 PM so I went back out to the bus and applied the polyurethane.  The directions said to apply it sparingly so that is what I tried to do.  They also said that it could take 48 hours to be usably dry and seven days for a full cure.  Drying time was dependent, however, on temperature and humidity, with higher temps and lower relative humidity promoting quicker drying.

I had run the Aqua-Hot earlier in the day and determined that there was still a little too much coolant in the system as the expansion reservoir overflowed into my catch bottle.  I closed the three windows that were open, leaving them just slightly ajar, turned on the Aqua-Hot, turned on all three thermostats, and set them for about 72 degrees Fahrenheit.  I will not be applying a second coat of polyurethane and cannot spare 48 hours for this one to dry.

I had thought that we might get the first sheet of underlayment installed this evening but decided we had done enough for one day.  It will be the only full 4’x8′ sheet we install but it needs a notch cut out of it before it goes in.  I thought it would require several cuts but then realized I had some floor leveling compound that I had not removed.  I got my chisel and mini-sledgehammer and knocked off the big chunks.  I then used the oscillating sander with 50 grit sandpaper to smooth everything out.  It was 7:45 PM and I was done working on the bus for today.

I went to my office and spent a couple of hours dealing with e-mails.  Linda was still up when I turned in at 10 PM but drifted off to sleep as I finished up this post.  She has to go to the bakery tomorrow which means she will be up very early.


2015/08/25 (T) Turning The Corner

It got pleasantly cool overnight and with the bedroom doorwall open it made for nice sleeping conditions.  Between being up a bit late last night and not wanting to get out from under the warm covers we slept in a few minutes longer than usual.  I put on my sweats, which I find very comfortable on a cool (or cold) morning, and made a pot of Costa Rican decaf coffee.  We had our usual granola for breakfast, took a few minutes to enjoy our coffee in the living room without our cats, who were off somewhere and probably up to no good, and then got to work.

In order to install the new seats in September we need to have the desk installed and in order to install the desk we need to have the floor installed and in order to install the floor we need to have the underlayment installed and in order to install the underlayment we need to have several things done.  First and foremost was finishing the patching and leveling of the subfloor, so that was my first task today.  While I pursued that Linda continued working on cleaning and waxing the walnut drawer fronts.  Given the limited work surface in the garage Linda can only work on three to six drawer fronts at a time depending on their size.  When she reached a stopping point with those and started working on the woodwork in the bedroom.

I have spent the last week patching, skimcoating, and sanding the entire area where the old tile was installed which I estimate to be about 80 square feet.  I went over it one more time this morning with 80 grit sandpaper on the orbital sander.  The sander has an integral dust collection bag so it did not get the coach too dusty.  I was satisfied with most of the job but still had some unevenness along the edges by the walls and especially in the toe kick spaces extending out about three inches from the cabinet bases.  That is because I did not get the last skimcoat as smooth as I needed to in those areas and the orbital sander cannot reach them.


I figured I would need to do one more application of floor leveling compound but did not want to open the second bag of mix for such a small job.  I decided to go the Lowe’s and buy a small pail of pre-mixed floor patching compound and the 3/4″ #8-32 machine screws we needed to install the new handles.  While I was there I noticed that they had 50 grit hook and loop sandpaper triangles designed to fit our Porter-Cable oscillating saw.  I was aware that we had a sanding pad attachment for the tool but had not considered using it until I saw the 50 grit paper.  I bought a pack and picked up some 120 grit as well.  I would also have bought 80 grit but they were out.  I had to go to The Home Depot for the machine screws as I wanted the same brass ones we had already purchased.

Back at the bus I decided to try sanding out the imperfections rather than filling them in with another round of patching and sanding.  I was, admittedly, tired of this phase of the work and anxious to be done with it so I could move on to next step.  August is slipping away and I am very aware of the date.  I was also not keen on creating more sanding dust inside the coach.

I don’t know why I did not try this tool sooner.  The design of the tool and shape of the sanding pad allowed me to work in the all of the areas the orbital sander could not reach and it worked very well with the 50 grit sandpaper.  The circular air sander can also reach these areas, and was the right tool for grinding down the old thinset and mastic, but the oscillating tool was the right one for this final smoothing.

When I thought I was done I vacuumed the floor and used the Revel Damp Mop to pick up any residual dust.  We then went inside to have lunch while the floor dried.  Linda heated up a can of Amy’s vegetable soup, made roll-up sandwiches, and served fresh black grapes and plums.  It beats fast food hands down.

After lunch I inspected the floor carefully and decided that the patching and leveling was done.  Although it was one task out of many, and there was no fanfare attached to the moment, I was very much aware that we had finally turned the corner.  We still have some minor disassembly to do, but from this point forward most of our tasks will involve putting the interior back together and installing new things.  All things being equal (which they never are) the building work should be more fun than the deconstruction work.

The major exception is the wallpaper.  We still need to remove the old paper, much of which is stained from old water leaks, and install the new paper, which Linda will be ordering tomorrow from Delux Drapery and Shades in Ann Arbor.  The critical pieces are the ones that go behind the desk and the built-in sofa.  Most of the rest of it can be finished later but we would prefer to have it all done by September 12th if possible.  The more stuff that gets installed the more awkward it will be to work on the walls.

With the floor leveling done the next impediment to installing the underlayment was getting the refrigerator out of the living room and into its alcove.  That, however, required three other things to be done.  First I needed to replace the electrical outlet with a recessed one.  Second, we needed to build up the base of the alcove and finally, we needed to install the pantry as we cannot get to the slides to mount them to the side of the alcove with the refrigerator in place.

The electrical outlet only took a few minutes to change.  With Linda’s help I used the template I made last Thursday to cut the base pieces from the 4′ x 8′ sheet of 3/4″ plywood we bought on Tuesday.  The bottom piece was the full width of the refrigerator alcove (34″ wide at the front and 33.75″ wide at the back) and 25.75″ deep.  We set it in place, checked the front setback, and screwed it to the subfloor.  The next piece was the same width as the first but 1/2″ deeper (26.25″).  We set it in place on top of the first piece and made sure the front edges were flush with the back edge extending 1/2″ farther back.  I used longer screws to go all the way through both pieces into the subfloor.

I was not happy with the way my circular saw blade was cutting and a few raindrops gave us an excuse to take a break.  We were working just outside the small garage bay and moved everything into the garage to keep it from getting wet.  I went to Lowe’s and bought a new 7.25″ blade with 60 teeth, which should give a very clean cut through plywood but still work on 2x4s and trim boards.  While I was there I checked their selection of driver bits again.  I was looking for a 3″ long No. 1 SR (square recessed) bit but they did not have any that long.  I found a 2″ bit for $2.48 but then I spotted a pack of seven 2″ long bits for under $4.  It had two #1, three #2 (the most common size), and two #3 bits from the same manufacturer as the single bit.  Can someone explain that pricing structure to me?  Apparently most of the cost is retail packaging.

Linda prepared large, wonderful salads for dinner.  She made her own dressing using balsamic vinegar, walnuts, raisins, garlic, and seasonings, and it was very good.  We finished the Pinot Grigio with the meal and then resumed our work.

I changed the blade on my saw and then we moved the wood and 2×4 supports back out into the driveway.  The new blade made very clean cuts confirming that changing it was long overdue.  The third piece of the alcove base was not as wide as the first two, measuring 28.25″ across the front and 28″ across the back.  (The alcove tapers in 1/4″ from front to rear along the right side.)  The depth was 26.75″ to match the refrigerator base depth, and a half inch deeper than the second piece.  I set it in place, snug to the right side of the alcove and flush with the front edge of the other two pieces, and checked for an even reveal along the left side of 5.75″.  Everything looked good so I screwed it down.

There are several reasons for this design/construction.  First, there is a large bundle of wires and two air lines that run across the floor of the alcove at the rear wall.  Using three layers of plywood allowed the top layer to be high enough for the base of the refrigerator to extend over the wire bundle and have its back about 1″ from the back wall (thus the reason for the recessed electrical outlet).  It will also leave about 1″ of clearance above the fridge, which is enough.  The second reason is that the 5.75″ width at the left, with only two pieces of plywood under it, is where the pull-out pantry will go.  But third, I will install a 24″ long 2″ x 2″ angle (steel or aluminum) on the middle sheet against the left edge of the top sheet to prevent the refrigerator from shifting to the left.  The front edges of the plywood base pieces will be covered (eventually) by a something, probably a piece of 3/4″ thick walnut hardwood, that will stick up above the top surface of the top piece just enough to keep the fridge from rolling out.  That piece, however, will have to be removable so I am still thinking about just how I want to secure the refrigerator case in the alcove.

Linda does her Vanna White impersonation, highlighting how the new pull-out pantry will look when it is installed.  The pantry is in its extended position revealing the slides sections that will mount on the cabinet wall.  The refrigerator is out so we can work in the alcove.

Linda does her Vanna White impersonation, highlighting how the new pull-out pantry will look when it is installed. The pantry is in its extended position revealing the slides sections that will mount on the cabinet wall. The refrigerator is out so we can work in the alcove.

We still had some light but with the heavy cloud cover it was darker than usual in the coach for this time of day (6:30 PM).  We rigged up a piece of twine to hang the work light and turned on as many interior lights as we could.  We then carried the pull-out pantry from the library (in the house) to the bus.  We brought all of the slides in as well, along with two pieces of 3/4″ plywood and a 4′ length of 2×4.

We set the two pieces of 3/4″ plywood in front of the left edge of the alcove flush with the two bottom base pieces.  We then set the 2×4 on flat (3.5″ side down) spanning the plywood inside and outside the alcove.  We installed the cabinet halves of the nine slides onto the pieces attached to the pantry and then set the unit in place with the bottom resting on the 2×4.  We moved the pantry in and out checking its position and considering where the slides needed to be attached to the alcove wall and exactly how we would do that so the front has an even reveal relative to the vertical front trim of the left alcove wall.

By this point it was after 8 PM, it was getting dark, and we were too tired to start something as critical as attaching the slides to the alcove wall.  We are behind schedule, but had enough sense to not push beyond our limits.  We closed up the bus, relaxed on the couch for a bit with our kitty cats, took some Advil PM, and went to bed at 9 PM.


2015/08/24 (M) Skimcoating

For a change of pace we had granola with vegan yogurt for breakfast.  I made seven cups of the Cafe Europe / Columbian decaf blend but Linda only had one mug as she was meeting Diane at Kensington Metropark at 9 AM to walk.  After she left I gathered up the laundry, sorted it, and started the first load.  I then turned my attention to the bus.

My first task was to cut one of the 8″x8″ sheets of #80 sandpaper in half, put it on the orbital pad sander, and go over all of the Universal Patch and Skimcoat (UPS) that I applied yesterday.  The 80 grit worked well and I only needed the one half sheet.  I swept the floor clean of loose debris and then assembled my tools and materials to patch a few gouges I missed yesterday and then skimcoat the entire portion of the floor that used to have ceramic tile on it.  I mixed 24 ounces (by volume) with 12 ounces of water (by volume), half as much UPS as I did yesterday.  I tried to work more quickly and got most of it applied.  I cleaned up my tools and let them dry while the compound cured.  That also gave me an opportunity to move laundry from the washer to the dryer and start another load in the washing machine.

I had a call from Chuck so I took a break to chat with him.  He and Barbara spent the weekend racing at the old Air Force base in Oscoda, Michigan.  Their bus and race car both ran well and he turned in some very good times.  He had installed a new turbo boost gauge in the bus and based on my experience had selected a 0 to 15, PSI VDO unit.  Apparently 15 PSI is not high enough for his engine.  I have seen the boost on my gauge, which is a 0 to 30 PSI model, go as high as 17, but not often.  For most of our trip to Arizona and back this past winter it did not go over 15 PSI.

The only issue they have with their coach at the moment is their old Amana residential refrigerator.  The freezer is apparently not keeping things as cold as it should and the ice maker is not working.  They use a lot of ice and generally have the freezer stocked, so those are problems.  They bought a bag of ice for the weekend but it appeared to get warm enough to develop surface moisture and then refroze into large chunks, inconvenient at best.  I think they have decided to replace it and want to do so before they leave for the winter and while they still have the shop and the forklift.

Chuck is also going to contact the glass installer and see if he would be willing to install bus windshields.  Both of his lower windshields need to be replaced as do both of ours.  We have five replacements at his shop, two for him and three for me.  I also have new gaskets but he needs to get two sets.  We discussed late September as the best time for me and he will see if the windshield guy will do all four of them on the same day.

I mixed the remaining USP, about 12 ounces (by volume) with 6 ounces of water (by volume) and finished the skimcoating of the bus floor.  I used the last little bit of compound to patch some screw holes and small gouges in the living room floor where carpet had been installed.  There may be a few more but instead of opening another bag of UPS I will probably return it and buy a quart of the premixed compound.  I then cleaned up my tools again and left them in the sun to dry.

Linda got home about this time.  It was just after noon, so we had a light lunch of vegan deli slices with lettuce, onion, and Daiya non-dairy cheese, on thin buns.  A pluot provided a nice, sweet finish to lunch.

We measured for wallpaper the other day so I took the notes and created an Excel spreadsheet to figure out how many rolls of wallpaper to order.  While I did that Linda worked on cleaning and reconditioning drawer fronts with Touch of Oranges and Touch of Beeswax.  After examining the wallpaper in the bathroom (of the bus) I think we need to replace it too.  We took a few minutes to get those measurements and I added them to the spreadsheet.

The wallpaper we have selected is the Lamar (#699-3377R) from the Just Textures collection of Sellars and Josephson.  It is an off-white color with a small texture pattern designed for reverse hang, random match installation.  It is only sold in 2-roll bolts 27″ wide and 4.5 yards long.  We will need more than six rolls to replace all of the wallpaper so we will have to order eight rolls even though we may defer doing part of the hallway and the bathroom for a while.  Fortunately it is not too expensive (as wallpapers go) and is scrubable, which was one of our requirements for use in the bus.  Linda will return the sample books to Delux Drapery and Shade Company in Ann Arbor on Wednesday morning and place the order.

Linda reheated the leftover fajita veggies from last night and fixed some white rice to go with them.  We had fresh strawberries and a little Coconut Bliss non-dairy ice cream for dessert.  Coconut Bliss ice creams are not too coconuty, and are appropriately named.  They are as good as I remember Hagan-Daas being.

I took a little time to add lines to my floor tile layout drawing showing the location of the underlayment sheets.  It looks like I may need at least eight sheets.  I have four sheets in the garage and will install those before buying more.  I spent the rest of the evening working on the article for Bus Conversion Magazine about Larry and Carol Hall’s GM4106 bus conversion and finished it around 10 PM.  I spent another 1.5 hours catching up on e-mail and checking in on the status of Technomadia’s bus renovation project at MasterTech in Elkhart, Indiana.  The weather has turned cool and should be perfect for working on the bus tomorrow.  We need to have long, productive days, so I had a snack and got to bed at midnight, played a few games, and went to sleep.


2015/08/22 (S) Clean and Level

We arrived at the SLAARC breakfast just before 8 AM.  We took the last two seats at the end of the long row of tables, but had to add another one as six more people came in after us.  We had a lively chat that lasted until almost 9:30.  After breakfast we stopped at the Tractor Supply Company store in New Hudson to get a couple more deer blocks and then headed for home.

We took a few minutes to put away tools and straighten up the garage enough that we could set up a work surface for Linda to use for cleaning the walnut drawer fronts for all of the bus drawers.  We set up the two sawhorses we got at Lowe’s yesterday, set two 8-foot 2x4s in the provided grooves, and set a 4’x8′ piece of 2″ rigid foam insulation across them to use as the work surface.  I found an old package of 4/0 steel wool and Linda found some old terry cloth towels.

Foam insulation work surface in garage with walnut drawer fronts laid out for cleaning with Touch of Oranges.

Foam insulation work surface in garage with walnut drawer fronts laid out for cleaning with Touch of Oranges.

Linda removed the drawer fronts from seven of the drawer boxes and tagged them so they could be reunited later as each front is uniquely paired with its box.  She then removed the handles from the drawer fronts and set them aside as they will be replaced with new ones once the cleaning is done.  She started with the back sides of the drawer fronts.  Following the directions she sprayed them liberally with Touch of Oranges wood cleaner, let them sit for 10 minutes, sprayed them again lightly, and rubbed them with the 4/0 steel wool.  She then wiped them off with a terry cloth towel and applied Touch of Beeswax using 4/0 steel wool, always working with the grain, of course.  The wax will have at least 24 hours to soak in before being wiped off.  Once that is done she will flip them over and repeat the process on the front side.

While Linda was doing all of that I hauled the 15 gallon DeWalt portable air compressor out by the bus, plugged it in, and connected the air hose.  I used the 4″ circular pneumatic sander on a few remaining high spots and decided I was done with it.  I had found some old packs of 80 grit half sheets and tried using them on my orbital sander but the grit disappeared very quickly and the sheets snagged and tore on splinters in the plywood.  I spent more time changing sheets than I did sanding with them so I abandoned this approach after the fifth sheet.  I did, however, find a half dozen splintered areas and prepared those by making stop cuts with a utility knife and then peeling the splinter free with a putty knife, creating voids that will be filled with leveling compound.

I was tired of sanding and was clearly not going to get the floor back down to bare wood.  I decided that the floor was as sanded and smooth as it was going to get and it was time to move to the next process; patching and leveling.  Before I could do that, however, I needed to clean the coach.  I vacuumed the floor three times and vacuumed all of the woodwork and wallpaper.  As I worked from the bedroom forward Linda followed behind with a microfiber cloth wiping down all of the woodwork.

I assembled the tools I needed to apply the Universal Patch and Skimcoat; a 3″ putty knife, a 5″ putty knife, a combination smooth and toothed rectangular trowel, a mixing bucket, and a 2 foot long wooden stir stick and a mixing paddle designed to go in a drill.  Each bag of UPS weighs 7 pounds and gets mixed with 1.75 quarts of water, which works out to 1 part water to 2 parts UPS.

The directions on the bag indicated that a full bag of UPS, properly mixed, would cover 20 to 25 square feet 1/8″ thick.  That’s only a 5’x5′ area, but I only had a few gouges that were 1/8″ deep, so an entire bag was going to cover a lot more than 25 square feet when applied as a skim coat.  Not having worked with this material before I had no idea how much working time I would have so I decided to mix half a bag.  The recommended mixing method using a paddle in an electric drill turned out to be a bad idea so used the 2-foot long wooden stir stick to mix the compound.

TEC Universal Patch and Skimcoat applied to the floor in that hallway.

TEC Universal Patch and Skimcoat applied to the floor in that hallway.

I started in the bathroom patching small depressions and then working out from the baseboards.  By the time I got out into the hallway I had not even used half the compound and it was starting to set up.  I hurried to use as much of it as I could, and tried adding a little extra water to extend its workability, but was only able to use about 60% of it before it was too stiff to spread and trowel off smoothly.  I could have waited 1 hour and then mixed and applied more compound but I did not want to risk disturbing what I had already done and it has to set for 24 hours before I can sand it, which I will have to do.

Cleanup required warm soapy water for the tools.  I then poured it into the 5 gallon compound bucket, topped it up with water, stirred it to dissolve the compound as much as possible, and let it sit.

For dinner Linda made Farro with mushrooms, onions garlic, glazed snow peas, and grated carrots.  She needed some dry white wine for the Farro dish and opened a bottle of Pinot Grigio, so we had a glass with the meal.  As rule if a wine is used in a dish it is also a good choice to drink with that meal.

After dinner I went to Lowe’s and got some more 4/0 steel wool and some 80 grit sandpaper sheets.  I stopped at O’Reilly’s for a battery disconnect switch for the lawn tractor but they did not have one.  I tried the Howell Tractor Supply Company but they did not have one either.  I drove to the Brighton Shell station, topped off the fuel in the Element, and went home.  We turned in at 9 PM and watched a 007 movie before going to sleep.


2015/08/07 (F) Arrangements

We had our usual, but never boring, homemade granola with fresh blueberries for breakfast.  I brewed a pot of the Costa Rican half-caff coffee we bought yesterday without tasting it first.  We found it to be somewhat bitter, which is not our taste in coffee, so we probably will not buy more after this batch is gone.

We spent a good part of the morning researching cabinet pulls on the Cabinet Service Hardware (CSH) website.  We found a pull on the CSH website that appeared to be identical to the one from The Home Depot, which is a Rockefeller Antique Brass from Liberty Hardware.  The one from CSH was a Belwith Keeler HH.P135-AB for $2.47 each.  The one from The Home Depot was $2.48 plus tax but no S&H.  Since we have the one from THD in hand and like how it looks we will probably buy them locally.

Many of the drawers in the bus have the pulls attached to the walnut face and then the face attached to the front of the drawer box.  Thus, the only way to remove the pulls is to first unscrew the box from the face.  I took the face off of one drawer and installed the new pull.  It fit perfectly, confirming that the mounting hole spacing is 3″ center-to-center.   The one from THD comes with 1″ and 1.5″ #8-32 machine screws but it looks like we will need something shorter than 1″ for the framed drawers and shorter than 1.5″ for the solid drawers.  The cabinet doors have 3/4″ thick frames so the 1″ machine screws may work for those.  Thus we should be able to use some of the machine screws that come with the pulls from THD but will have to buy some as well.  The pulls from CSH do not come with screws so we would have to buy those anyway.

Linda left around noon to meet Diane in Livonia to see a movie (Ricki and the Flash) starring Meryl Streep, Kevin Kline, and Rick Springfield.  I went on an errand run while she was away.  At The Home Depot in Howell I found 10 packs of the drawer pull we like so the price came out to under $2 per pull compared to $2.48 when purchased individually.  We need 58 to replace all the ones in the coach plus at least four for the new desk drawers so I bought six 10-packs.  We have not decided if we will replace the single screw round pulls on the two TV cabinet doors with the double screw pulls.  If we do we will need a couple more pulls.  If not, we will need two round pulls in the same style and finish, which THD also carries.  I bought small packs of #8-32×3/4″ and #8-32×1-1/4″ lengths so I can figure out what lengths work best in each location.

Jarel called while at was THD.  The plans for the built-in sofa had arrived in today’s mail and he had a few questions.  We talked through the issues and came to the conclusion that it would be better for us to come down on Wednesday instead of Tuesday to pick up the desk.  That will give him time to cut the sofa pieces and do some minor assembly and finishing.  The plywood seat and side pieces need to be stained to resemble the walnut hardwood and a 3/4″x3/4″ piece of walnut hardwood needs to be attached to the front edge.  He also needs to cut the piece of walnut veneered plywood for the front and then spray everything with the same lacquer he has used on all of the walnut desk pieces.

As I was finishing up at THD I also got a call from Chuck letting me know that everything was on track for the refrigerator swap tomorrow.  My next stop was at the Howell Lowe’s for a 4′ x 4′ sheet of 3/4″ plywood but I did not like their selection any better than THD.  I ended up buying two quarter sheets (24″ x 48″) of birch plywood.  This plywood has a lot of thin layers, so it is very flat and dimensionally stable, with defect free surfaces that are sanded smooth and very clean edges.  These sheets will go on the bottom of the refrigerator alcove in the bus to elevate the new refrigerator above the new vinyl tile floor.

Back home I texted Josh at Coach Supply Direct, called Terry at A-1 Upholstery, and called Butch regarding the change in our visit date for next week.  Linda got home shortly thereafter and helped me reattach the edge trim to the two doors of the old refrigerator and load them into the back of my car.  We covered everything with blankets and then loaded all of the drawers, shelves, racks, and bins.  Once the old fridge is out of the bus we will clean it, reassemble it, plug it in, and make sure it is cooling.  We will then call DTE Energy to arrange pick up through their recycling program.

Loading pieces of the old refrigerator into the back of the Element to take to Chuck's shop.

Loading pieces of the old refrigerator into the back of the Element to take to Chuck’s shop.

Linda bought an Amy’s Roasted Vegetable Pizza while she was out and cooked it for dinner.  It is our favorite store bought pizza, and much better (for us) than what we can usually get at restaurants and pizzerias (with the exception of Satchel’s in Gainesville, Florida), but not as good as the pizza we had while Mara was here.  That pizza was memorable.

After dinner I got a shower and then worked on the design/drawings for the seat and back cushions for the built-in sofa for the bus.  I started editing blog posts for July but did feel like uploading them.  We went to bed earlier than usual as we had to up at 7 AM tomorrow to go to our weekly ham radio club breakfast.