We were up at 8 AM, fed the cats, made coffee, and had breakfast. Phil showed up around 8:30 AM, unloaded his front loader, dropped his flatbed trailer, and left in his dump truck. I turned on the fireplace and we enjoyed our coffee while iPading until 10:15 AM.
Our first task today was to cut up several large limbs that I pulled out of the woods last evening to get them out of Phil’s way. I cut them up with the chain saw and then we stacked them on the disposal pile for Phil to haul away.
Phil returned at 10:30 and moved his Caterpillar 305C excavator into the woods across the street by the culvert. I went down to chat with him briefly to make sure I understood what he was going to work on. There were a lot of small trees (3″ diameter), saplings, and bushes scattered around the site. Some of them had been dead for years and some had just been knocked over by Phil. I decided to work in that area with my chain saw cutting everything up into five foot lengths so Phil could use his front loader to get them into his dump truck. I worked at this until 11:30 AM and then turned my attention to the bus. Linda worked on her needlepoint while I cut wood.
Before getting started on construction tasks I took two pieces of filter material and set them on the wire shelf in the freezer compartment of the new refrigerator, one on top of the other. I then set the two remote thermometer sensors on the filter material. Butch had suggested the other night that I set the sensor on a sponge to get it off of the floor of the freezer compartment as it was likely responding to the automatic defroster heat strips when they come on. I figured the filter material would work just as well and that placing the sensors on the shelf would definitely get them away from the floor.
Linda brought out a bag of ice from the house fridge and put it in the bus freezer. She also filled several 1/2 gallon juice and milk cartons with water, put the caps on, and put them in the fresh food compartment. The purpose of all of this was to add thermal mass to the compartments to cause the refrigerator to run less often and reduce large swings in temperature.
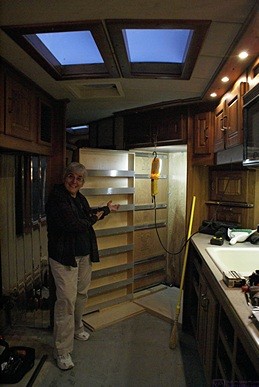
Inside the bus our first sub-project was installing the desk, which included putting the front passenger side HVAC duct cover in place even though it is not finished. It took us quite a while to get everything positioned just right. With Linda holding things in position I screwed the right pedestal to the wall, adjusted the position of the base and screwed the pedestal to the base. We then repeated that process for the left pedestal and base.
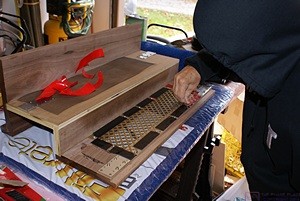
Linda removes the backing from the double-sided tape on the back side of the air grate in the center connector/cover for the desk.
At this point we had several things to do with, and under, the center connector/cover so I removed it and took it into the garage/shop. We cut a piece of the decorative brass colored metal grate and secured it to the back of the air opening with small screws every few inches. Next we cut a piece of black plastic mesh to fit over the grate. We then cut pieces of 3M Extreme Mounting Tape (double-sided) and attached them to the back side of the grate in between the screws. Linda peeled off the protective layer and we carefully placed the plastic mesh. Using one of the scrap pieces of the protective layer I rolled the plastic into the take with our wallpaper seam roller. Finally, we had a piece of filter material already cut to cover this air intake opening so we set that on top of the mesh, pressed it down to take advantage of the tape, and then secured it with Gorilla Tape on all four edges, rolling it with the seam roller to get good bonding.
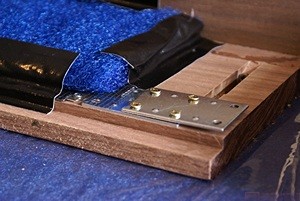
A detailed view of one of the homebrewed tongue and groove alignment assemblies made from flat mending plates.
Back in the coach I had to tie in the outlet strip to the 120VAC power feed. I shut off the breaker for this circuit and checked with my tester to make sure it was not live. The hot and neutral wires were accessible but the ground wires were back under the left pedestal where they were not easy to reach and manipulate. It took a while, certainly longer than it should have, but I got the three ground wires tied together with a grounding clamp. I connected the hot and neutral wires (three each) relatively easily using wire nuts. I turned the circuit breaker back on and checked that the outlet strip had power between the correct terminals and did have power between any other terminal pairs.
I went to the garage to get a four foot long piece of 1″X1″ aluminum angle that I bought weeks ago to use as a support bracket for the upper rear edge of the center connector/cover. I was going to cut off a 26″ long piece and then drill countersunk holes but I noticed a piece of 1/2″X1/2″ light gage angle that was about 26″ long and already had holes in it. It was long enough to span the space between the pedestals and go under each one about an inch. That was sufficient to position it correctly so Linda held it there while I secured it to the wall with four round (pan) head screws. I then put the center connector/cover back in place.
Phil has cleared all of the organic debris from the area where the driveway extension and RV pad will be located.
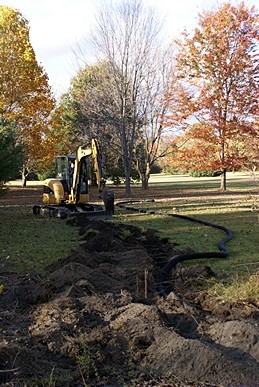
Phil starts trenching and placing the plastic drain tile tubing for the French drain.
Phil had long since left in his truck to dump all of the wood debris. We had a light lunch of Amy’s Lentil Vegetable soup and fresh organic grapes. While we were eating a group of three deer came to our back yard and eventually ended up eating apples that had fallen from our tree onto the ground. These same deer, along with two others, were here yesterday at twilight and were very frisky. We saw them later in our neighbor’s yard across the street.
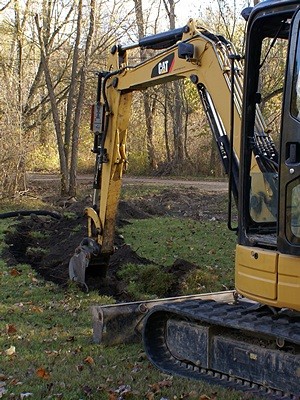
Another view of Phil’s smaller excavator with the 12” bucket being used to trench the French drain in the southwest portion of our property.
Phil returned around 3 PM and started working on the French drain. He replaced the 30″ wide toothed bucket with the 12″ one and started at the high end if the culvert on this side of the road.
The grand finale was the installation of the Corian desktop, which has been sitting on a blanket in the middle of the living area floor since Tuesday. I drilled countersunk holes through the four corner plates in each desk pedestal from underneath. I then inserted 1-1/4″ #8 self-drilling outdoor wood screws into each hole, again from underneath, until they just protruded above the corner blocks and then backed them off until the tips were just below the surface. We set the desktop across the pedestals and pushed it as tight to the back and right end wall as we could. Linda put her weight on it and I ran the screws home, pulling the top tight to the pedestals. We reinstalled the four drawers in the right pedestal, finally getting them off the floor in the hallway where they have been since Tuesday. We stepped back to admire the desk and agreed it was a thing of beauty and a joy to behold. Linda also marveled, once again, at how much space she now has to work in the kitchen.
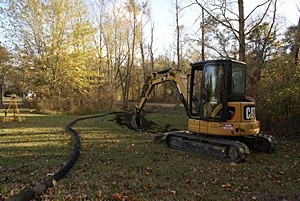
A wider shot showing the excavator and drain tile. The laser level is at the left edge of the frame. The main arm of the excavator (with the bucket attached) has a laser sensor on it that tells Phil exactly where the lower edge of the bucket is relative to the laser level.
The “denouement” was mounting the outlet strip and adding felt pads to the two fake drawer fronts on the left pedestal and then adjusting the magnetic catches. I originally had the outlet strip (temporarily) mounted to the wall between the two pedestals with two screws a few inches below the cord notch in the center of the back edge of the desktop. Rather than put it back there I decided to mount it on the underside of the desktop just in front of the cord notch.
The underside location will work just as well as the wall mount location for regular 2- and 3-prong plugs but probably not as well for small AC adapters. The added pluses of this location, however, are: 1) it will not interfere with cords coming through the notch, 2) it will be up out of the way of the UPS (uninterruptible power supply) that will sit on the shelf at the top of the center connector/cover, and 3) if liquids are accidentally spilled and run over through the notch they will not run into the outlet strip. Besides, devices with an AC adapter will probably be plugged into the UPS so this was a better overall approach.
Our next task was to adjust the sofa seat until it was deep enough to be comfortable. We slide the plywood seat out a couple of inches and then got the seat and back cushions (three each) from the house where they have been stored since September 21st. We put the cushions in place and sat down. We pulled the cushions out and pulled the seat board out until it was five inches farther out than originally designed and put the cushions back in.
The front edge of the seat cushions were out farther than I liked but we both agreed the sofa was now comfortable to sit on. The distance from the bottom front edge of the back cushions to the front edge of the seat cushions was originally only 16 inches and that turned out to just be too short. With the seat board moved out it will now be 21 inches.
In order for the sofa to work correctly, both as a sofa and as a bed, we will need a cushion that is 5″ wide by 6″ high, by ~76″ long to fill in the space behind the seat cushions and below the back cushions. The height and foam makeup will be such that it is level with the tops of the seat cushions and have the same firmness and feel. Would that I had designed the sofa for this depth to begin with and had the seat cushions made accordingly, but we were trying to open up the living room by not having the sofa protrude into the aisle any more than absolutely necessary.
Next up was reinstalling the wood trim in hallway. We have an interesting plan for the lower half of the hallway but in case we do not get it finished before we leave for the winter we wanted the trim off the bed and back on the wall.
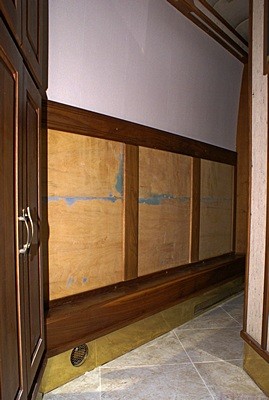
The lower outside hallway wall. There were originally three framed panels of vertical strip mirrors here. We will replace them with wood panels, probably in a lighter color to contrast with the walnut trim.
This trim originally framed three panels of vertical strip mirrors. We were able to remove the mirrors as they were glued to wallpaper. In the process we discovered that the left and right panels were the same width but the center panel was wider. The trim consisted of six pieces of wood; a long upper and lower horizontal piece and four vertical pieces. The six pieces were screwed to the lower half of the outer wall but not attached to each other. The left and right vertical pieces were tight to adjacent woodwork, but the two intermediate pieces were free to be repositioned.
We reattached the upper horizontal piece first making sure the mounting screws went back in the same holes. Next we pushed the lower horizontal piece into place but did not screw it to the wall. We then attached the left and right verticals. The horizontal distance between the inside edges of the left and right verticals was 75 inches. The two intermediate verticals were each 4-1/2″ wide so the distance between verticals needed to be 22″ (75 minus 9 = 66 divided by 3 = 22). We carefully positioned and secured the two intermediate verticals to achieve this spacing.
The trim boards all have rabbited edges on the back side. I need to measure them carefully, but they are ~3/16″ deep by 3/8″ wide. Our current plan is to use 3/16″ underlayment or other 3/16″ high quality plywood to make three panels that will fit within these rabbits with a little room to spare. The panels will either have a hardwood face or we will cover them with a hardwood veneer of a wood that contrasts with the walnut trim. We can get the veneer from Rockler once we decide what we want.
Linda spread out several towels on the new desktop and we moved tools and supplies from the A-V cabinet, behind the driver’s seat, to the new desk. I then removed the Corian top of the A-V cabinet and put in on the bed. We still have a small amount of wallpaper to install in the front of the living room and into the cockpit on the driver side, but it will not be easy to do.
These areas, such as the one behind the A-V cabinet, are small with limited access so most of my sanders cannot be used. The only one that might work is the Porter-Cable oscillating tool but I did not get it out today. I got some sanding sponges instead and tried those on the wall under the passenger side window trim next to the co-pilot seat. When I sanded a dark area about 6″ long by 3″ wide the wood in the center crumbled and I ended up with a hole 3″ long by an inch and a half wide. I could see one of the stainless steel structural members through the hole. Given what was obviously water damage I was glad we bought a bus with welded stainless steel as the main structural material.
Based on what I could see, the walls in the bus appear to be 1/2″ plywood although I did not measure the thickness. This area had obviously gotten very wet over a long period of time and some of the wood has rotted. It is the only spot we have discovered that is this damaged and we immediately realized that we will not be able to wallpaper this area. We will probably panel over it, similar to what we plan to do with the veneered panels in the hallway, but today was not the day to figure that out.
It was going on 5 PM and we decided we were done for the day. I turned off all of the electric heaters, turned on the Aqua-Hot, turned on all three thermostats, and set the temperature to 20 degrees C. The refrigerator was also indicating much colder freezer temperatures than it had been before I moved/isolated the remote sensors so I reset the freezer and fresh food controls to their “normal” center positions. Tomorrow we will replace the alkaline batteries with the Lithium batteries we bought specifically for the TempMinder thermometer system, reset the min/max data, and monitor it for a few days.
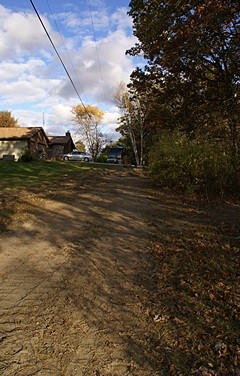
I walked down to see what Phil was doing. He was making good progress with the French drain but did not have enough of the plastic drain tile to finish it today. He plans to work tomorrow and will have the additional tile he needs to finish the drain. I left him to his work and took photos of the fall colors in our yard as I worked my way back to the house.
I spent an hour at my computer dealing with e-mail and transferring photos from the Sony a100 to my laptop. Linda called me to dinner at 7 PM. It was a simple meal of vegan Coney dogs with mustard, onion, and beans served open-faced on a whole wheat hotdog bun. As a side dish Linda steamed Opo squash. It was the first time either of us had this particular squash. It was very mild with a hint of cucumber. It is available all over the world and widely consumed as it is relatively inexpensive. It was OK, but I thought it might work better as an ingredient rather than a stand-alone side dish.
I exchanged a couple of text messages with Chuck and confirmed that we would be at his shop tomorrow after breakfast to retrieve our two bus windshields. The rest of the evening was spent in the living room by the fireplace reading and writing on our iPads before turning in and watching episodes of Rick Steeves’ Europe and Joseph Rezendo’s Travelscope on Detroit PBS (WTVS).