[ This post has 9 photos. ]
MONDAY 30 January
Expect the unexpected, right? For me, that’s inline with the idea that “things happen beyond our control, but how we deal with them is up to us.” After a week of somewhat strange communications, but no additional work, a crew from Rauhorn showed up today. Rauhorn is another DTE contractor. I think they do both overhead and underground work, and were prepared for both, but the remaining work was mostly underground.
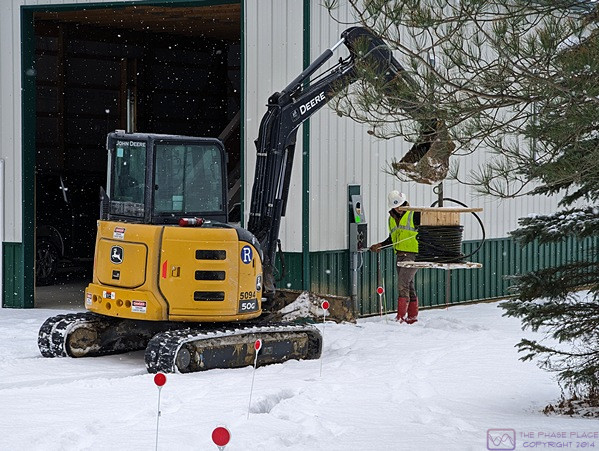
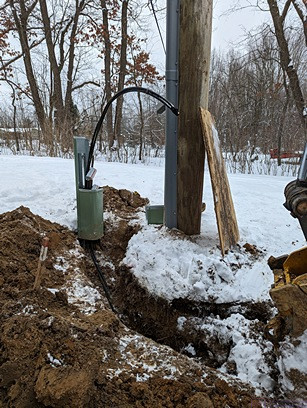
The small excavator was used to “hang” the large spool of 3-conductor, 3/0 AWG service conductor cable so it could unwind easily as it was fed into the 2” Schedule 40 PVC electrical conduit through the bottom of the meter enclosure. The conduit is visible coming out of the bottom of the meter enclosure and into the ground.
I was already familiar with Rauhorn as they did some of the work on the power upgrade for our neighbor’s house across the street back in mid-November. When they were finished doing that work, I asked the crew chief if he had a few minutes to came over and look at what I was planning to do, conduit-wise. He did, and gave me some very useful suggestions as to how to do it to make it easier on whatever underground crew eventually showed up to install the electrical cable to the barn.
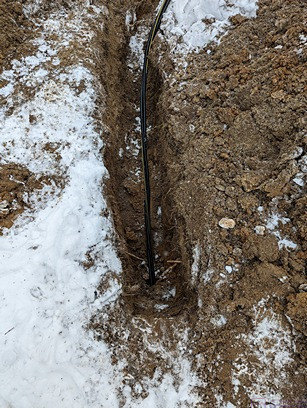
The trench from the open end of the conduit towards the pedestal with the service conductors already pulled through. The open end of the conduit is at least 24” below grade, but they did not trench that deep all the way to the base of the pedestal. There is no conduit from this point to the pedestal, as the cables they installed are rated for direct burial. That also means it does not matter if dirt or water gets into the conduit. The conduit was optional, but it saved me the cost of having DTE (or a contractor) dig the whole trench, allowed me to route the cable away from some trees, and will provide external protect in the event that someone ever decides to dig in this area.
This crew was here “to complete the installation of power to the barn,” but were surprised to find that major pieces of the work they planned to do had already been completed, specifically the pedestal and the 350 kcmil service drop conductors. (I was not surprised that they were surprised.) But they were fine with the situation.
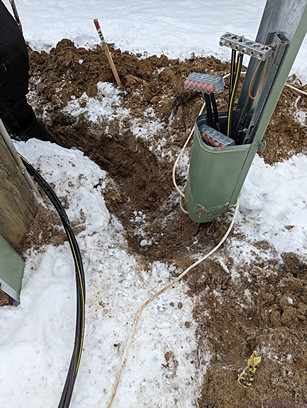
The trench for the barn service conductors to the base of the pedestal. The top cover of the pedestal has been removed to allow access to the junction blocks.
I explained about the advice I got from one of their guys before trenching in the 2” Schedule 40 PVC electrical conduit, and pointed out the stake that marked the location of the free end near the new pole. With the small excavator (12” bucket), they came prepared to dig a trench, but only had to use it to unearth that end of the conduit (and hang the large cable spool). They dug up to the base of the pedestal by hand as there were live conductors buried there.
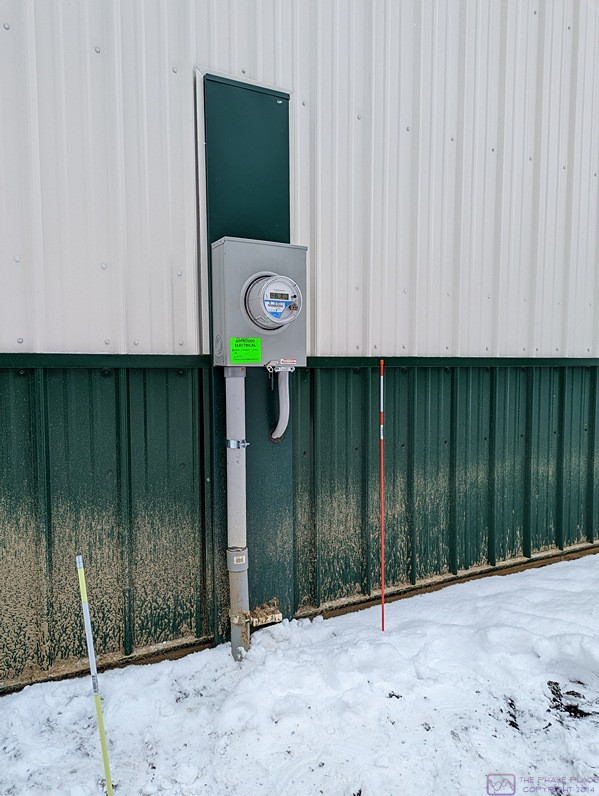
The 3-conductor, 3/0 AWG service conductor cable being fed into the 2” Schedule 40 PVC electrical conduit through the bottom of the meter enclosure.
They were glad to have the 7/16” rope already through the conduit and used it to pull the 3/0 AWG, 3-conductor underground service conductor (USG) cable from the meter enclosure up to the pedestal. To does this, they suspended a large spool of the USC cable off of the excavator bucket so that it could unwind horizontally. The free end of the cable was attached to the rope in the meter enclosure in such a way that it would not pull loose. One guy helped guide/feed the cable into the conduit attached to the bottom of the meter can, while two guys pulled it through the conduit from the other end by hand with the rope. They stopped with enough cable still at the meter enclosure to make the connections to the meter lugs.
The barn service conductors through the conduit and up through the pedestal. They were then trimmed to the length needed to fit into the junction blocks. At this point, the crew was dealing with live (energized) un-fused wires. They knew what they were doing, and had the right personal protective equipment, but this was still not work for the faint of heart.
On the other end, they opened the top pedestal cover and routed the cable from the barn up through the bottom and out the top. They cut each wire to length to fit into the large junction blocks that were already there. As they were working, I noticed that one of the hot conductors that had been terminated by the previous crew had about an inch of exposed conductor below the insulated junction block. That was a major oversight that could have led to a short or an energized pedestal cover (the covers are made of metal). Rather than try to cut the live exposed metal strands shorter, one of the guys removed the conductor from the junction block, wrapped electrical tape around it up past where the wire insulation ended, reinserted it, and tightened it. He was wearing proper personal protection equipment, (PPE), and clearly knew what he was doing, but all of this was on a live, unfused wire.
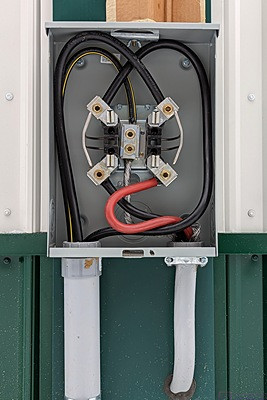
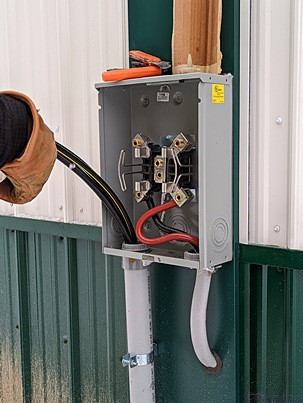
The barn service conductors enter the meter enclosure from the large conduit on the left and are attached to the meter socket lugs at the top. (Meter enclosures/sockets have been built this way for a long time, going back to when almost all utility conductors ran overhead and entered the meter enclosure from the top.) The black, red, and bare/aluminum conductors attached to the bottom meter lugs are the service entrance conductors. They are enclosed in a sheath as they exit the meter enclosure at the lower right and go through a hole in the side of the barn, where they are then routed up into the bottom of the main load center and connected to the main breaker (first disconnecting means) at the top of the enclosure. Because this is a sheathed cable assembly, it is not required to be in conduit. Although I would have preferred that it was, this work was done by the electrician, under permit, and inspected/approved by the County. As such, it was not appropriate for me to change it (and would have been a bit of work to do so).
ep was to install a meter, at which point we finally had power to the barn! I closed the main circuit breaker (which serves as the main disconnect for the barn) and then closed the circuit breaker for the Siemens FirstSurge surge protection device. Two green lights indicated that I had power to both buses of the panel. (I later checked the GFCI receptacle the electrician had installed way back when, and confirmed that I had 120 VAC and the GFCI feature worked.)
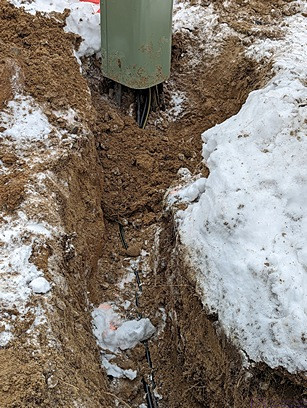
The trench with the barn service conductors bending into the bottom of the pedestal. This photo shows that the wires, which are direct -burial, are not buried very deep at this point.
The final step was to put the upper cover back on the pedestal and secure it, and use the excavator to push dirt back into the trench and up to the base of the pedestal. One of the crew members said they would transmit the meter number to DTE.
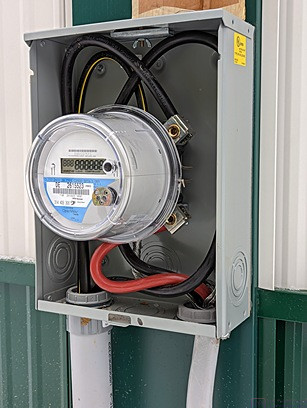
Almost done. They meter was seated in the socket and, just like that, we had power to the barn! It was obviously nice to finally have power to the barn, but the five (calendar) days it took to do this work were fascinating for me to watch and document. I learned a lot from the various crews, who were all (mostly) good sports about me being around with a camera and asking lots of questions.
As the trench by the pedestal was being filled back in, I took this photo to show that the bottom cover of the pedestal does not extend very far below grade, and the wires going to barn bend almost immediately as they leave the pedestal towards the conduit. The same is true for the service conductors going to the house. Any digging within a 5’ radius of this pedestal would risk contact with these conductors. They are all insulated, of course, but still …
I e-mailed the DTE case manger and the planning consultant (with a couple of photos) to let them know the work had been completed and I had power to the barn. As far as I knew, I was now done dealing with DTE other than to get the account number for the new meter and pay the bill each month.
The meter enclosure cover installed and secured.
Although I was not going to pull an electrical permit until mid-March, and probably not start wiring the barn until early April, it was time to work on the electrical plan in earnest. As soon as we returned from our travels I would need to be ready to start buying electrical materials and devices and staging them in the barn. Of course, I needed the big roll-up doors in order to do that.
…