We set our alarm for 6 AM, got up, had granola for breakfast, and then went to The Home Depot to rent a 100 pound floor roller. The roller consists of three steel rollers, each about 4″ wide and 6″ in diameter, on a common axle. A three foot long handle attaches to the axle between the middle and outside rollers. A pair of small wheels attach to the crossbar at the base of the handle for transport and can be swung up out of the way or removed. We rolled the roller out to our car and loaded it into the back. We then went back inside and purchased up a hard edge grout float, a small offset float, sponges, a bucket, and a bottle of Armstrong Once and Done floor cleaning concentrate.
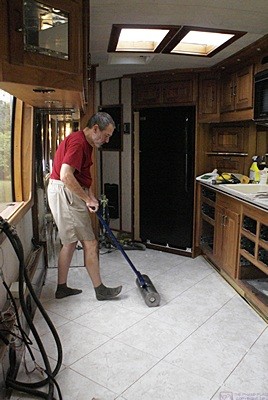
Bruce rolls the floor tiles in the kitchen with the 100 lb. roller.
Once we got home we got right to work on the bus. We had a few pieces of vinyl tile that still needed to be cut and installed at the front of the bus and that took us over an hour. Once that was done it was time to glue the tiles down. I got the Armstrong S-288 adhesive and the trowel. We read the directions on the adhesive bucket and finally figured out that I should probably not spread more adhesive than could apply in about 20 minutes as the product is time sensitive. The adhesive would then have to set until it was tacky but did not transfer to my finger when touched, which would be 10 to 30 minutes, but we would need to have the tiles set within an hour of when I started spreading the adhesive. The tiles then needed to be rolled with the 100 pound roller.
We started in the center of the coach and installed the tiles as follows: 1) Remove selected tiles; 2) Spread adhesive; 3) Clean up tools while adhesive cured; 4) Lay tiles carefully back in place; and 5) Roll the freshly set tiles. It sounds easy and straightforward enough, but each step had its own issues.
For Step 1) we had to agree on how to remove and stack the tiles so they were in the correct order for installation and to remove them so as not to disturb the surrounding tiles. At Step 2) I had to be careful not get adhesive on anything except the area of the floor I was working on. I also had to make sure the working area was completely covered but also completely troweled off correctly. In Step 3) the tools needed to be cleaned before the adhesive set so we could use warm soapy water to clean them. Once set, the adhesive would have to be cleaned off with mineral spirits. Step 4) was the most critical. The tiles get installed once the adhesive has set to the touch, i.e. still pliable but no transfer when touched. The adhesive effectively acts like a contact cement–it is not possible to slide a tile once it is down–so getting each tile correctly positioned on the first try was critical. Step 5) was the easiest, once we got the 100 pound floor roller out of the car and into the bus. The tiles needed to be rolled as soon as they were installed, which was easy except for the limited confines of the bus interior.
We ended up doing this six times in the following order:
- Kitchen;
- Built-in sofa portion of the living room;
- Front passenger side of living room’
- Hallway;
- Foot and front side of bed;
- Rear side of bed; and
- Bathroom.
This corresponded roughly to the order in which we had done the dry fit and it was critical that the central tiles get installed in exactly the right locations. We used plastic spacers at all tile intersections and between tile edges where needed. (The spacers were 2-sided. One side was an X for use where four tile corners meet. The other side had three tabs in line for use between the edges of two adjacent tiles.) These spacers were removed when we pulled the tiles out and replaced when we installed them. We also divided the job up to keep the number of tiles being set to a small enough number that we could meet the time requirements of the adhesive and to make sure we did not get trapped in the back of the coach. We finally installed the last piece (for now) at 9 PM. We had short breaks for lunch and dinner but each cycle of this process took about 90 minutes.
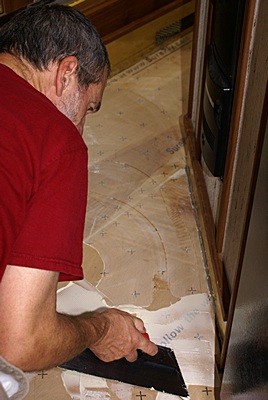
Bruce spreads Armstrong vinyl floor adhesive in the hallway.
My knees were sore by the time we quit. They have never done well with kneeling due to the boney lumps that resulted from Osgood-Slaughter’s disease in my late pre-teens. Occasionally kneeling down on one of the spacers, which had pointy centers on one side, did not help. I probably got down and up at least 100 times throughout the day, maybe more, which was hard enough all by itself. Although I am in better health and physical shape than I was in my 30’s and 40’s at 63 I am certainly not in the prime of my youth. At one time Linda and I had a hundred pounds or more to lose between us. Time, use, and the abuse of being overweight have inevitably taken their toll on our joints. At the end of the day I was left thinking that flooring work is a young person’s game. Whether hardwood, carpet, tile, or even continuous sheet vinyl, much of the work is done on your hands and knees, or bent over, and it is tough work.
I took a long, hot shower and then Linda took her shower while I checked e-mail. We had some Coconut Bliss ice cream with fresh strawberries and then turned in. We watched an episode of Joseph Rosendo’s Travelscope, set the alarm for 7 AM, and went to sleep.