[ Note: This is an update post on the accessory building (barn) we had built while we were traveling in Eastern/Atlantic Canada and New England. It is long, and contains 12 photos with captions. ]
TUESDAY 11 October
Our barn builder (Chuck) was due to come by today to meet with his insulation sub-contractor (Mike), and then meet with us. He texted me mid-morning to let me know that he and Mike would be here at 11:30 AM. Mike got here first, so I walked down to the barn and introduced myself. Chuck showed up a few minutes later. The three of us looked at the insulation part of the job, and discussed a few options. When it sounded like we were all on the same page, I left them to discuss business.
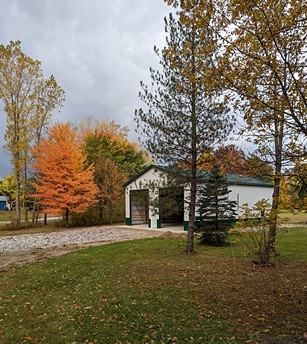
The view of the SE corner of the barn, on a cloudy fall day, looking towards the NW from the existing driveway near the utility pole.
We were not insulating the entire barn (that would be a big/expensive job), but we were insulating the shop room on the main floor and the storage room above it. The original plan was to spray foam the walls of both rooms with closed cell foam, and use blown-in insulation above the ceiling of the storeroom. After talking it through, Chuck and Mike agreed that it made more sense to go ahead and spray foam the top side of the storeroom ceiling, which would have a layer of OSB on the underside anyway. That would make the entire envelope for the two rooms really tight against air infiltration or leakage, so I was OK with that change. (Note that the floor of the shop is concrete with 4” of foam insulation underneath. The floor of the storeroom is plywood, and the joists are exposed and will not be insulated.)
Once Chuck and Mike were done, and Mike took off, Chuck, Linda and I walked the barn. It was the first time since we left on our trip that we were able to talk to him face-to-face, and in the barn. We had a few questions, which he answered, and there were a few details to discuss, which we did, and he gave us an approximate timeline to finish the job.
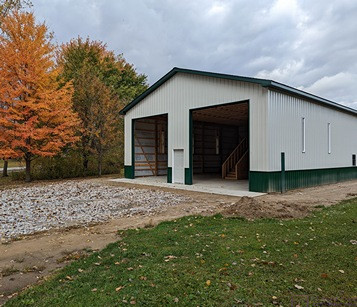
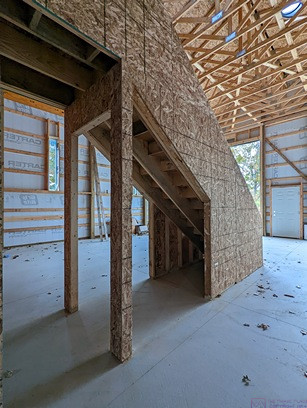
A closer view of the SE corner of the barn looking towards the NW. The stairs to the storeroom are just visible through the large door for the smaller bay on the right. The tall, narrow green trim on the side near the front of the building is the location of the electrical service entrance.
There was a modest list of smaller things that needed to be done, including removal of some of the OSB that currently enclosed part of the underside of the stairs to the storeroom (which my plans indicated should be open on both sides). Most of the tasks should be completed by the end of October, but the job won’t be completely finished until the two large roll-up bay doors are installed sometime in November, the driveway and finish grading are completed, and the final inspections have taken place. The driveway and grading work will happen as soon as Phil (Precision Grading) is available and the weather allows the work to be done properly.
Chuck indicated that the next building inspection might happen as soon as this coming Friday, but the storeroom ceiling had to be installed before the insulation could be installed. The insulation will likely be installed early next week (if the storeroom ceiling is in), followed not too long after that by the electrician, who has to install the meter can, the 200A distribution panel, and one electrical outlet (per code). The tunnels and diffusers for the four sun tunnels still have to be installed, along with three insulated entry doors: The main entrance (between the two big bay doors) and the doors for the shop and storeroom.
WEDNESDAY 12 October
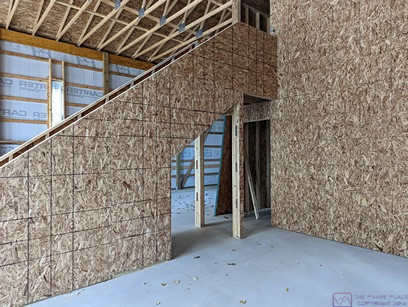
This view is of the entrance to the shop (main level) and the staircase going up to the storeroom, as seen from the east side (smaller RV bay). The OSB enclosing the space under the stairs has been partially removed at my request.
The lead carpenter (Garrett, I think) and his two assistants were here today, so I walked down and introduced myself. By the time I got to the barn, they had already installed the OSB ceiling in the storeroom, including the sun-tunnel and diffuser, and were working on cutting out the portion of the OSB on the sides below the staircase that I wanted removed. I spite of having just the door opening (no windows) there was enough light to see clearly. Artificially lighting will be needed, of course, but I was pleased with the effectiveness of the sun-tunnel/diffuser. I only stayed a few minutes as they were clearly busy. I texted Chuck to let him know they were here and that I had met them briefly.
THURSDAY 13 October
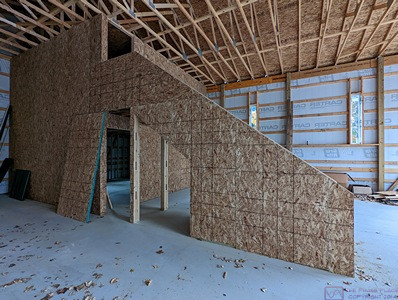
This view is of the entrance to the shop (main level) and the staircase going up to the storeroom, as seen from the west side (larger RV bay). The OSB enclosing the space under the stairs has been partially removed at my request. A small portion of the shop room is just visible through the door opening.
Yesterday, I finally managed to get on the DTE website and locate the information I needed on the process/procedure for getting electrical power to the barn. I had printed off the instructions and called one of the indicated numbers, but it was already after hours, so I had to wait until today to pursue this further.
After breakfast I made the call to DTE. Actually, there were two phone numbers, one for commercial and one for residential. I called the commercial number first, as that’s what the instructions seemed to indicate I needed to do. The voice menu made it fairly obvious that this number was for builders and I needed to call the residential number, so I did.
I spent about 15 – 20 minutes with Jennifer, the customer service representative, at the end of which time I had a work order number and a phone number for the service center. She said to give them four business days to contact me, but to call them if I had not heard from them by then. She reiterated the information in the website instructions: I will have an initial phone call with a planning consultant and then do whatever I need to do as a result of that. There will then be a site visit, after which we will have costs and then make decisions and service commitments. Getting power to the barn is a big deal, and doing it in the best, but also most economical, way is important to the overall project, both in terms of capability and cost. There are really only two main options: 1) Have DTE run a cable to the barn from a transformer, or 2) Pull a cable from the house to the barn. This second option does not involve DTE directly, unless we would need to upgrade the power to the house, which is likely.
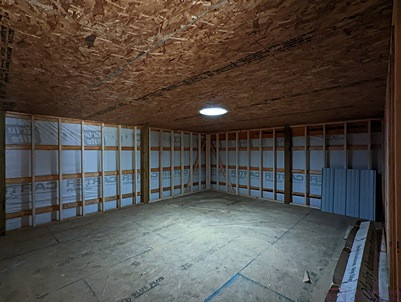
This is a view of the 2nd story storeroom as seen through the door opening from the landing at the top of the stairs. The two walls that are visible are the exterior walls of the barn. Not obvious in this photo is that there is space between the wall studs and the exterior wall, eliminating any thermal bridging. The white material on the walls is house wrap, and it extends around the two interior walls as well. Besides providing a vapor barrier, the house wrap will prevent the spray foam insulation from contacting and adhering to the exterior siding. The OSB ceiling has been installed along with the sun-tunnel and diffuser, which are nicely lighting the windowless space.
I think the most straight-forward approach would be to run power directly to the barn from the existing pole that feeds the house. (This pole is actually closer to the barn connection point, at 88.5 feet, than it is to the house service entrance, at 95.5 feet.) DTE might be able to piggyback off the existing transformer, install a larger transformer as a replacement for the current one and then piggyback the two feeds, or install a second transformer just for the barn.
Regardless of those options, which would be determined by DTE, we would end with a second meter. Our neighbor has this exact setup, and the readings from the two meters are combined into a single residential rate bill. The main disadvantage is that we would not have any backup power to the barn, at least initially, if the grid goes down. That would be a major issue in terms of a heating system for the shop and storeroom, and more minor issue for the chargers that maintain the batteries in the bus and travel trailer.
The main advantage to pulling power from the house is that we have a 20 KW Kohler whole-house backup generator with grid-monitoring and an automatic-transfer switch. One of the downsides, however, is that the closest straight-line distance between the house (garage) and barn is ~155 feet, and the required wire run could be 30 to 40 feet longer than that. That’s a long run, and would require really large size wires in order to properly support the 240V/200A main distribution panel in the barn. The other downside, which relates to the first, is that we already have a 240V/200A main distribution panel (for the house) and 240V/125A main distribution panel (for the garage and library). I doubt that the existing service entrance cable from the transformer to the house is adequate for that total (525A) potential load. Of course, some of the loads will be shifting location as I relocate the shop from the garage to the barn, and the reality is that we never draw anything close to 325A now. And we never will, but everything has to be sized correctly to work safely as a system. It’s going to be an interesting process, regardless of the final solution.
FRIDAY 14 October
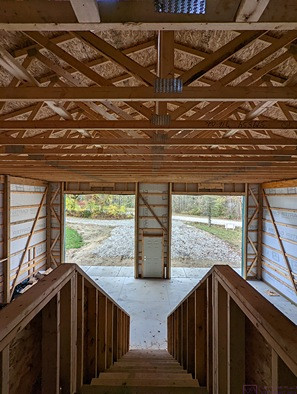
This is the view from the landing at the top of the stairs to the storeroom, looking south toward the inside of the front of the barn. The entry door is visible between the two larger bay door openings. (The doors will not be available for installation until sometime in November, 2022). The wall structure and headers over the large door openings are visible as are some of the roof trusses. The trusses are set on a 24” spacing, and the bottom members of are 38’ long, spanning the 36’ width of the building with a 1’ overhang/soffit on each side.
Around breakfast time, I got a call back from Sharon in the DTE Northwest Planning office. She confirmed that the work order for my service request had been created, and verified my information. She followed that up with an e-mail giving me the name and contact information for the planning consultant (John) who will work with me. She requested that I send/e-mail him a site plan and that it identify the location of the current electrical service (pole/transformer) and distances to the house (existing) and barn (new).
We were outside working on the trailer when a vehicle pulled in the driveway by the barn. I suspected from the lettering on the doors that it was the Livingston County building inspector, who Chuck had indicated might be here this week, so I walked down and introduced myself. He needed the approved plans for the building, which I did not have, but then he spotted the 2’ long piece of 4” plastic pipe with the rubber end caps, and surmised that the plans were probably in there. I had picked up this tube on Monday when I saw it, but it was very light and I don’t recall opening it to see what was inside. It was, indeed, the plans for the project, which were required to be on site at all times.
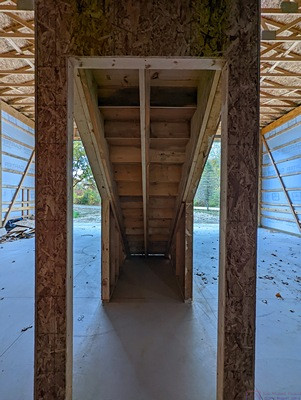
This is the view of the space under the stairs after some of the OSB has been removed from both sides. Opening this up will allow me to keep rolling tool and parts carts here that I can easily move to the bus, trailer, or anything else I might have in the barn to work on.
I was helpful, to the extent I could be, but was careful not to say too much as I was not the builder and the permits were not issued to me. The inspector was confused initially by a notation about a 12×42 something, until I explained that the building was sitting on 12”W x 42”D trenched concrete footing. He then had a moments hesitation when he realized the 16’ tall 6×6 engineered posts did not extend below the surface of the concrete. (I think he was expecting this to be a pole barn.) Again, based on my conversation with Chuck on Tuesday, I was able to explain the anchoring system used to secure the posts. The only thing he found, and wrote up as a “deficiency,” was the lack of proper handrails on the stairs going up to the storeroom. Deficiencies do not halt the project, but have to be taken care of before the final inspection.
I texted Chuck to let him know the inspector had been there and what he had cited. Chuck called me back to discuss handrail options and we agreed on a straight wooden handrail with a gripable profile that could be applied to the top of the 2×4 cap that is already in place.
SATURDAY 15 October
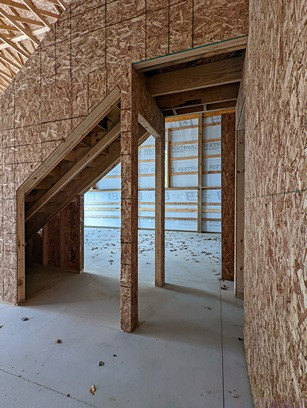
Here’s another view of the space under the stairs as seen from the smaller/east RV bay near the shop and looking ~WSW. A small portion of the low end of the staircase is still enclosed down to the floor to provide additional vertical strength (to prevent sagging and bouncing) and prevent any side-to-side motion. The OSB on the sides is attached to 2×4 studs sitting on base plates that are anchored to the concrete floor. I have been up and down this staircase several times, and it is very solid under foot.
My existing site plan for the barn project did not include the existing utility pole location, or distances to the house and barn service entrance points, that DTE needed, so I spent part of the day modifying my QCAD drawing to include those features. Although I had determined the location and this pole, and the approximate distances involved, on more than one occasion, I was unable to immediately put my hands on that information. It was thus easier, and less time consuming, at that point to get my 100’ tape measure and a stake, and just measure it again.
The distance to the service entrance point near the southeast corner of the barn was ~88’6” and the distance to the house service entrance point (southwest corner of the garage) was ~95’6”. I had previously told DTE the distance to the barn was less than 100’, so I was relieved that this was actually the case. Also, as the service entrance points were now both known locations, knowing the distances from each of them to the pole allowed me to draw auxiliary circles centered on each point with the corresponding radii, and thus accurately locate the pole on the drawing. (I was pleased that the pole ended up adjacent to the north side of the west driveway, where it is actually located.) While I was at it, I marked the (approximate) location of the other three utility poles on our property, as well as the pole just off our property near the northwest corner, and added notations for some of the other things on the drawing. (The distribution line was already shown, as was the location of the Consumers Energy gas line.) Once I was satisfied with the revised drawing, I saved it as a QCAD dwg file, and then again as an 11×17 PDF. I then e-mailed the PDF to John, the DTE planning consultant.
SUNDAY 16 October
Here’s another view of the space under the stairs as seen from the larger/west RV bay and looking ~ESE. A small portion of the low end of the staircase is still enclosed down to the floor to provide additional vertical strength (to prevent sagging and bouncing) and prevent any side-to-side motion. The OSB on the sides is attached to 2×4 studs sitting on base plates that are anchored to the concrete floor. I have been up and down this staircase several times, and it is very solid under foot. There is still a small space enclosed on both sides where I could store something, but I have no idea at this point in time what it would make sense to keep there.
Today was Sadie’s 4th birthday party for family at her parents’ house in Ann Arbor. (Her “Buddies party” was last weekend at Domino Farms). On the drive home in the afternoon (Linda was driving) I texted Phil at Precision Grading, to let him know we were home and to check on the completion of the driveway and finish grading for the barn, as well as the possible timing for redoing our French Drain in the valley behind the house. Phil has done all of our driveway and septic tank work since we bought the house, and built a French Drain for the west portion of our property that works really well. But he is also the sub-contractor for the excavating, grading, and driveway work on the accessory building. Indeed, Phil referred us to Chuck (the builder).
MONDAY 17 October
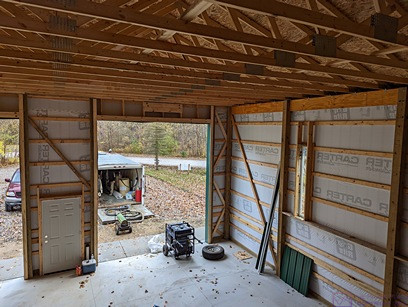
This is a view from the staircase landing by the storeroom door looking down towards the large west bay door opening. The trailer that is visible through the door opening holds the spray foam insulation equipment and materials. There is a large air-compressor at the front of the trailer along with an air dryer. The mixing unit in the center of the trailer draws the two chemicals out of 55-gallon drums (one is visible to right towards the rear) that weigh ~500 pounds when full. The two chemicals are mixed in the spray nozzle at 1,200 PSI at the end of a heated hose bundle that keeps the materials at 110 degrees (F). The Westinghouse portable generator sitting on the floor in the barn is rated at 28,000 Peak Watts and was used to run the equipment as we did not yet have power to the barn. For comparison, our Kohler whole-house natural gas generator is rated at 20,000 Watts (continuous) and the genset in our bus, powered by a Yanmar 4-cylinder/4-stroke turbo-diesel engine rated at 28 HP, can produce 17,500 Watts (continuous). Mike said the portable generator weighs between 500 – 600 pounds, and burns a bit gasoline when in use.
I had to drop-off the Airstream at the dealership in Grand Rapids today. When I got home at 3 PM, there were two trucks and a trailer in the driveway by the accessory building (barn). I suspected it was the insulation sub-contractor, as Chuck (the builder) had said last week that they would probably be here early this week. I walked down to see, and that was, indeed, the case. They were in the middle of spraying closed-cell foam in the shop, however, so I did not linger or talk to anyone.
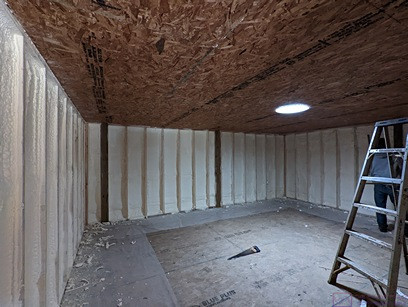
From left to right, the west (interior), north (exterior), and part of the east (exterior) walls of the storeroom after being spray foam insulated on the inside with two inches of closed cell foam. Mike’s assistant is scraping off any foam that got on the interior face of the wall studs, or other surfaces that would prevent the OSB wall panels from being installed properly.
I went back down later when it appeared they were finished spraying, and got to see the finished result of their work. I was also able to chat with Mike (the owner) and his assistant for bit while they were cleaning up the site and packing up their equipment. Per his agreement with Chuck (the builder), Mike had foamed the walls to ~2” thick and the space above the storeroom ceiling to ~3” thick. He had actually sprayed the exterior walls (two for each room) slightly thicker and the interior walls (two for each room) slightly thinner to maintain an ~2” average use of material.
Although I would have liked a thicker application of the spray foam everywhere, it would have cost more and wasn’t really necessary for the intended use of these spaces. For much of the winter they will be maintained at 40 – 45 degrees (F) except when I want/need to work out there, and the amount of spray foam that is there will allow me to do that fairly economically.
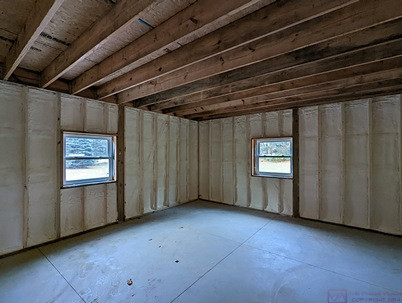
This is the view looking NE from the shop door opening showing the spray foam insulation on the inside of the north and east exterior walls.
Phil (Precision Grading) called me around dinner time and we had a nice, long chat. We don’t talk too often, as Phil is a very busy one-man business and works long hours, but we always have a good conversation when we speak. Phil has done all of our driveway and septic tank work since we bought the house in February 2013. He recommended Chuck (Patriot Builders) for our accessory building project, and is the sub-contractor for all of the excavating, grading, and driveway construction. I also have him lined up to replace the failing drain in the valley behind the house with a properly constructed French Drain to get the water away from that part of the yard and out to the wetland at the northeast corner of our property and then into the pond to our east. That was one of the reasons I had texted him yesterday.
…