Linda turned off her alarm and slept a few extra minutes before getting up at 6 AM. I watched the weather on TV while she got ready to go to the bakery. She left at 6:25, about 10 minutes later than usual. I am always amazed at how quickly she can get showered, dressed, and out the door.
The temperature across our area was 37 degrees F, more or less, and the wind was blowing, which we could see just by looking at our trees. The winds were forecast at 15 – 25 MPH out of the SW gusting to 40 and strengthening into the morning hours as they shifted out of the west in advance of a second cold front.
Last night I shut off the color laser printer, the two NAS units, and the Linux box as a precaution against losing power but left my laptop on since it runs on its own internal battery. Even though all of our devices with hard disk drives are plugged into uninterruptible power supplies, and we have an auto-start whole house generator with an automatic transfer switch, I decided to leave all of these computing devices turned off until the wind subsided later today. Morning showers were forecast as likely, with the possibility of a few snowflakes, but never materialized. Overnight lows tonight are forecast in the mid-to-lower 30’s. The bus is not winterized, and I have been working in it almost every day, so I have had the heat turned on in the bus for most of October. I do, however, set the thermostats back to approximately 55 degrees F when I am done working for the day.
I got up, put on my robe, fed the cats, and made a half pot of coffee (Sweet Seattle Dreams). While the coffee was brewing I heated up a banana-nut muffin, poured a small glass of orange-grapefruit juice, washed the last of the blueberries, and fixed a bowl of granola. I was done with breakfast by 7:15, took my coffee to the living room, and enjoyed it by the warm glow of the fireplace as I worked on my iPad with Juniper on my lap and watched the night yield to the orange glow of sunrise.
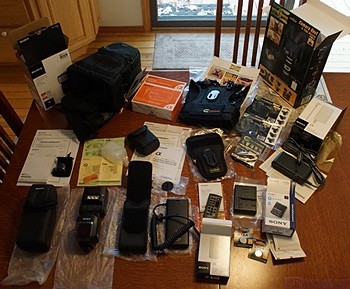
New photo accessories from B&H Photo Video in New York, NY., photographed with the new Sony a99v-DSLT camera.
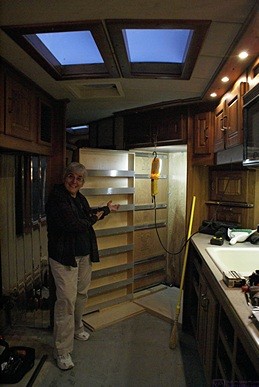
My main focus today was the cockpit of the bus, specifically the floor/wall tile, but first I got dressed, turned up the heat in the bus and the garage, and then opened the boxes that arrived yesterday from B&H Photo. I managed to do that at 8:30 AM; well ahead of my usual getting started time of 10 to 10:30 AM. Most of the items were in one large box but two small items were in a separate box that must have been shipped from a different location. The shipping boxes were in good shape and the B&H sealing tape was intact. I removed everything from the shipping boxes and then checked them off on the packing slip. Again, all of the individual product boxes and other packaging were undamaged. I opened each item, carefully removing all of the pieces and manuals/paperwork. I arranged everything on the dining room table and took a few photos to document what was there.
I had been pondering the damaged plywood under the driver’s seat ever since I removed the old vinyl tile. The exposed plywood was screwed down in lots of places so I figured it was not the original floor of the bus. I could also see many additional plywood layers in the holes for the seat mounting bolts. Closer inspection revealed that the top layer of plywood in the driver’s area was in two pieces, fore and aft, and that only the aft piece was damaged. Based on all of that information I decided to try removing the aft piece.
All of the screws came out except for two and they just spun in their holes so I figured the wood around them was bad. It took a little prying but the piece popped loose. I pushed the two power wires for the motorized seat back through a hole and the board was free. What I found made my heart sink.
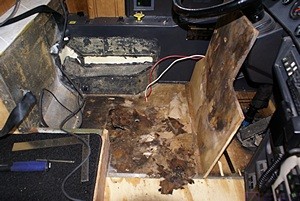
First look at the water damage in the aft portion of the driver’s floor area.
The underside of the plywood was much more damaged than the top side and it was moist. The original bus floor was even worse. Part of it was missing and I was able to crumble much of what was still there from the rear mounting holes back. It was obvious that there had been considerable long-term exposure to water but it was not obvious how this had occurred and was, apparently, still occurring. I texted Linda and Chuck with a photo of the damage and heard back from both of them fairly quickly. This was clearly an unanticipated setback but long term it was better that I discovered it, and had a chance to fix it, rather than having covered it up.
Speaking of covering things up, the top layer of plywood must have already been damaged when we bought the coach in late 2009. One of the things we had Creative Mobile Interiors (CMI) do to the coach between September 2009 and April 2010 was pull the carpet out of the entry and cockpit and replace it with the gray vinyl tile that I just removed. The tile was under the swivel pedestal base of the driver’s seat so whoever installed the tile must have removed the base and must have seen the obvious signs of damage. They should have stopped right there and let someone know and CMI should have contacted us to discuss a course of action. The obvious course of action would have been to pull up the top layer of plywood and see what was going on. We would not have been happy about it at the time as we were already spending more money on fixing things than we anticipated, but we could have discovered and fixed this six years ago.
The floor directly under the base of the seat is the ceiling of the first bay on the driver’s side of the bus. It was very chilly outside so I put on my hooded sweatshirt and had a look from below. I could see that the four threaded holes for the seat mounting bolts were part of two large steel angles running fore and aft that were welded to two square tubular steel cross members. From that observation I decided on how to proceed.
My plan was to cut out the bad plywood by cutting between the centers of the holes. That would leave half of each angle to support a new piece of filler plywood. I got the Porter-Cable oscillating saw and started cutting out the really rotten wood aft of the rear seat mounting holes. I was not prepared for what I found when I finally got that piece out.
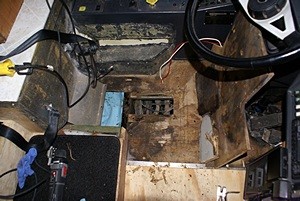
The damaged bus sub-floor cut away. I could see through into the bay below the driver’s seat. The blue to the left is paper shop towels soaking up the water and rotted plywood in a small tray area.
What I found was water; not dampness, but standing water. And debris, lots of mucky debris. We had a lot rain starting late Tuesday evening, all through the day yesterday, and overnight into early this morning so I suspected that this water might be “fresh” as in recently arrived in this location.
The cross member aft of the rear pair of seat mounting holes is the top of the rear wall of the compartment under the driver’s seat. All of the water was in the area aft of the cross member in what appeared to be a kind of tray about two inches deep below the level of the driver’s floor. It was almost full of disintegrated plywood, and other stuff, and obviously did not have a natural drain. I sent a second text message to Linda and Chuck with a photo of the water/debris-filled pan aft of the rear mounting holes for the driver seat pedestal. Some things you just have to share, and some things you just have to see to believe.
It took me a little longer to realize what was going on as my immediate concern was cleaning up the mess. I put on a disposable glove to pick up all the detritus in the tray and put it in a trash bag. The tray extended under the floor towards the outside of the coach so I reached back in there and just kept pulling out more and more wet junk. At this point I started to analyze what was in front of me.
It was now obvious to me that the damage to the floor under the driver’s seat was caused by water filling this tray and coming in contact with the bottom of the plywood bus floor. With nowhere for the water to drain it was able to stay in contact with the plywood for very long periods of time allowing it to penetrate the plies, soften them, and destroy the (water soluble) glue between them.
Clearly I needed to figure out where this water is coming from and stop it, but that was not going to happen today. I did, however, go back outside and check the front electrical bay. Sure enough, there was a little water on the floor of that compartment, so it was possible that the water might be coming from there somehow. If so, I need to find the breach and seal it. That, however, just pushes the problem down the road as I will still need to figure out how water is getting into the electrical bay in the first place and stop that.
The more I studied the way the bus was built the clearer it became that the original plywood bus floor extends under the left console into the first bay and separates the small upper compartment from the larger one below. But this tray-like area was below the floor and farther back which meant it was under the front electrical bay and above the driver side steer tire. I will have to check again but it appeared that this piece of plywood must be the floor of the electrical bay.
With a better, but still incomplete, understanding of the situation I resumed cutting out plywood. My oscillating saw went through the rotten wood like a hot knife through butter, but did not cut the undamaged plywood very well. I figured the blade was dull so I opened the Bosch replacement blade I had on hand only to discover that it did not fit my Porter-Cable tool. Arrrgh.
It was probably a good time for a break anyway, so I went to Lowe’s to get a couple of extra blades. I had good QSOs with Mike (W8XH) going to and from the store. The weather is supposed to be very pleasant all next week, with afternoon highs in the upper 60’s, so we are going to try to find a day to work on my antennas and the small tower next to the house. Bus or no bus, I also have to make time for our amateur radio hobby. When I got home I made popcorn for lunch and then got back to work. It’s a good thing I don’t have to fix most of my meals.
Linda called at 3:15 PM to see if she needed to come home and pick me up before going to Ann Arbor. Given what I was dealing with I was tempted to say ‘yes’ but I knew that this was a situation where I needed to stay on task until it was fixed. Brendan and Shawna both had work-related obligations this evening and asked Linda if she could watch Madeline for a while. Rather than have her cut her work day short to come home she left the bakery and drove directly to Ann Arbor while I continued to work on repairing the floor.
I called Chuck to see if he had time to consult with me about all of this. He called me back and we talked it through. He thinks the entry point for the water could be the frame on the large piece of fixed glass just aft of the driver’s position. I know we have a leak near the front of the large window assembly just aft of that one and the forward edge of the window panel may also be above the front electrical bay.
As soon as I was done talking with Chuck I removed the reading light on the vertical walnut chase by the driver’s left shoulder and then removed the nine screws that hold the cover in place and took it off. I have known for a long time that there was a lot of stuff running through that chase but I had never removed the cover to look inside. It is crammed full of AC and DC wires, coaxial cables, air lines, and residential air-conditioning refrigerant lines. My immediate interest was evidence of water, and I did find the same stains that were similar to ones we have found elsewhere in the coach, but I did not see anything that looked or felt wet.
With the new blade for my oscillating saw I managed to cut out the piece of plywood between the four mounting holes but it wasn’t easy. With that piece out, however, I could use my inspection mirror to see the underside of the floor and reach into the space below to determine distances to various structural members with my carpenter’s tape measure.
I still had more wood to cut out but by 4:15 PM I’d had enough for today. I set the top layer of plywood back in place and covered all of the larger holes with painter’s tape in a feeble effort to keep critters and cold air out of the coach overnight. I also used two pieces of felt and painter’s tape to seal the hole where the steering column goes through the floor. I took a few more photos, which I had been doing all along today. Tomorrow I think I will use the circular saw and/or the cutoff tool and try to make quicker work of this.
Before quitting for real I decided to unscrew the 3-sided bump out from the passenger side HVAC duct cover and measure the left desk base and pedestal to see what the correct distance needs to be. The bump out protrudes about four inches but it should only be three inches. As I suspected it is too big by the width of the wood, but I will take more careful measurements before I take it to Jarel to have it cut down. I also discovered, however, that the filter material we used to cover the hole where the heater hoses previously came out of the HVAC duct was interfering with the fit of the duct cover, including the bump out. While I was thinking about it I pulled out the two filler strips that go on either end of the plywood sofa seat. Jarel is going to remake them longer and out of solid walnut. Since we moved the seat board out almost five inches one side of each strip is now exposed and visible and the stained plywood edge is just not the look we want.
We had a heavy overcast most of the day and by 5 PM the light was fading. I dialed back the thermostats, grabbed the camera and the house phone, locked up the bus and went inside. I changed into my robe and then fixed dinner. I did not want to spend a lot of time preparing and eating a meal by myself so I had a can of Amy’s Chili with Vegetables. I added crackers, Smoked Tabasco Sauce, and shredded Daiya mozzarella vegan cheese. Some strawberry preserves on crackers added a touch of sweetness and Stash Raspberry Pomegranate Green Tea added its own warmth. Given a little more time I can make a better meal for myself but ever since Linda retired and took over preparing our whole-food plant-based (vegan) cuisine I am no longer as comfortable/confident in the kitchen as I once was. This way of eating involves ingredients and techniques with which I am simply not familiar.
After dinner I sat on the living room couch in the same spot, and in the same robe, as I did at the beginning of the day and worked on this post. I like the sense of things coming full circle, but mostly it is a comfortable place to sit and use my iPad. Linda and I texted for a while after she had put Madeline to bed. At 9:07 PM she indicated that she was leaving Ann Arbor and heading home. She got home a little before 10 and we sat in the living room for a while and finally turned in at 11. It had been a long day for both of us.