2014/11/10 (M) New Heights
We rarely set wake up alarms anymore, one of the major perks of retirement, but ‘rarely’ does not mean never so this morning my alarm went off at 5:05 AM. I grabbed a quick shower, got dressed, and got busy pulling everything together for the trip to Twelve Mile, Indiana. I had hoped to be on the road by 6 AM but did not quite make it. Linda left at 6:15 AM for a 7:30 AM medical appointment and I had the car packed by 6:30 AM and pulled out shortly after that.
The drive always takes me about five hours including stops. Butch called me around 10 AM to let me know they were in Logansport and would not make it back to the house until mid-afternoon. I was going to stop in Rochester anyway to buy groceries so I had lunch first and then took my time shopping. From Rochester I took IN-25 south and stopped in Fulton to buy fuel. The street I normally turn on is Aitken and the filling station was at the intersection with IN-25 so I headed east to Meridian Street and then south to IN-16 and finally east to Twelve Mile.
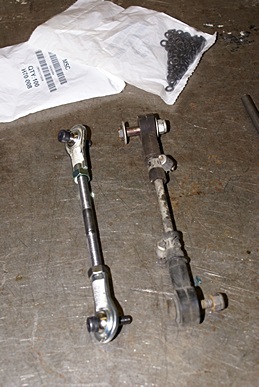
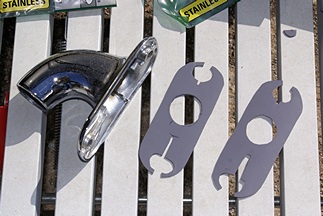
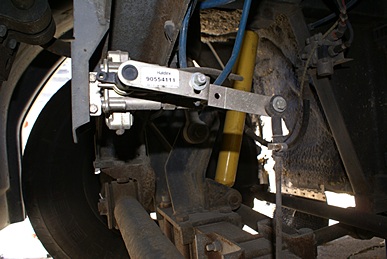
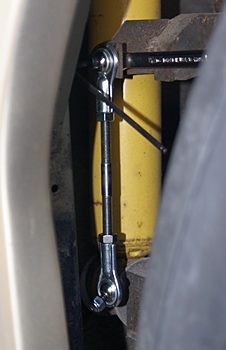
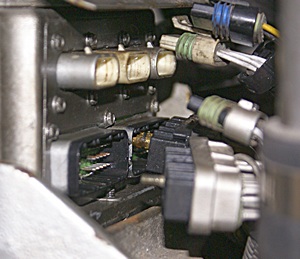
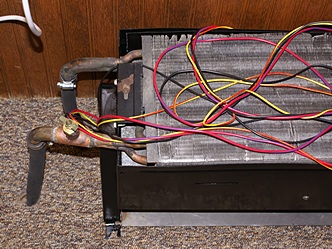
New ride height linkage (L) with ball ends. Old linkage (R) with rubber ends.
I pulled up in front of the bus at 12:30 PM and unloaded all of the groceries and bus parts from the car and put them in the bus. I changed into my work clothes and started working on inside projects. First up was resetting the clocks since the switch from EDT to EST occurred while I was away. I then emptied the cabinet above the refrigerator, which is currently used to store cleaning supplies, in preparation for installing an under cabinet florescent light fixture against the ceiling. I was investigating the details of that little project when Butch and Fonda got home. With the house now unlocked I finished unloading my car and moved my clothes and technology into the guest bedroom, which is where I stay when I am here working on buses.
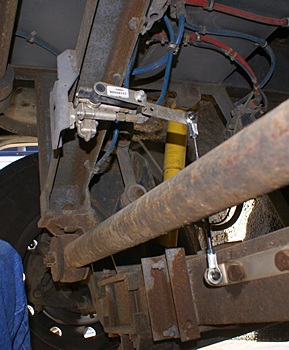
Butch had fabricated one of my ride height linkages while I was away. He made a second one and then I gathered up tools and my camera to install them while he finished the last one. Fonda found a large sheet of corrugated plastic that made it much easier to slide under the bus to work. The front one was easy to install, just as it had been easier to remove. The rear ones were even more difficult to install than they were to remove. I got the rear protection shields back on with Fonda’s help. Some jobs just require more than two hands.
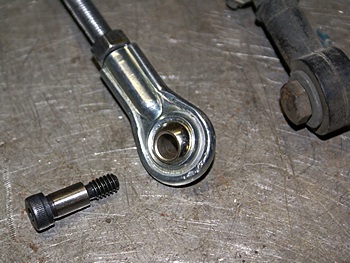
New ride height linkage ball end and mounting bolt. Old linkage end visible upper right.
Bill Tharpe showed up to help Butch work on Brittiny’s car. Butch and Bill had retrieved it a couple of days ago with a car hauler trailer when it quit running. It was leaking coolant and apparently needed a new intake manifold gasket. Bill spent most of his time disassembling the top of the engine so he can eventually remove the manifold.
Although I bought fresh salad greens on the drive down it ended up being a long day so I prepared a Simply Asia Mushroom Noodle Soup Bowl for dinner along with a few grapes. Linda called at 8:30 PM and we chatted about her audiology and ENT appointments this morning. The audiologist said her hearing in her ‘good’ ear was essentially unchanged from four years ago, which was good news, and she had a great visit with Dr. Siedman. I chatted briefly with Butch about the fair weather ‘to do’ list for tomorrow and then we all turned in for the evening.
2014/11/11 (T) Code 23
I was up at 7 AM and in my coach by 7:30 having a simple, but yummy, breakfast of orange juice and homemade granola with unsweetened soy milk. With all of the projects I have going on I have very little space at the moment to prepare food or sit and eat so I decided to forego making coffee and walked across the street to Small Town Brew to get some. Lisa (the shop owner) was there so we had a nice chat.
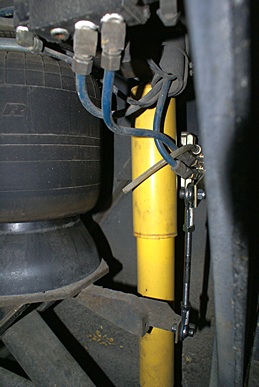
New ride height linkage installed on front axle and leveling valve.
The weather forecast indicated that the best part of the day was going to be the morning with the high temperature of 54 degrees F at noon and then falling steadily with a rapidly increasing chance of rain. I had two outside tasks to accomplish on my bus today so I wanted to get them done in the morning if possible. My first task, however, was to attach the stinger (or whip, the long slender flexible piece at the top of an amateur radio antenna) to the base screwdriver portion of Butch’s mobile HF ham antenna. I was able to do this from his ladder and did not have to get up on the roof.
While I worked on the antenna Butch prepped their new motion-sensing patio light. He installed it over the entrance door to their bus with Fonda’s help. With his assistance I removed the new fan belt from my engine, removed the two old air-conditioning compressor belts, and installed the two new a-c belts. It was obvious from the extra slack in the inside belt that the a-c compressor was out of alignment with the pulley on the engine. Butch suggested that we take the new belts off rather than ruin them and put the old ones back on until we can align the compressor. That made sense to me, so that’s what we did, finally putting the new fan belt back on.
The drive side rear ride height linkage was not easy to get to with the dual drive tires on the axle.
In the process of changing the belts I tried to us the valve that either tightens the belts when the engine is running or retracts the belt tensioners when they need to be changed. The retract position did not appear to work and after looking at how the valve was plumbed Butch and I were of the opinion that it may not be connected correctly. The run/tighten position works as intended, extending the air-driven belt tensioners, but it would sure be nice to be able to turn the valve and have the belt tensioners retract as intended. I’m going to have to find out more about this valve and re-plumb it if necessary.
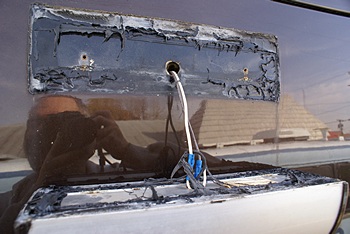
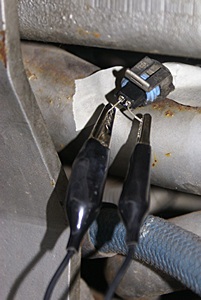
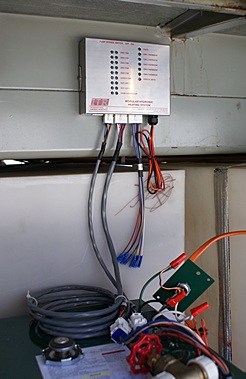
Butch and Fonda had to take some time to move things out of their warehouse for someone who is coming by to purchase them. While they did that I started working on the DDEC II code 23 (Fuel Temp Sensor Voltage High) problem. I got the diagnostic procedure from Chuck over the weekend. The first step was to remove the harness from the sensor, short out the two pins, turn on the ignition (but do not start the engine), and see what Active Codes the ECM (DDEC II) generates. That sounded simple enough but unfortunately the Fuel Temperature Sensor is located on the right side of the fuel pump under the ECM and behind a coolant pipe. The only way to get to it is to unbolt the ECM mounting plate from the block and lift it up, which it turn requires all of the harnesses to be unplugged from the ECM. Again, simple enough in concept but more difficult in practice. Once I could get to the sensor and disconnect the harness I had to figure out a way to jumper across the two sockets. I ended up using two pieces of small solid wire inserted into the connector and then bent to give me something to connect the alligator clips to. Fonda helped with all of this. Again, it was more than a two-handed job.
Access to the passenger side rear ride height linkage was a little better, but not great.
I turned on the ignition and read the Active Codes on my ProLink and also had them flash on the Check Engine Light. I was looking for a code 25 (everything is OK) or either a code 23 or a code 24. What I got was both a code 23 (sensor signal and/or return wire open) and a code 24 (signal wire shorted to +5 VDC wire). The diagnostic procedure has you check resistance between pins in either case, just different pins, so I checked both. The readings I got did not make a lot of sense and I did not have time to pursue it further as the temperature had started dropping and it had started misting. (I figured out later that the code 23 test requires the jumper to remain in place but I had done the code 24 test first, which required it to be removed, and not reinstalled it, so I did not do the Code 23 test correctly.)
By the time I got the ECM bolted back in place and all of the harnesses reconnected it was raining lightly and my tools were getting wet. I got all of them put away and closed up all of the bays and decided to start the engine to make sure it would still run. It started right up and I let it run on high idle for 25 minutes while I had a bite of lunch. The test procedure called for clearing all codes before starting the engine and monitoring the CEL for 8 minutes, stopping the engine, and checking the historical codes. I was clearly done working outside for the day so I did not get to do this at this time.
It was only mid-afternoon when I shut the engine off so I set to work installing the florescent light fixture in the cabinet above the refrigerator. As with most projects this one seemed simple enough but took quite a while to do. I was able to use an existing hole with wires running through it to snake two more wires through from the cabinet (where the fixture was going) to the adjacent cabinet to the right over the left corner of the kitchen counter. That cabinet already had two 12 VDC light fixtures and I had previously identified the positive and negative supply wires. What complicated matters was that the glue holding the carpet on the ceiling of the refrigerator cabinet had failed and the carpet was falling down. The loose carpet also led to the discovery of other 12 VDC wiring hidden underneath it. That, in turn, led to two things: 1) I had to make sure that when I mounted the new florescent fixture I did not screw through any of these wires, and 2) I had to figure out a way to keep the ceiling carpet up.
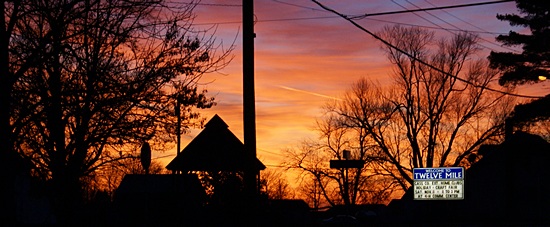
The sunset was amazing on November 10th.
I taped the existing wires to the plywood ceiling so they would be in known locations. I then used wood screws and fender washers to hold the carpet to the ceiling. I added insulated spade lug connectors to the fixture wires and the supply wires and connected the other ends of the supply wires to the existing supply wires using special connectors designed for tapping into an existing wire without cutting it. I would not use these for higher current applications but for a small florescent light fixture they are fine. I attached the fixture to the ceiling with four short wood screws, installed the F13T5 bulb, turned the switch ON, and there was light! I love it when that happens.
As long as I was working in this area I decided to reattach the incandescent fixture in the cabinet above the kitchen sink. It was designed to be mounted with two screws but only one was in place. Again, this turned out to be more work than it at first appeared. The fixture is mounted to the inside of the upper cabinet face frame, not the ceiling, so there was no way to directly see what I was doing. That meant mirrors and flashlights, and a blown fuse when my screwdriver shorted +12vdc to DC ground. It turned out that the wiring was interfering with the mounting. I eventually got it tucked up under the ceiling carpet and got the fixture mounted using two screws. My documentation indicated that the upper kitchen cabinet lights were powered by wire #51. I located that wire in the front DC distribution panel and pulled the 10 Amp fuse that protects it. It was indeed open, which was good as it meant my documentation was correct and allowed me to find it on the first try.
The florescent light in the hallway ceiling cove quit working the last time I was here. I removed the bulb, with some difficulty, to see what it was. It was an F72T12 55 Watt (72″ length) with a single pin on each end. I needed a 10 A blade fuse to replace the one I blew so I made a shopping list and headed off to Logansport to visit Walmart, O’Reilly’s Auto Parts, and Home Depot. Since I was in town I called Linda as my cell phone does not work in Twelve Mile. She wanted to know if I had shut off the outside water at home. I had not, so she took photos of the valves/pipes in the utility room and e-mailed them to me. I got a call from Butch while I was in town. He needed a few machine screws so I picked those up. When I got back to the house I checked the photos Linda had sent and then sent her a couple of replies which resulted in her calling the house to go through what had to be done. She e-smiled me later that she had taken care of it.
I Replaced the F72T12 (with considerable difficulty) but it still did not work. It was late, and dark, and I was tired, so finding and fixing the problem would have to wait until tomorrow. Somewhere in there I had a tofu Italian sausage on a whole wheat hotdog bun with mustard and onions. By the time I came in to the house Butch and Fonda had gone to bed. I checked e-mail and logged in to RVillage ad saw that our “Vegan RVers (WFPB)” group was up to 100 members. I worked on this post and then went nighty night.
2014/11/12 (W) Burrrr
The leading edge (cold front) of the polar vortex had passed through north central Indiana by the time we got up this morning. There was a definite bite to the air, and it will get worse before it gets better, but I brought a selection of winter clothing that I can layer in various was to suit the conditions and the work that needs to be done. All of my projects today were inside the bus or the house so I did not have to bundle up excessively. Butch and Fonda spent a little time working on the privacy curtain system for the front of their coach but much of their time today was taken up with someone who bought a lot of metal shelving and storage racks from them. He showed up sometime between 9 and 10 AM and brought a crew to disassemble the shelving and load everything into a trailer. Butch had to use his forklift to help load some it.
The DDEC II ECM on our DD8V92TA with all of the harnesses unplugged.
I had cleared some space in the kitchen (of the bus) so I made coffee to go with breakfast. That emptied out the last of three storage canisters, so I opened the three bags of custom roasted beans from Teeko’s and transferred them to the three containers. After considering my project choices I decided to install the knob on the front TV cabinet door. I spent a few minutes checking the installation details and dimensions of the Gaggenau halogen cooktop, which we would eventually like to replace with a built-in two-position induction cooktop if we can find one that fits the existing opening in the kitchen counter. I had a note to get the GenSet model number for Martin Diesel so I looked that up in my documentation and found both the model and serial numbers. I then turned my attention to the fluorescent light fixture in the hallway cove.
After studying the construction of the cove I realized that the front piece could be detached by removing seven (7) screws from underneath. With the fascia removed I had great access to the F72T12 bulb. I also discovered that there wasn’t an actual fixture there, just two ends to hold the bulb. One was spring loaded and the other one was not. The ballast was obviously somewhere else. But where?
I vaguely recalled having seen a small metal box with wires coming out of it in the space under the bottom shelf of the pantry so I looked there and, sure enough, there it was. It still had a label on it that was in good condition and indicated that it was a 13.2 VDC ballast for a single F72T12 fluorescent bulb. Things were slowly starting to make sense. There is an identical box in the back TV cabinet, with the same wires and connector but no label or markings, so I reasoned that it must power the fluorescent cove light in the bedroom. That meant there were probably two more boxes somewhere for the two front fluorescent cove lights, although there might only be one as they are on the same switch. Again, I vaguely recalled having seen these boxes in the bottom rear of the A-V cabinet behind the driver’s seat, so that’s where I looked first, and there they were.
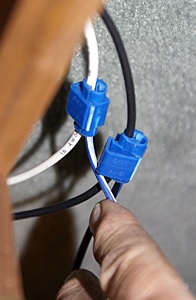
Wire taps for joining a new wire to an existing wire.
It appeared that we had a bad ballast and that this would be an easy fix. The label said the ballast was a Triad made by Magnetek in Huntington, Indiana and had the model number. Cool. I could drive over there and get one if I had to. I went inside to use my iPad to search for sources of supply and found that Magnetek had divested itself of most of their product lines, including this one. Their website gave the URLs of the various companies that acquired their product lines. Universal Lighting picked up the DC ballast products so I tried their website but did not find one for an F72T12 bulb. Ugh. I searched some more and eventually found a Bodine (Philips) ballast electronic/inverter ballast that appeared to be exactly what I needed…for $98 plus tax and S$H. Double ugh.
I would eventually like to convert most of the lighting in the coach to LEDs, so perhaps this was the time. I found a kit with 52.5 feet of LED rope light (~10 LEDs/in) and power cords, end caps, and mounting clips to make up to 10 segments. The description said the light pattern was 360 degrees and the illumination was 48-60 lumens per foot. An FTC website indicated that a typical 40 W incandescent bulb puts out about 450 lumens and a 60 W bulb about 800 lumens. Figuring conservatively at 50 lumens per foot a 10 foot length, folded back mid-point to make a five foot long light source, should give us at least 500 lumens which is plenty of light for this application. The kit has enough materials to make four such lights and still have 12 feet to use somewhere else, such as around the inside of the face frame of the wardrobe closet in the bathroom. I ordered it with 3-day shipping. While I was at it I ordered an Everpure (SHURflo) ADC Full-timer bacteriostatic water filter cartridge with 2-day delivery through Amazon Prime. I thought about ordering several, but figured I might find them cheaper in Quartzsite this winter.
There wasn’t anything else I could do on the fluorescent fixture so I decided to shorten the cable for the front OTA TV antenna and put an F-connector on the RF coax portion. I borrowed Butches crimper with the hex jaws and opened the coax cable stripper I bought at Home Depot. I then discovered that the RG-6 connectors I had did not fit the cable, which was smaller in diameter. Without different connectors this would be another stalled project with my front TV unusable. Butch told me there was a Radio Shack store inside McCord’s Hardware and Lumber so I made a shopping list and headed to Logansport.
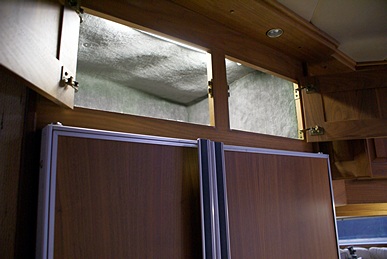
New florescent light in cabinet above the refrigerator.
Based on the connectors available at Radio Shack I determined that my cable was probably RG-59 so I got four crimp style F-connectors. While I was in town I stopped at Home Depot for a GFCI outlet to replace the one in the bathroom, which keeps tripping. I also spotted some packages of cover plate screws so I got one each of white, almond, and brown. A quick stop at Walmart for some personal items and I was headed back to Twelve Mile.
When I got back Fonda was just starting to make their dinner so I went to my coach to fix a salad. I had a large salad of power greens, fresh mushrooms, fresh strawberries, onion, peanuts, and dried cranberries with a raspberry walnut vinaigrette dressing and a small glass of Moscato wine. I then worked on the F-connector.
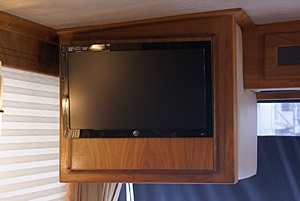
It took a while, and a couple of test fits, but I eventually figured out how to strip the coax, folding back the braided shield while leaving the foil shield in place, and get the prepped cable fully inserted into the connector and crimped it. I stripped the three control wires, secured the little bit of extra cable inside the cabinet, and then connected the coax and control wires to the back of the controller. Twelve Mile is a long way from everywhere but I figured I would I would test my cable construction by trying to tune in a channel. The TV was having trouble receiving channel, 16-1 HD until I moved the antenna from position 8 to position 6. Position 8 is just to the driver side of the nose, so given how I was parked it was facing slightly east of south. Position 6 was more ESE, and the signal was good except when a truck went by.
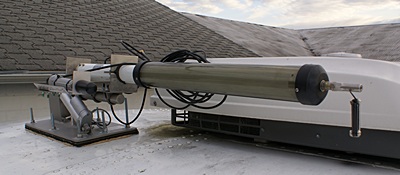
Tarheel HF screwdriver ham radio antenna on motorized lift mount.
I checked with Butch and WNDU 16-1 HD turned out to be a South Bend station. South bend is north and slightly west of Twelve Mile. Hummm? I swung the antenna around to position 14, 180 degrees from position 6 and roughly NW, and had an excellent signal there too (I don’t recall it being interrupted by passing vehicles). Clearly the F-connector was on well enough to transmit a clean signal. The only thing I can figure is that my antenna had an unobstructed view of a large house in direction 6 that provided a very usable signal that was blocked by large trucks passing by. Either way, South Bend is over 60 miles away, so propagation must have been very good this evening.
That was enough for one day. I gathered up my dirty dishes and camera and returned to the house. Fonda was just loading the dishwasher so I added mine. I chatted a while with Butch about the DDEC II code 23 diagnostic procedure and the game plan for tomorrow and then turned in to check e-mail and work on this post.
2014/11/13 (R) Thermal Underwear
I slept in this morning so I skipped making coffee and after my usual breakfast went across the street to Small Town Brew to get some. I then got to work on one of Butch’s projects. We kept busy today including, in spite of the cold, some outside work. Thermal underwear helped keep me comfortable. I went back to STB and got a second cup of coffee around 10:30 AM.
I spent the morning helping Butch and Fonda with the wire chases for the bedroom in their bus. Each chase is a pair of boards joined at a right angle to make a horizontal bottom and a vertical side. They will each be mounted using a pair of aluminum angles, one on the wall for the bottom and one on the ceiling for the brackets for side. My first task was to drill holes in the aluminum angles approximately every 12 inches. I then helped position them, drill the holes for the mounting screws, and attach them to the bus.
Testing the DD8V92 fuel temperature sensor.
Fonda and I moved three large wooden tables from the warehouse to the now mostly empty ‘parts room.’ All three of us moved a couple of loaded metal shelving units and then Fonda and I put the wooden tables in place. I plan to move my all of the stuff I have in the (unheated) warehouse to the (heated) parts room tomorrow.
I worked on some minor projects in my bus and had a tofu turkey sandwich with vegan mayonnaise, lettuce, and onions. I disconnected/removed the ballast for the bedroom fluorescent cove light and used it to test the hallway fixture. The light worked just fine which verified that it was a ballast problem and not a wiring problem. I needed to know that before I went to the trouble of converting this fixture to LED rope lighting early next week. I put the good ballast back in rear TV cabinet and kept working in there, starting with the installation of the knob for the TV cabinet door.
I shortened the control/coax cable for the TV and installed the crimp-style F-connector. Unlike the front TV (which was on and receiving WNDU Ch-16 from South Bend over 60 miles away) the rear TV was not able to detect any signals at any antenna direction. The OTA antenna for the rear TV is in the rear roof tray and the bus is backed into its parking spot, so it is more shielded from radio frequency waves than the front antenna. The only direction that might be good is straight ahead, which is due south. Unfortunately there are no TV towers in the direction for a long way.
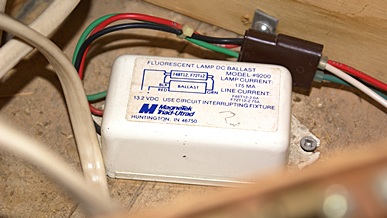
Magnatek 13.2 VDC ballast for F72T12.
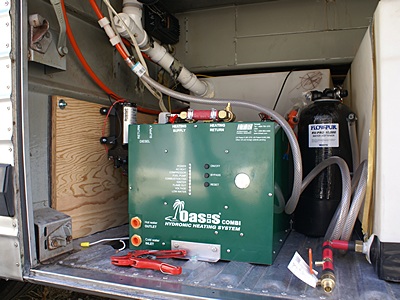
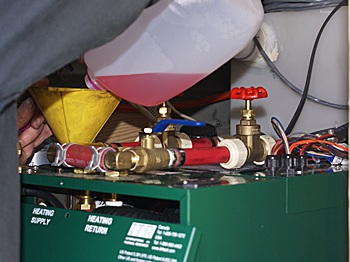
Butch decided to install the plate heat exchanger in the bay just forward of where the Oasis Combi is installed and needed my assistance. The plate heat exchanger will be used to tie the Combi to the OTR bus heating system (engine coolant loop). We also discussed possible locations for the coolant circulating pump that he plans to plumb into the OTR heating lines once he determines which line is the supply and which one is the return.
I returned to my rear TV closet projects while Butch started compiling a shopping list. After stabilizing the back piece of plywood inside the cabinet with a couple of screws I mounted the Pressure Pro Repeater to it using a couple of self-adhesive Velcro pads that came with it. I then mounted the dual 12 VDC outlet directly below the ballast and installed a small cube relay just behind it using its built in mounting tab. Tomorrow I plan to connect the outlets to the relay and supply it with 12 VDC to power the repeater. I also plan to figure out a way to drive the relay from a 12 VDC source that comes on when the 12 VDC chassis battery switch is ‘ON.” For now, though, I will connect the outlets to the NC (normally closed) contacts so that power will flow to the outlets when the relay coil is not energized.
I was pondering my next project when Fonda let me know that Butch would be ready to head to town shortly. I was considering how I was going to enlarge the two small openings that allow air to flow from the grate in the rear TV cabinet through the upper parts of the center cabinet and into the driver side corner cabinet where the rear air-conditioner evaporator and blower are located. At Butch’s suggestion I looked up the specifications on the Carrier air-conditioning units; 14,000 BTUs and 465 CFM air flow. Requirements for supply and return grates? At least equal to the square area of the evaporator coils. The coils are roughly 9″ x 12″, as are most of the grates. The two small openings in the side walls of the upper closet, however, are 3″ x 10″, not nearly big enough. This is what happens when buses are converted to “look nice” instead of to “work correctly.”
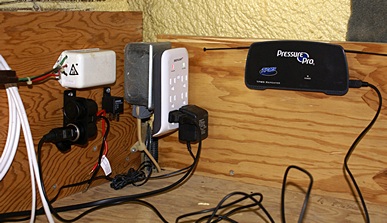
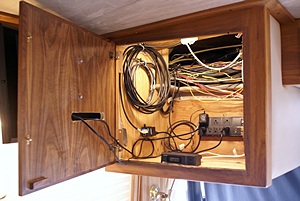
Passenger side rear corner TV cabinet with ballast, dual 12V outlet, relay, AC outlets, and PressurePro TPMS repeater.
I rode into Logansport with Butch where we stopped at O’Reilly’s Auto Parts, Aldi’s market, and Home Depot. We ran into Bill Tharpe at O’Reilly’s and saw his car again at Home Depot. When we got back Fonda was putting the finishing touches on their dinner so I made a salad and selected a can of Amy’s split pea soup and a can of Mandarin oranges. I returned to my coach, cleaned up the kitchen area, and locked up for the night. I spent a few minutes studying Butch’s MC-9 manual and finally found the diagram that identified the engine coolant supply and return lines. That was a nice way to end the day so I retired to my room to work on this post and transfer photos from the last few days to my computer.
2014/11/14 (F) Arctic Oasis Grandma
I bought a dried fruit stolen last night at Aldi’s and had a few slices for breakfast this morning. No animal products, of course, but a few less-than-desirable ingredients like HFCS. Still, it was very tasty and not something Linda would be likely to buy at home. I brewed a pot of coffee with a mix of the Cafe Europe Blend and Columbian Decaf beans from Teeko’s. I had some with the stolen and drank the rest over the course of the morning.
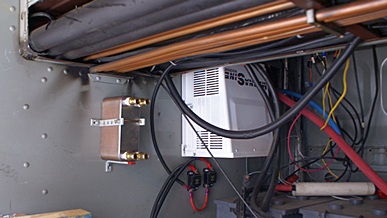
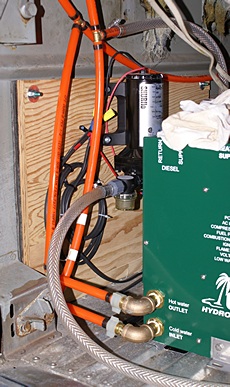
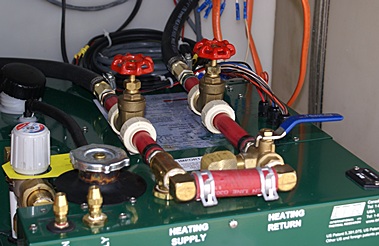
Stacked plate heat exchanger to left of Magnum 4024 inverter/charger.
Most of our work today was focused on trying to finish the installation of the ITR Oasis Combi in Butch and Fonda’s MCI MC-9 bus conversion, and much of that work was outdoors. The temperature was around 20 degrees F when we got up this morning and never broke the freezing mark. It was sunny most of the day, however, without any wind and I was dressed for the conditions so I was generally comfortable in spite of the Arctic air mass sitting on top of us.
My first task was to mount the Zone Controller to the face of the ceiling tunnel above the Combi. I then completed the cable connections and dressed the cables. We then pulled the #10 2+g cable from the old Aqua-Hot bay to the Combi and I completed the connections for the 120 VAC electric heating element. We pulled two lengths of two-conductor low voltage cable from the bedroom closet to the fresh water pump, which is mounted on a vertical plywood plate on the rear wall of the bay next to the Combi. One cable brought +/– 12 VDC down from the 12 VDC distribution panel in the closet where the negative (DC ground) was connected to the pump. The other cable was used to route the +12 VDC back to a switch in the closet and then return it to the bay where I connected it to the pump. With this arrangement Butch has DC + and – in the bay and can add a switch later (or use a jumper) to turn the pump on from there. Although a bit unusual there is nothing fundamentally wrong with wiring switches in parallel; it just means that ALL switches must be off for the device to be off.
While I was working on the wiring in the Combi bay, Butch and Fonda pulled a pair of #4 welding cables from the battery compartment to the bedroom closet to provide + and – 12 VDC to the low voltage distribution panel. He and I then pulled the remote panel cable for the Combi from the bay up into the bedroom closet. He took care of the connections at the remote panel while I took care of the ones in the bay.
Oasis Combi Zone Controller (top).
With the Combi wiring done I took a few minutes to move all of the parts and supplies I had stored in their (unheated) warehouse into their (heated) parts room where Fonda had cleared some shelves for me. By the time I was done Butch was ready to move to the next part of the Combi installation; running the coolant lines. He discovered that his insulated heater hose would not fit over the fittings on the ends of the fan-coil heat exchangers but might fit if he cut off the enlarged swaged ends. It turned out that the insulated hose still would not fit so he made a quick run to town for regular heater hose. Sometimes bus projects are just like that and you have to figure out how to make things fit and work.
While Butch was gone I spent some time working in the back TV cabinet of my coach. I tapped into the +/– 12 VDC wires that supply power to the fluorescent light fixture to provide power to the dual 12 VDC outlets and relay I installed yesterday. The DC negative went directly to the outlets and the DC positive went to the common terminal on the relay. I connected the positive lead from the outlets to the NC (normally closed) contact on the relay. All of the relay connections were made with insulated spade connectors.
When I can get a +/– 12 VDC chassis battery cable to the cabinet I will use it to control the relay and move the outlet positive connection to the NO (normally open) terminal. With this arrangement, the power for the PressurePro Repeater will come from the house batteries (which are rarely switched off) but the unit will only be on when the chassis batteries are on. For now, however, we will simply have to remember to plug the repeater in when we are going to drive the bus.
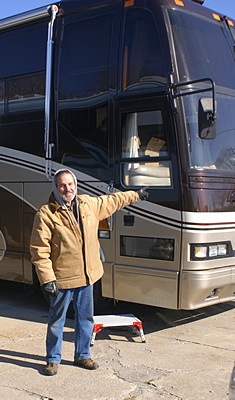
That’s our bus!
As soon as Butch returned all three of us got busy working on the coolant lines. First Fonda and I pulled the insulated lines out. Butch then fed a standard line from the front heat exchanger through the floor to the front driver side bay. Fonda and I then fed it through the access holes to the rear driver side bay and through the floor to Butch by the rear heat exchanger. Butch connected the hose to rear heat exchanger. He then pulled the line back up by the front heat exchanger as we removed most of the slack in the bays and connected it to the front exchanger. Fonda and I fed a piece of hose along the back wall of Combi bay and up into the bedroom closet where Butch connected it to the rear heat exchanger. I then routed the hose and Butch connected it to the Combi. Butch fed a second hose from the front exchanger through the floor and we routed that one to the stacked plate heat exchanger one bay forward of the Oasis Combi. He connected the hose to the front exchanger and I then climbed into the bay, routed the hose with Fonda’s help, and connected it to the heat exchanger. Butch fed another piece of hose from the Combi bay to the bay where I was working. I attached that hose to the heat exchanger and then Butch pulled out the slack and connected it to the Combi. At that point we had a complete, closed loop with the three heat exchangers in series. I think that was about when the UPS truck arrived with my SHURflo Everpure ADC water filter cartridge for under the kitchen sink.
It was time to make it work; sort of. Butch had not tied the diesel fuel lines in yet, and the fresh water connections were also not done, but that did not matter. The next step was to fill the coolant loop with coolant (anti-freeze) and purge it of air. We thought we had to have at least one of the thermostat circuits active, and thought they worked by grounding the wire coming out of the Zone Controller, but figured out later that we had it backwards. No harm done, just no good either. Butch put the 3-way “Summer/Winter” valve in what he thought was the Summer position, which just connects the output (supply) port to the input (return) port, and turned the Bypass switch on the Zone Controller ON, activating the built-in coolant circulation pump. The Combi was already full of coolant and in this configuration should have just circulated it internally. Butch was watching the radiator cap and had additional coolant ready to add if any air got purged. We could hear the pump running, but he could not see any fluid motion in the radiator fill tube. Hmmm, yet another bus conversion mystery.
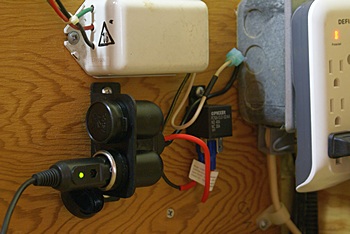
Close up of the dual 12VDC outlet and control relay in the passenger side rear corner cabinet.
Butch turned the valve to the Winter position which is supposed to allow coolant to flow through the external loop. This should have caused a drop in the reservoir level, requiring additional coolant, as the coolant was transferred to the coolant lines, but again, there was no flow. The two heat exchangers in the house (living room / kitchen and bedroom / bathroom) have bleeder valves to help rid the system of air. I opened the valve on the rear (bedroom) heat exchanger but that did not help. Butch decided to call ITR for technical support. He talked through the details of the installation but they did not have any definitive advice.
All indications were pointing towards some sort of blockage internal to the Combi and Butch thought it might be ice. Kevin, in Washington passed Butch to Marcello at the factory in Canada, but still no luck. We decided to turn on the electric heating element and set up a small electric space heater to warm up the bay and the unit while we went to dinner. We drove to The Old Mill west of town on SR-16 where I ordered a mushroom, onion, jalapeño pizza, light sauce, no cheese, and extra thin crust. It turned out quite well. When we got back to the house we gave the Combi another try and it looked like it was going to work, but then didn’t. At that point we called it quits for the night. Linda called around 9 PM and we chatted briefly, catching up on the events of the day. Grand-daughter Madeline finally called her “grandma” for the first time, so she was very excited about that, and it was good note on which to end another long, productive day.
2014/11/15 (S) Houston, We Have Ignition
I was up a little before 8 AM, had some more of the stolen I bought at Aldi’s for breakfast, and made about five cups of Teeko’s Seattle Blend coffee. Butch and I then got back to work on the Oasis Combi hydronic heating system.
Butch was up earlier than me and drove into Logansport before I got up. When he got back his first task was to remove the supply and return lines (heater hoses) so he could install shutoff valves. It turned out that he had the wrong parts and had to go back to Logansport so I rode in with him. When we got back we finally got to work. It was chilly but we had another mostly sunny day on tap with light-to-no wind, so working outside was not unpleasant.
Fresh water pump on isolated plywood panel behind Oasis Combi.
Butch got the valves installed and the lines reattached. He then plumbed in the two fuel lines (supply and return). Before he turned the unit on I pointed out what I had discovered in the manual last night; that the position of the “summer/winter” loop 3-way valve was the opposite of what we thought it was. With the valve in the “winter” position, which would allow coolant to flow through the loop with the heat exchangers, he turned on the bypass switch on the Zone Control Board. The circulation pump came on and the coolant level immediately started to drop in the filler neck, which meant the coolant was being moved into the loop and whatever had blocked this from happening yesterday had cleared up. He turned the pump off so we could stage one gallon jugs of antifreeze/water mixture to finish filling the system.
Butch suspects there was an ice plug in the domestic hot water heat exchanger which is internal to the Combi box and the first place hot coolant goes before it leaves the unit and travels through the coach. We also suspect that the use of the 1500 Watt electric heating element last night melted the ice plug. At least that’s our best guess as to what the problem was. The reason we thought this was the cause is that the factory apparently tests the units with water and it is probably impossible to get it all out using compressed air. That is certainly the case with an Aqua-Hot.
Butch prepared six gallons of antifreeze/water mixture and staged them by the Combi. With a funnel in the filler neck he turned the bypass switch on again and started adding the coolant mixture as the pump pushed it through the system. Once the system seemed to be full I went into the house portion of the bus and barely opened the bleeder valve on the bedroom heat exchanger. I got a three second puff of air and then coolant started to appear so I closed the valve. I repeated this with the bleeder valve on the front heat exchanger with the same result. These two valves are the highest points in the loop, so air tends to collect there. The system essentially had no air in it at this point.
fan-coil heat exchanger
Butch hooked up the two fuel lines (supply and return), turned the power on to the unit, and then turned the burner on using the switch by the bedroom utility closet. We could hear the pump trying to prime but the burner would not ignite. The unit “flamed out” and Butch reset it several times to no avail so he turned the burner switch off. We studied the situation and Butch realized that he had reversed the fuel lines. He switched them and turned the unit back on. It fully primed on the second try and ignited! Finally, we had ignition.
Butch rigged up temporary power to the fans on the two heat exchangers and let them run. The coach eventually got too warm to work and we had to turn the fans off. We spent the rest of the day, with help from Fonda, completing other aspects of the system installation. I removed an old mechanical thermostat from the warehouse and Fonda cleaned up an identical one. We had a third one (different make) that did not need any work.
We pulled three two-conductor thermostat cables from the Combi across the bay and up through a hole in the floor of the bedroom utility closet and then to the three thermostat locations. We used colored electrical tape to tag the ends of each cable as we pulled it so we could keep them straight later; yellow for the living area, blue for the bathroom, and red for the bedroom. I mounted one of the thermostats in the kitchen by the front living area, the second one by the bedroom, and the third one in the bathroom. I completed the connections in a somewhat unusual way. The cable had a red wire and a white wire. The white wire was left intact and provided a path from the thermostat to the Combi for DC negative (ground). The red wire was cut in the utility closet and used to provide +12VDC to the thermostat. The red wire in the cable from the closet to the Combi was not used.
The Combi came with pigtail harnesses that plug into keyed sockets on the Zone Control Board (box) and have butt splice connectors already installed on the loose ends of the wires. I completed the thermostat wiring by connecting the wire for the front thermostat to Zone 1, the bathroom thermostat to Zone 2, and the bedroom thermostat to Zone 3. Butch had connected a wire to the Zone 4 connector yesterday and planned to leave it and connect it to a switch in the bay for test purposes.
With the thermostats wired in Butch worked on the fan control relays while Fonda and I pulled a four-conductor thermostat cable from the Combi across the bay, up through the floor into the utility closet, and all the way up the center isle of the bus to the dashboard. When then took the cable back into the bedroom and pulled it from the utility closet through the driver-side chase to the cabinet at the front end of the kitchen counter and then down through the cabinet to the very bottom and out the front facing grill to the front heat exchanger. We left plenty of cable for hooking up the fan control relay that Butch had mounted on the fan-coil heat exchanger and left an extra coil of cable in the utility closet so I would have enough wire to make connections to the relays for the fans on the rear heat exchanger.
As with the thermostat wiring, I left the green and white wires intact all the way from the front heat exchanger to the Combi. In the utility closet I removed the jacket from a six inch section and cut the red and blue wires. The red wire coming up from the Combi was connected to the relay for the bedroom fan and the blue wire coming up from the Combi was connected to the relay for the bathroom fan, both of which draw air through a common radiator. These colors matched the colors of electrical tape used to identify the corresponding thermostat cables. I connected a separate white wire from the DC negative terminal on each relay to the DC negative (ground) bar on the 12 VDC distribution panel at the top of the utility closet. The red and blue wires from the closet to the front heat exchanger were not used.
Adding coolant to the ITR Oasis Combi.
I mounted the relays to the outside wall of the closet; bedroom relay to the rear, bathroom relay to the front. I do things like that when I work on projects like this. By this time it was dark and Butch had gone inside not feeling completely well. He was really stressed out yesterday when we were unable to fill the coolant loop and purge it of air and he did not get a good night’s sleep. Been there, done that, didn’t even get the T-shirt.
It was going on 6 PM and I was done working for the day, the first day since I have been working here that I had finished up that early and the first day that I had not worked on any of my own bus projects. But that was OK; Butch and Fonda’s ability to use their bus conversion during the winter with comfort and convenience was directly related to the successful completion of the Oasis Combi installation and it felt good to have it so close to bring done. I will finish up the little bit that remains to do tomorrow and then install another 120 VAC circuit from the inverter circuit breaker panel to outlets for the bedroom.
I need to mention that Butch has been very pleased with the treatment and communication from International Thermal Research, the manufacturer of the Oasis product line. He was on the phone with their U.S. sales office yesterday when we ran into difficulty and they transferred him to someone at the factory in British Columbia. The factory contact sent Butch an e-mail, which gave him an address to reply to, and his personal cell phone number.
Sometime in the late afternoon Bill Tharpe showed up to continue working on Brittiny’s car. It needs a new intake manifold gasket, which requires the disassembly of the top half of the engine. Bill really knows his way around cars having worked with Indy and Formula (One?) race car teams over the years. Around 7 PM we headed into Logansport to have dinner at Pizza Hut. I had the salad bar and some decent (smooth, mild) decaffeinated coffee. When we got back to their house Bill got back to work on the engine and I retired to my room for the evening. Butch and I talked earlier about possibly driving over to the Ft. Wayne Hamvention tomorrow but decided to stay here and continue working on bus projects.
2014/11/16 (N) Death of a Mouse
I was up around 8 AM and had my usual breakfast of homemade granola, some orange juice, and coffee (Teeko’s Seattle Blend). I still had some of the stolen left, but having had that the last two mornings I felt the need to return to my normal routine. Right after breakfast I replaced the GFCI outlet in the bathroom. The old one had tripped a couple of times for no apparent reason and that was just one more thing I did not want to live with. The old one was feeding two load circuits and had short pigtail wires wire-nutted to the hot and neutral conducts. GFCI outlets are much bulkier than normal ones so that made for a very crowded box. The new one had back connectors that allowed two wires to be inserted straight in under one screw and tightened. That allowed me to do away with the two pigtails and the two wire nuts and make it a bit easier to get the outlet into the box.
By the time I finished installing the GFCI outlet Butch was ready for my assistance. He finished connecting the fan relays on the front heat exchanger and I finished connecting the fan relays on the rear heat exchanger. I then tied in the fan relay lines to the appropriate fan control lines coming out of the Oasis Combi Zone Control Board. With the burner switch turned on I tested each zone by turning its thermostat up until it clicked, causing the burner to ignite, the circulation pump to start, and the fan(s) to come on. All three zones worked. Although not as dramatic or emotional as yesterday when got the unit to fill, purge, and ignite, this meant we were done with the Oasis Combi installation (except for some purely cosmetic things that Butch and Fonda may not get to for a while) and that it was fully functional.
Top of the Combi showing summer/winter valve lower right (blue handle).
While I was working on the Oasis Combi fan control wires Butch started working on installing a fuel gauge. The New Jersey Transit MCI MC-9B coaches did not have fuel gauges as they made regular runs of known distances and returned to the same NJT garage every day. For cross-country RV use, however, a fuel gauge is a very good thing to have.
To install the fuel gauge Butch had to pull the instrument cluster out of the dashboard. These things are rarely designed/built for easy servicing, and this was no exception, but he got it out. He had installed the sending unit in the fuel tank a long time ago but never hooked it up. He managed to run a fishtape up from the driver-side front bay into the area behind the dashboard. He attached a wire to it and fed the wire in as I pulled the fishtape out. We then used the fishtape to feed the wire from the driver’s side of the generator bay to the passenger side. From there the wire had to go through the chassis battery bay to get to the sending unit on the fuel tank. After drilling a hole in one panel and drilling out two rivets holding an unused fuse holder to another panel we finally had a route for the wire.
There was a blank spot on the instrument cluster where the fuel gauge would have been so that is where Butch installed it. It took us a while to decode the 24 VDC dashboard wiring diagram but we eventually figured out that there was an unused screw terminal on the load side of the Master Switch just below the fuel gauge that would very conveniently provide the +24 VDC for the gauge. I made that connection and then Butch connected the instrument, remembering to pass the wires through the dashboard hole first. In addition to the +24VDC, signal, and ground for the gauge he had to tap into the 24 VDC instrument lighting circuit to power the instrument light and provide a ground connection for that as well. With everything hooked up Butch turned on the Master Switch and the fuel gauge indicated just below a full tank, which is what he expected. These kinds of “little” projects sound relatively simply, but they always seem to take a half a day to a full day to do, even with two people working on them.
At this point it was about 2 PM so I took a quick lunch break and had a tofu hotdog with mustard, relish, and onions. We had hints of snow flurries during the morning that became more persistent after noon. I was thinking about installing the new Shurflo Everpure ADC water filter cartridge under the kitchen sink and opened the cabinet door to have a look at what was involved. (Actually, I knew what was involved having done this before.) This filter cartridge should be the easiest thing in the world to remove and install but that has not been my experience. The location of the filter head doesn’t make it any easier. Anyway, I turned on the light and noticed a waded up paper towel in the trash can. I had not been using this trash can since I realized that the resident mouse had easy access to the area under the sink and regarded the waste basket as a buffet. I figured I had thrown this used paper towel in there by mistake out of force of habit as I catch myself several times a day starting to do that. I moved the can and reached in to get the paper towel and that’s when I noticed the dead field mouse in the corner of the trash can.
The mouse was a tiny creature, gray on top and white on the bottom. I surmised that it had returned to this cabinet looking for the food it had found there on previous occasions, climbed up a carpeted wall or electrical cable, perhaps walked across a drain pipe and, seeing the paper towel moved to the rim of the trash can (the only place I ever actually saw it alive) and either jumped or fell in. Unfortunately (for the mouse) the trash can did not have a plastic liner bag and so it had no way to escape. I presume it died of thirst and/or lack of food. It was not my intention to use the trash can as a trap. In fact, I had purchased a live trap a few days ago but not yet set it. My plan was to trap it, unharmed, and release it a couple of miles away near a creek so it had access to water. Instead, I added it to my real trash bag, tied up the bag, and put it in the dumpster. Although I was glad to no longer have it roaming around inside the coach, I was saddened to find it dead and to think that it had died this way. I have no way of knowing, of course, if this was the only mouse in the coach so I will continue to be on the lookout for telltale signs of the presence of mice.
I returned to working on Butch and Fonda’s bus. While they dressed up some coolant lines and tightened up some fittings on the Oasis I installed four surface mount duplex electrical outlets in the bedroom, two on the back wall above a narrow shelf at the head of the bed, one in the driver side chase at the midpoint, and one at the front end of the chase inside the utility closet. I turned off the power to the inverter panel, removed the cover, and routed the cable down into the box. Butch discovered that he did not have any more 20A circuit breakers so I connected the ground and neutral and left the load wire until we had an appropriate breaker. We were done working in/on their bus for the night, so I left the cover off of the inverter panel and turned the power back on so they would have lights in the front part of the bus
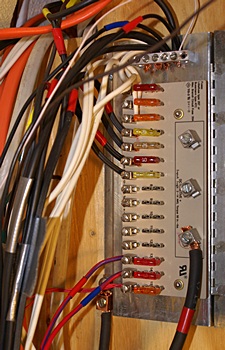
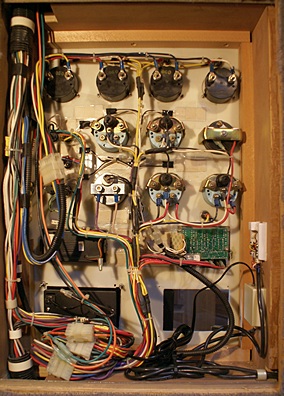
Fused DC distribution house panel in MC-9 bedroom utility closet.
Throughout the day Butch had been adding to a list of things he needed and at this point the list was long enough, or the items critical enough, that we made a run to town. By this time it had been snowing for a few hours and it was accumulating on grassy areas and making the roads slick. Unfortunately the Logansport Home Depot closed at 7 PM on Sunday evenings and we got there at 7:05 PM, having stopped first to fuel up the Suburban. No problem, we just drove down the street to Rural King which was open until 9 PM and has free popcorn. Bonus! Butch found most of what he needed there. My shopping list was short and easily filled at Walmart where Butch picked up a few other things on his list.
When we got back I made a tofu “turkey” sandwich with vegan mayonnaise, sliced onions, and power greens and got out some of the seedless black grapes. As I was finishing the preparations Fonda came to the bus to let me know that Linda was on the phone. I brought everything into the house and chatted with her for a little while. We then sat down and ate dinner. After dinner I used Butch’s chop saw to cut my oak center pillar mounting board to length and then set it up on a table in the parts room so I could stain it. Fonda got the stain, a shallow wide mouth can, a disposable foam brush, a rag, and a pair of disposable gloves for me to use. I was not very happy with the results, but I will see how it looks in the morning. I suspect I will end up painting it flat black. I would really like to get it mounted to the center windshield pillar before I wrap up working on my bus this Wednesday but, given the other things I need to do, it’s going to be close.