It’s a good thing there are still five weeks until we depart for Florida; there are a lot of unfinished items that need to be taken care of on the bus and around the house/property before we go.
When Phil is here my attention tends to be on what he is doing. He really knows his stuff, and is an excellent contractor to work with, but since he is not working from drawn plans there are inevitably questions and discussions about just exactly what it is I want and whether that is the best idea or even doable.
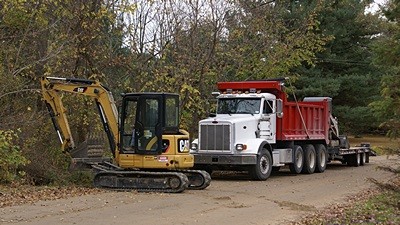
Phil had ordered a load of sandy soil for delivery first thing this morning and the “train” (double trailer) showed up not long after he did. The sandy soil he wanted was not available so he got clean sand instead. The train driver of the backed it over our third culvert and into the part of our yard were Phil wanted the material dumped. That took a lot of skill and was impressive to watch. I took a few photographs but video was really required to capture what was happening. The Sony SLT-a99v does video in several different modes but I am just beginning to learn how to use it as a still camera and did not want to mess around with shooting video. Besides, I am not a videographer; it’s a completely different way of thinking than being a still photographer.
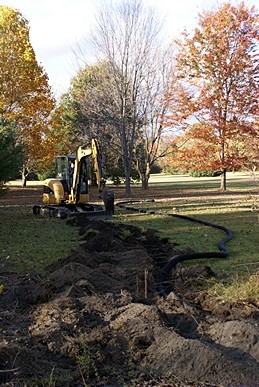
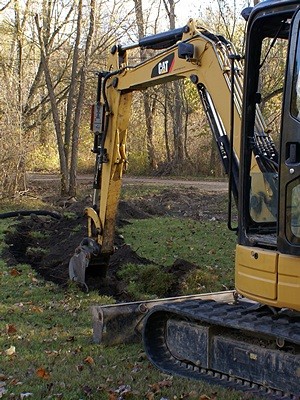
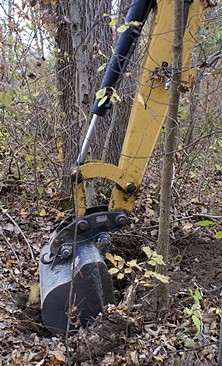
Phil digs the trench for the electrical conduit from the SW corner of the garage to the far side of the driveway extension where he also dug a hole for the post that will support the RV outlet box.
With the material on site Phil was at the point where he needed to dig the trench for the RV electrical feed. That meant I had to quickly make some final decisions. I had an 8 foot 4″x4″ treated post and the PVC conduit pieces I needed to go from the post under the driveway to the other side but not enough to go all the way to the garage. If I only put conduit under the driveway I could cap it, let Phil bury it, and then dig it up later and finish trenching from there to the garage. I would not do that by hand, however, so it would mean having Phil come back next year just to dig this little trench. Although I could have him dig the foundation hole for the ham radio tower at the same time that still did not make any sense to me. Among other considerations I would have to fill the trench in by hand after I ran the cable.
Another option was to still use conduit just under the driveway but go ahead and run direct burial cable like we did two years ago for the pull-through driveway in front of the house. I would need three (120VAC) or four (240/120VAC) large wires (or equivalent service entrance cable, each at least 80 feet long to get from the outlet box location in the post to the riser pipe on the garage and through the wall into a circuit breaker box. Not only would I have to get the wire, which would be expensive, I did not have the outdoor outlet box or other parts I needed, so it would take me quite a while to go buy everything. I also did not know exactly where/how I would feed the circuit. (I had some ideas about that but they depended on just what the electricians do tomorrow.)
The most expeditious, and least expensive, option was to get more conduit and additional fittings and run the conduit all the way from the post to the southwest corner of the garage. I left at 9:30 AM for Lowe’s as Phil started digging the trench and the hole for the post.
At Lowe’s I picked up five more 10′ pieces of 2″ PVC conduit, a 45 degree elbow, another 90 degree elbow, a right angle entry box, and a bag of 2″ conduit clamps. By the time I got back to the house Phil had the post set in place and most of the trench dug. I got all of the conduit pieces laid out on the ground and got the PVC cement, a hack saw, and the rope and weight.
Since Phil could not do anything else on the driveway until the conduit was installed he helped me install it (or vice-versa). We joined 10′ sections to both ends of one of the 90 degree elbows and then dropped the weighted rope through it. We then set the elbow and one of the straight sections in the trench with the elbow at the base of the post and the other straight section going straight up the post where I secured it with two clamps. We proceeded to drop the weighted rope through additional straight sections of conduit, applied PVC cement to the ends, and put them together. The conduit had to be inserted about 3″ into the mating piece and twisted as it went in. I was glad Phil was there to help with this as I did not have the grip strength to do it by myself. (I don’t have a lot of physical limitations but the arthritis in the base of my thumbs makes itself known in specific situations.)
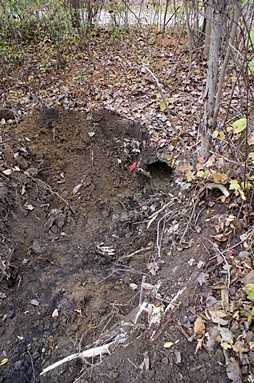
When we got near the southwest corner of the garage we measured and cut a section of straight pipe to get us to a turn in the trench. Because of a decorative grass plant the trench could not go directly to the desired location on the west side of the garage and had to go between the grass plant and a nearby small evergreen bush and then turned towards the garage. We installed a 45 degree elbow to get around the corner and it ended up in the center of the trench. When I said Phil knew what he was doing I meant it. We again measured carefully and cut a short section of straight pipe to get us to a 90 degree elbow that would turn up and bring the conduit out of the trench and up the side of the garage. I measured and cut the vertical riser section and we cemented it into the elbow. We now had a complete run with conduit coming out of the trench vertically on both ends.
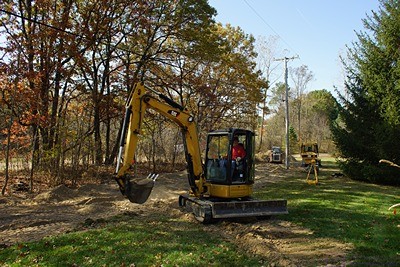
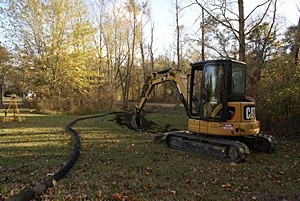
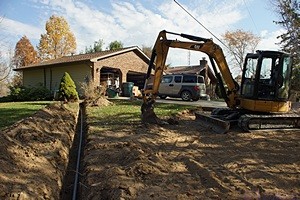
Phil back fills the trench for the electrical conduit from the corner of the garage to the RV electrical post.
While Phil used his excavator to scoop and push dirt back into the trench and tamp it down I closed off both ends of the conduit. At the garage end I removed the gasketed cover from the entry box, cut a short piece of 2″ conduit, and put it in the fitting hole on the back side. Next I brought the weighted rope up through the bottom fitting hole of the box and used Gorilla tape to secure it inside the short back pipe. I put a cap on the other end of the short back pipe and then put the entry box on top of the riser sideway. I coiled up the extra rope, taped it inside the box, and put the gasketed cover back on. I did not cement any of these connections. When permanently installed the gasketed cover will point away from the wall and the hole in the back will have a longer piece of paper 2″ conduit cemented in and going through a hole into the wall of the garage.
At the post I used a Rigid brand pipe cutter, designed specifically for cutting large plastic pipe and conduit, to cut off the vertical riser at a convenient height above the top of the post. I threaded the rope through a 3/8″ hole in the center of a 4″ disc of 3/4″ plywood and tied a big knot in it. I modified the 2″ cap by drilling three adjacent holes lengthwise from the bottom up and cutting out material with a hacksaw to make a slot. With the rope hanging over the edge of the conduit I lined up the slot in the cap with the rope and put the cap over the end of the conduit.
Since I decided to not have Phil build the area leading up to the planned barn location I wanted to pull all of the unneeded yellow plastic stakes out of the yard and put them away. Re-staking the layout, however, is a time-consuming task so I put 10″ metal (iron) spikes at the locations of the front corners of the barn and the center point for the curved transition into the driveway. I drove them flush with the soil so Keith would not hit them with his mower but we can find them later with a metal detector.
With the conduit installed and the trench filled and tamped, Phil filled started building the “curbs” for the driveway. He had excavated parts of the driveway path and filled in other areas to create a base for the construction fabric and road gravel that was eight inches below the finish grade. The construction fabric is 12’6″ wide and Phil likes to wrap it up on the sides about 8″ so when he staked out the driveway to be 11′ 2″ wide. Phil used the sand to build up the areas along both sides of the driveway so that it looked like he had cut the driveway out, but that is not, in fact, what he had done.
My main bus project today was cleaning up the kitchen and living room, which mostly involved moving tools back to the garage. It is a confined workspace and tends to get cluttered over time as we fetch tools for this and that. I also wanted to be able to see the desk and its Corian countertop.
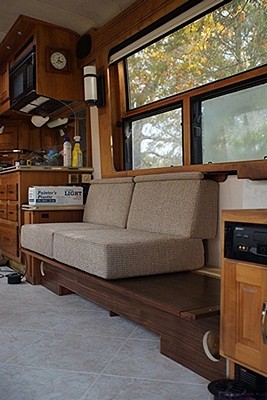
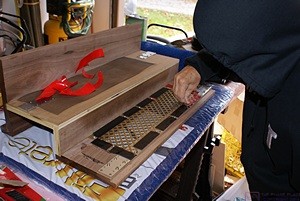
Two of the three sets of cushions in place on the new built-in custom walnut sofa/storage base.
I called Butch in Quartzsite, AZ regarding the distributor tester. He suggested that I send him an e-mail requesting Bill’s e-mail address and he would send it in his reply. We then discussed the refrigerator and he suggested that I set the freezer to a colder setting, leave the fresh compartment setting as is, and monitor it for a while to see if it changes. I did that and reset the min/max memory for both compartments.
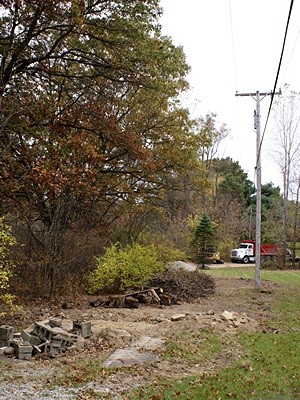
Phil is not done with the French drain yet and spent part of the afternoon working on that instead of the driveway. He made lots of trips back and forth with the front loader to take the topsoil he had removed to create the driveway, spread it out along on top of the pea gravel that fills the drain trench, and grade it off to blend with the undisturbed yard along either side of the drain. Before he is all done with these two separate, but inter-related projects, he will have to bring in several truckloads of topsoil. It will be used to fill low spots, especially at the west end of the property, and to cover everything that has been disturbed. All of the topsoil will be finish graded to blend into the existing contours of the property and then seeded with grass seed.
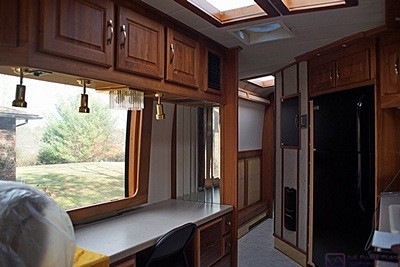
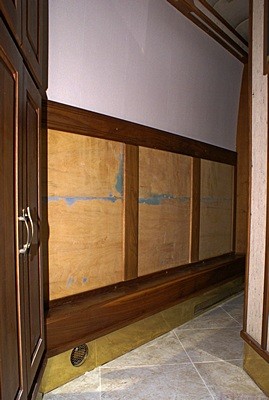
The view from the living room looking towards the hallway. The new built-in custom walnut desk has its Corian countertop in place and the new refrigerator is in place next to the built-in custom pull-out pantry.
I did not want to get involved in any complex or time-consuming projects so I hung out on the west half of our yard where Phil was working and took lots of pictures with the new camera. Actually, I had been doing that all day trying to document the work as it progressed. When I wasn’t taking photos I gathered up broken branches and larger deadfall and carried or dragged it to the brush pile on the west side of the line of large fir trees that separate the east and west halves of our five acres.
Linda called around 3:30 and asked me to see if her wallet was on her desk. She thought she had it with her but could not find it. She finally located it in her car where it had been since falling out of her case this morning. She was on her way home by 3:50 PM.
I had a final chat with Phil, who won’t be back until Saturday, and then closed up the bus and the garage. We were headed to Ann Arbor this evening and I needed to get cleaned up and put on nicer, more appropriate clothes for our evening out. I used to wear Oxford shirts and nicer pants every day for work, and sometimes a sport coat and tie or even a suit. These days it’s mostly polo shirts and blue jeans or sometimes REI ripstop nylon convertible cargo pants. And this summer it has mostly been my work jeans and work shirts.
We left around 5:15 PM and were parked in Ann Arbor before 6 PM. We agreed to meet Kate at the Lab Cafe which was just around the corner from the Thompson Street parking garage. (This garage is behind the former Border’s book store #1 which also housed the company’s corporate headquarters. Our daughter started with Border’s as a cashier at this store and within four years was a regional manager for their PaperChase product line before the company imploded and went bankrupt.)
Kate was sending Linda text message updates on her travel status and ETA so we ordered a couple of decaf coffees to go. At $3.75 each they were pricier than we are used to paying for coffee but they were “hand-crafted” and the coffee was very good. It took the barista at least 10 minutes to make our cups, grinding the beans just before brewing and then slowly pouring hot water through individual filter holders after pre-wetting the filters. In the time it took to make our coffee I would have been on my second cup at Panera.
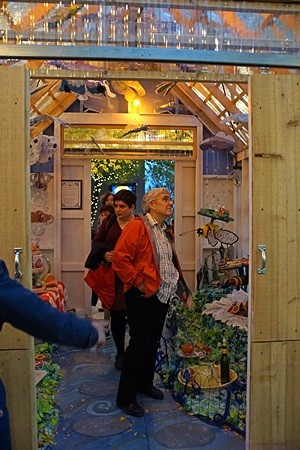
Linda (front) and Kate (behind) take in the interior of one of the Pop-X art exhibit sheds.
The music was too loud and really awful, a bad combination in our opinion, so we sat outside in spite of the occasional attempt to rain. When Kate showed up we walked the short distance to Liberty Park to see the Pop-X Art Exhibit. Organized by the Ann Arbor Art Center, all of the art was displayed in “sheds” designed by an architect, one artist per shed. The sheds were approximately 10 feet square with steep pitched roofs. The roofs, and the two sides they pitched down to, were covered in clear wavy plastic panels to let in a lot of natural light. The back end was solid and the front had a pair of sliding “barn style” doors hung from tracks. There was a solid floor that was elevated relative to ground level and provision for electrical power. They were designed to be sold as potting sheds after the exhibit was removed at the end of the week. Although the light was fading I was still able to get some decent shots with the new Sony a99v DSLT camera. It has much greater light sensitivity than the Sony alpha 100 it is replacing as my primary camera and this was my first opportunity to take advantage of that since getting it.
Our main reason for coming to Ann Arbor was to have dinner with Kate but Pop-X was a nice bonus. Ann Arbor has a LOT of dining options; hundreds I would guess just in the very walkable downtown area. We decided to try the Grizzly Peak Brewing Company after Linda confirmed that they had some things on the menu we could eat. It was a bit of a walk but the rain held off and it was an otherwise pleasant evening.
Linda had a dark Porter with definite chocolate tones and I had a hard cider with distinct cinnamon/vanilla tones. It was also supposed to have roasted pecan notes but I did not detect that. Kate had a red beer that was not hoppy and thought I might have liked it. I had a sip of Linda’s Porter and it was very agreeable. We both had small couscous and greens dinner salads, which were very nice, and both had wild mushroom burgers, which were excellent. Linda said her chips were also very good and my French fries were tasty and generously portioned. Kate had a burger and all of our meals came with pickles. Kate does not care for pickles, which I knew, and does not care for vinegar in general, which I did not know, so Linda and I split her pickle rather than have it go to waste. The waiter was very attentive and a good sport when I asked for a gallon of ketchup for my fries. He brought two very full bottles for the table and a bottle of Frank’s hot sauce. We tipped him accordingly.
At 9:30 PM we started a slow stroll back to the parking garage and chatted a while longer by our cars, which coincidentally were parked very close together. It was 10:40 PM by the time we got home. I fed the cats and we went straight to bed. I was up later than I wanted to be trying to outline this post but I had not had much opportunity to work on it throughout the day.