It got pleasantly cool overnight and with the bedroom doorwall open it made for nice sleeping conditions. Between being up a bit late last night and not wanting to get out from under the warm covers we slept in a few minutes longer than usual. I put on my sweats, which I find very comfortable on a cool (or cold) morning, and made a pot of Costa Rican decaf coffee. We had our usual granola for breakfast, took a few minutes to enjoy our coffee in the living room without our cats, who were off somewhere and probably up to no good, and then got to work.
In order to install the new seats in September we need to have the desk installed and in order to install the desk we need to have the floor installed and in order to install the floor we need to have the underlayment installed and in order to install the underlayment we need to have several things done. First and foremost was finishing the patching and leveling of the subfloor, so that was my first task today. While I pursued that Linda continued working on cleaning and waxing the walnut drawer fronts. Given the limited work surface in the garage Linda can only work on three to six drawer fronts at a time depending on their size. When she reached a stopping point with those and started working on the woodwork in the bedroom.
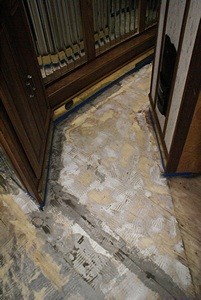
I have spent the last week patching, skimcoating, and sanding the entire area where the old tile was installed which I estimate to be about 80 square feet. I went over it one more time this morning with 80 grit sandpaper on the orbital sander. The sander has an integral dust collection bag so it did not get the coach too dusty. I was satisfied with most of the job but still had some unevenness along the edges by the walls and especially in the toe kick spaces extending out about three inches from the cabinet bases. That is because I did not get the last skimcoat as smooth as I needed to in those areas and the orbital sander cannot reach them.
I figured I would need to do one more application of floor leveling compound but did not want to open the second bag of mix for such a small job. I decided to go the Lowe’s and buy a small pail of pre-mixed floor patching compound and the 3/4″ #8-32 machine screws we needed to install the new handles. While I was there I noticed that they had 50 grit hook and loop sandpaper triangles designed to fit our Porter-Cable oscillating saw. I was aware that we had a sanding pad attachment for the tool but had not considered using it until I saw the 50 grit paper. I bought a pack and picked up some 120 grit as well. I would also have bought 80 grit but they were out. I had to go to The Home Depot for the machine screws as I wanted the same brass ones we had already purchased.
Back at the bus I decided to try sanding out the imperfections rather than filling them in with another round of patching and sanding. I was, admittedly, tired of this phase of the work and anxious to be done with it so I could move on to next step. August is slipping away and I am very aware of the date. I was also not keen on creating more sanding dust inside the coach.
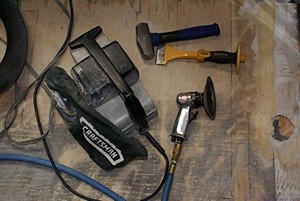
I don’t know why I did not try this tool sooner. The design of the tool and shape of the sanding pad allowed me to work in the all of the areas the orbital sander could not reach and it worked very well with the 50 grit sandpaper. The circular air sander can also reach these areas, and was the right tool for grinding down the old thinset and mastic, but the oscillating tool was the right one for this final smoothing.
When I thought I was done I vacuumed the floor and used the Revel Damp Mop to pick up any residual dust. We then went inside to have lunch while the floor dried. Linda heated up a can of Amy’s vegetable soup, made roll-up sandwiches, and served fresh black grapes and plums. It beats fast food hands down.
After lunch I inspected the floor carefully and decided that the patching and leveling was done. Although it was one task out of many, and there was no fanfare attached to the moment, I was very much aware that we had finally turned the corner. We still have some minor disassembly to do, but from this point forward most of our tasks will involve putting the interior back together and installing new things. All things being equal (which they never are) the building work should be more fun than the deconstruction work.
The major exception is the wallpaper. We still need to remove the old paper, much of which is stained from old water leaks, and install the new paper, which Linda will be ordering tomorrow from Delux Drapery and Shades in Ann Arbor. The critical pieces are the ones that go behind the desk and the built-in sofa. Most of the rest of it can be finished later but we would prefer to have it all done by September 12th if possible. The more stuff that gets installed the more awkward it will be to work on the walls.
With the floor leveling done the next impediment to installing the underlayment was getting the refrigerator out of the living room and into its alcove. That, however, required three other things to be done. First I needed to replace the electrical outlet with a recessed one. Second, we needed to build up the base of the alcove and finally, we needed to install the pantry as we cannot get to the slides to mount them to the side of the alcove with the refrigerator in place.
The electrical outlet only took a few minutes to change. With Linda’s help I used the template I made last Thursday to cut the base pieces from the 4′ x 8′ sheet of 3/4″ plywood we bought on Tuesday. The bottom piece was the full width of the refrigerator alcove (34″ wide at the front and 33.75″ wide at the back) and 25.75″ deep. We set it in place, checked the front setback, and screwed it to the subfloor. The next piece was the same width as the first but 1/2″ deeper (26.25″). We set it in place on top of the first piece and made sure the front edges were flush with the back edge extending 1/2″ farther back. I used longer screws to go all the way through both pieces into the subfloor.
I was not happy with the way my circular saw blade was cutting and a few raindrops gave us an excuse to take a break. We were working just outside the small garage bay and moved everything into the garage to keep it from getting wet. I went to Lowe’s and bought a new 7.25″ blade with 60 teeth, which should give a very clean cut through plywood but still work on 2x4s and trim boards. While I was there I checked their selection of driver bits again. I was looking for a 3″ long No. 1 SR (square recessed) bit but they did not have any that long. I found a 2″ bit for $2.48 but then I spotted a pack of seven 2″ long bits for under $4. It had two #1, three #2 (the most common size), and two #3 bits from the same manufacturer as the single bit. Can someone explain that pricing structure to me? Apparently most of the cost is retail packaging.
Linda prepared large, wonderful salads for dinner. She made her own dressing using balsamic vinegar, walnuts, raisins, garlic, and seasonings, and it was very good. We finished the Pinot Grigio with the meal and then resumed our work.
I changed the blade on my saw and then we moved the wood and 2×4 supports back out into the driveway. The new blade made very clean cuts confirming that changing it was long overdue. The third piece of the alcove base was not as wide as the first two, measuring 28.25″ across the front and 28″ across the back. (The alcove tapers in 1/4″ from front to rear along the right side.) The depth was 26.75″ to match the refrigerator base depth, and a half inch deeper than the second piece. I set it in place, snug to the right side of the alcove and flush with the front edge of the other two pieces, and checked for an even reveal along the left side of 5.75″. Everything looked good so I screwed it down.
There are several reasons for this design/construction. First, there is a large bundle of wires and two air lines that run across the floor of the alcove at the rear wall. Using three layers of plywood allowed the top layer to be high enough for the base of the refrigerator to extend over the wire bundle and have its back about 1″ from the back wall (thus the reason for the recessed electrical outlet). It will also leave about 1″ of clearance above the fridge, which is enough. The second reason is that the 5.75″ width at the left, with only two pieces of plywood under it, is where the pull-out pantry will go. But third, I will install a 24″ long 2″ x 2″ angle (steel or aluminum) on the middle sheet against the left edge of the top sheet to prevent the refrigerator from shifting to the left. The front edges of the plywood base pieces will be covered (eventually) by a something, probably a piece of 3/4″ thick walnut hardwood, that will stick up above the top surface of the top piece just enough to keep the fridge from rolling out. That piece, however, will have to be removable so I am still thinking about just how I want to secure the refrigerator case in the alcove.
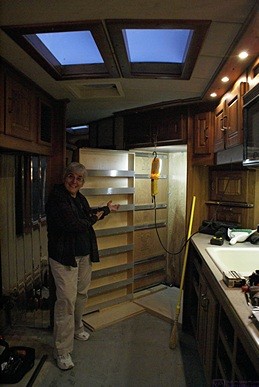
Linda does her Vanna White impersonation, highlighting how the new pull-out pantry will look when it is installed. The pantry is in its extended position revealing the slides sections that will mount on the cabinet wall. The refrigerator is out so we can work in the alcove.
We still had some light but with the heavy cloud cover it was darker than usual in the coach for this time of day (6:30 PM). We rigged up a piece of twine to hang the work light and turned on as many interior lights as we could. We then carried the pull-out pantry from the library (in the house) to the bus. We brought all of the slides in as well, along with two pieces of 3/4″ plywood and a 4′ length of 2×4.
We set the two pieces of 3/4″ plywood in front of the left edge of the alcove flush with the two bottom base pieces. We then set the 2×4 on flat (3.5″ side down) spanning the plywood inside and outside the alcove. We installed the cabinet halves of the nine slides onto the pieces attached to the pantry and then set the unit in place with the bottom resting on the 2×4. We moved the pantry in and out checking its position and considering where the slides needed to be attached to the alcove wall and exactly how we would do that so the front has an even reveal relative to the vertical front trim of the left alcove wall.
By this point it was after 8 PM, it was getting dark, and we were too tired to start something as critical as attaching the slides to the alcove wall. We are behind schedule, but had enough sense to not push beyond our limits. We closed up the bus, relaxed on the couch for a bit with our kitty cats, took some Advil PM, and went to bed at 9 PM.