We turned the air-conditioning off last night and enjoyed the fresh air, pleasant temperature, and lower humidity. The overnight low was 58 which made for good sleeping. We awoke to blue skies and what we thought would be a picture perfect Michigan summer day until Linda checked the morning news (iPad). There was a story about a storm that moved through the upper plains yesterday and had a bead on Michigan for later today and this evening. What had been a 10% chance of rain for today had been replaced by a forecast for strong-to-severe thunderstorms with the possibility of strong winds, large hail, and tornadoes. Ahhhh, summer in Michigan.
Not ones to sit around and wait for the apocalypse we did what any sensible couple would do, I made coffee while Linda reheated the last of the Baked French Toast from yesterday’s brunch. We had breakfast and then sat on the deck enjoying our coffee and contemplating the end of the world, or at least the possible destruction of our brand new roof. But it’s insured, so “no worries, maan” as they say in Jamaica. More coffee please.
We have a whole house generator that runs on natural gas so as long as a storm doesn’t damage it we can survive for a very long time without electric utility power. Losing our AT&T Internet connection, however, would be a genuine hardship as that would require us to use our Verizon Mi-Fi (without the benefit of the new Fusion5s cellular booster which I plan to install on Wednesday) or go to Panera, McDonalds, or one of the libraries to get online.
Keith showed up around 10 AM to cut the grass. We were hoping he would make it as we have not had too much rain this past week and the last few days in particular have been dry. I think this is the first time this season he has been able to cut our grass without it being wet. It looked nice when he was done.
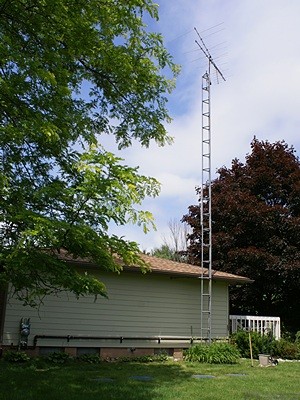
I got a call from Phil Jarrell. He had been successful in reaching Mike Fearer of Bid Rite Concrete on Mike’s cell phone. Based on Phil’s description Mike was interested in looking at our tower foundation project and was expecting me to call so I did, using my cell phone, and this time I was able to reach him. It turned out that the information about his business on the Internet is out of date. He is no longer in Whitmore Lake but now operates from near M-59 and Latson Road, not far from us. We agreed that he would stop by tomorrow at the end of the work day to look at our project.
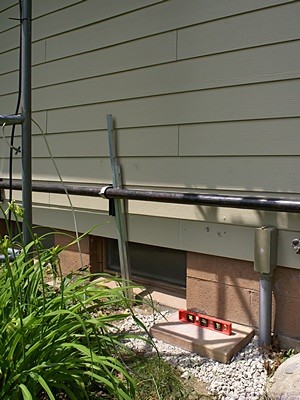
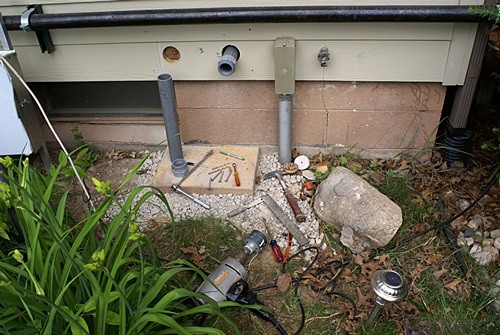
I did not want to do a lot of heavy work today, as I was still a bit tired and sore, but I needed to mount two lightning arrestors in the cable entry box and mount the cellular booster in the sump pump room so I could figure out what coax cable lengths I needed and go get them from Scott Adams (AC8IL) at Adams Electronics in Wixom. But first I called Mike (W8XH) to let him know I was planning on Wednesday for the tower work, assuming he was still available and the tower was still standing.
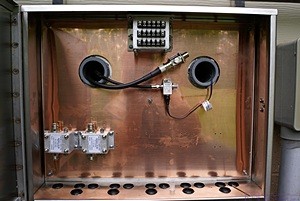
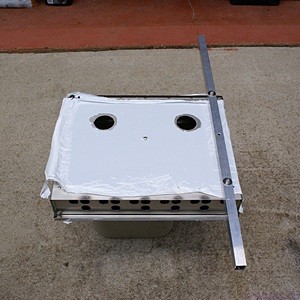
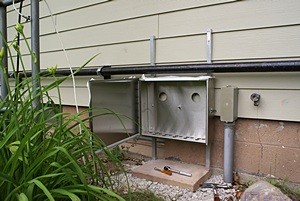
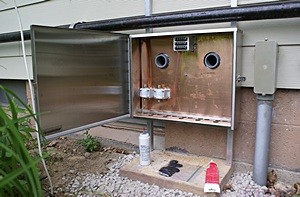
Cable entry box showing copper ground plane with Morgan lightning arrestors (lower left), control line arrestor (center top), and cellular and OTA TV arrestors (center).
I determined that I needed two coaxial cables and ordered them from Scott by phone rather than take the time today to drive to his place of business. They will both be LMR-400 with N-connectors on both ends. One will be 50 feet long, for our 2m/70cm Diamond X50-N VHF/UHF base station antenna, and the other will be 15 feet long, to get from the cellular booster lightning arrestor in the cable entry box to the repeater (amplifier) in the sump pump room. I will pick them up early Wednesday morning and install them.
One of the lightning arrestors was for the SureCall Fusion5s cellular booster system. It has N-connectors on both ends, one of which is intended for bulkhead mounting. It came with an angle bracket that fit over the bulkhead end and I used that to mount it. I used the 2′ length of LMR-400 that came with the booster installation kit to position the lightning arrestor so the cable from the repeater could exit one of the 2″ conduits and bend around and connect to it. LMR-400 is a low loss, 50 ohm impedance, coaxial cable that can handle high RF transmit power. The cellular booster only has a 1 Watt transmitter but is operating at frequencies where energy losses in coax cables become significant. To do what it does LMR-400 is just under 1/2″ in diameter. It is fairly stiff and does not make sharp bends so cable runs and connections have to be carefully planned.
The other lightning arrestor was for the Antennas Direct DB8e OTA TV antenna and serves a dual purpose as the power insertion device for the tower mounted amplifier. The coax cable for OTA TV signals is typically 75 ohm impedance RG-6 with F-connectors. It is half the diameter of LMR-400 and much more flexible. It is also typically used to receive low power signals and convey them in one direction; from the antenna to the TV. Because we are 25 miles from the nearest TV tower and some of the towers are 50+ miles away, I ordered a signal amplifier to go with the antenna.
Ideally you want to amplify an OTA TV signal as soon as it comes out of the antenna and this amplifier does just that. It will mount on the same tower leg as the antenna about two feet below the antenna feed point. However, being an active electronic device it needs electrical power to operate. There are two basic ways that could be done.
One way would be to have power wires, such as +5 VDC and DC Ground that are separate from the coaxial cable that carries the radio frequency (RF) energy. The two OTA TV antennas on our bus are set up this way with three wires to supply power and control the enclosed rotor.
The other way is to provide DC power through the coaxial cable itself, which is how this amplifier is set up. The nice thing about this arrangement is that the amplifier only has two connections and they are both coax connectors that can be weather sealed. To get the DC power into the coax cable, however, requires a special device called a power inserter. The power inserter, in turn, requires the coax to be split into two segments so there end up being four connections instead of two. The power inserter for this amplifier very conveniently acts as a lightning arrestor as well, which is why I mounted it to the copper back plane in the cable entrance box.
By boosting what I presume will be weak signals from distant towers the amplified signal should be strong enough to survive the trip through the coax cable to the power inserter, from there to a 1-in/2-out signal splitter, and then through additional lengths of coax to the two TV sets.
After getting the two lightning arrestors mounted in the cable entry box I took a break for lunch and then went to Lowe’s for some supplies. When I got back home I turned my attention to mounting the SureCall Fusion5s cellular booster (repeater amplifier) in the sump pump room. The sump pump is in the northeast corner of the basement, which is also the northeast corner of our ham shack and office. (The ham shack occupies the north wall and my desks occupy the east wall. Most of the rest of the room is storage.)
I gutted and rebuilt this space, with the help of long-time friend John Rauch, before we moved in and created the large closet (small room) around the sump with insulated walls to contain sounds. I installed an electrical sub-panel in this room to provide power to the office and ham shack desks and to an RV outlet by the pull-through driveway. I fed the power for the RV outlet through the bond on the east wall just above the concrete block foundation and ran it underground to the far side of the driveway. It was my intention from the beginning to mount a cable entrance box next to the power feed and have all of the coax cables and control wires for outside devices enter the sump pump room in the same manner as the power.
The ham shack/office walls are finished with T-111 exterior plywood with 4″ groove spacing and I finished the interior of the closet the same way as I knew I would eventually want to mount things to the walls. I mounted the SureCall Fusion5s booster on the west wall of the closet about a foot inside the door and just below my eye level so I could see all of the connectors, switches, and indicator lights on the top and front of the unit. It had four mounting tabs, two top and two bottom, that attached easily to the wall with short wood screws.
There is a duplex AC electrical outlet on that wall and one on the opposite (east) wall. The power supplies for the cellular booster and OTA TV antennas will plug in to these along with the sump pump and the charger/controller for the battery powered backup sump pump. One of the things I bought at Lowe’s were two outlet expanders which I installed in these two duplex outlets. I also bought a switch with a pilot light to replace a single pole Decora switch that will eventually control the light in the closet. I installed the switch but did not complete the wiring as I have to tie it in to the light fixture which requires me to cut the power to that circuit. I would also like to replace the bare bulb fixture while I am at it but have not yet purchased a replacement.
Although it was late afternoon I decided to install the inside antenna for the cellular booster system and run the coaxial cable that connects it to the booster. The antenna is designed to mount to a flat ceiling and provide a hemispherical coverage area below the plane of the ceiling. I had previously figured out that if I mounted this antenna in the main floor hallway near the midpoint of the house I could connect it to the cellular amplifier using a 50 foot length of coax cable that came with the system.
The desired mounting location was opposite the door to the hall closet and the access to the attic is through the ceiling of that closet, so that was very convenient. We emptied the closet, removed the clothes rod, and setup our six foot step ladder. I removed the piece of foam insulation we currently use to seal the attic access opening and climbed up, flashlight in hand to check out what was on the other side of the ceiling.
Our desired location for the antenna was free of problems on the back side so I drilled a 3/4″ hole for the mounting stud and used a piece of rebar to poke a hole through the insulation for the coax cable that came out of the stud. Linda fed the coax and stud through the hole and I put the retaining nut on the stud from the attic side of the ceiling. The antenna is shaped like a coffee filter, is about six inches in diameter at the ceiling, and tapers down to about four inches in diameter about four inches from the ceiling. The housing is white plastic and blends in well with the ceiling paint.
About four feet from where we installed the antenna is a chase that runs from the attic to the furnace room in the basement. It appears that once upon a time something having to do with the furnace ran through this chase, such as the combustion air intake. The combustion air is now drawn through the back wall under the deck and the exhaust goes out through the east wall of the basement via a double wall stainless steel flue pipe. The chase is no longer used for furnace or other utilities although there are electrical cables to switches mounted in the bathroom walls and it still contained a piece of 4″ plastic pipe.
I positioned myself near the chase and guided one end of a 50 foot length of LMR-400 coax down through the pipe and through the hole into the furnace room while Linda held the roll of coax near the top of the ladder and unrolled it. At one point the coax bunched up and Linda had to go to the furnace room and untangle it. At another point the 4″ plastic pipe slipped through the bottom hole into the furnace room which caught me by surprise. Once the cable was mostly fed through I routed it to the location of the antenna, connected it to the pigtail coax from the antenna, wrapped the connection in weather seal tape to keep moisture out, and secured it with a cable tie.
With the antenna installed Linda started preparing dinner while I dealt with the 37 feet of coax in the furnace room. The furnace room does not have a finished ceiling so I had access to the areas above the suspended ceilings in all of the adjacent rooms. In particular I was able to feed the free end of the coax above the ceiling in the office and into the sump pump room. I secured the cable with plastic cable ties at two points in the furnace room to keep it away from the flue and various hot water pipes. I had about 8 extra feet of cable so I made a large coil with two loops such that the free end came off the loop straight down into the connector on top of the booster. I hung the coil on the wall above and to the right of the booster making for a very neat installation.
I took a shower to try and get rid of some of the fiberglass itch while Linda finished the dish she was making for dinner. It was a complex Indian style dish with Basmati rice, garbanzo beans, Swiss chard, onions, and shallots, seasoned with salt, black pepper, cayenne pepper, cumin seeds, garam masala, fresh lemon (zest and juice), and fresh dill that Linda grew herself. The house was filled with the aromas of all these ingredients for a couple of hours as they were prepared and combined into the final dish. It tasted as good as it smelled with many flavor layers.
Our beautiful blue sky gave way to high, thin clouds through the morning and then to lower, thicker clouds during the early afternoon. By 2 PM the clouds to the west were dark as I drove to Lowe’s in Howell and the first, heavy rains came as I got to the parking lot. I waited a few minutes and they stopped so I got into the store without getting wet. I had the same good fortune on my way back to the car. The sustained rains came later in the evening along with a tornado watch. We went to bed before 10 AM but did not go to sleep. It took me a long time to write this post and we kept a watchful eye on the weather radar. Although thunderstorms were forecast as a certainty from 1 to 5 AM with the possibility that they might be severe, we finally turned the lights out around 12:45 AM and tried to get some sleep.